
REST APIs (GQL PAPI)
Create, update, and delete REST APIs using the GraphQL Platform API.
Enterprise Hub customers onlyThe GraphQL Platform API is available only to Enterprise Hub customers. It is not available to rapidapi.com users.
Create an API
Create an API "from scratch"
The createApi mutation is used to create a REST or GraphQL API on the Hub assuming you are not starting with a specification file for the API. If you have an OAS document that describes the API, see Create an API from an OAS Document.
You enter details for the API, such as its name, in the Variables for the mutation.
mutation createApi($apiCreateInput: ApiCreateInput!) {
  createApi(api: $apiCreateInput) {
    id
  }
}
{
"apiCreateInput": {
"name": "My REST example",
"category": "Other",
"description": "REST API example.",
"version": {
"name": "1.0"
}
}
}Mutation input arguments are discussed here.
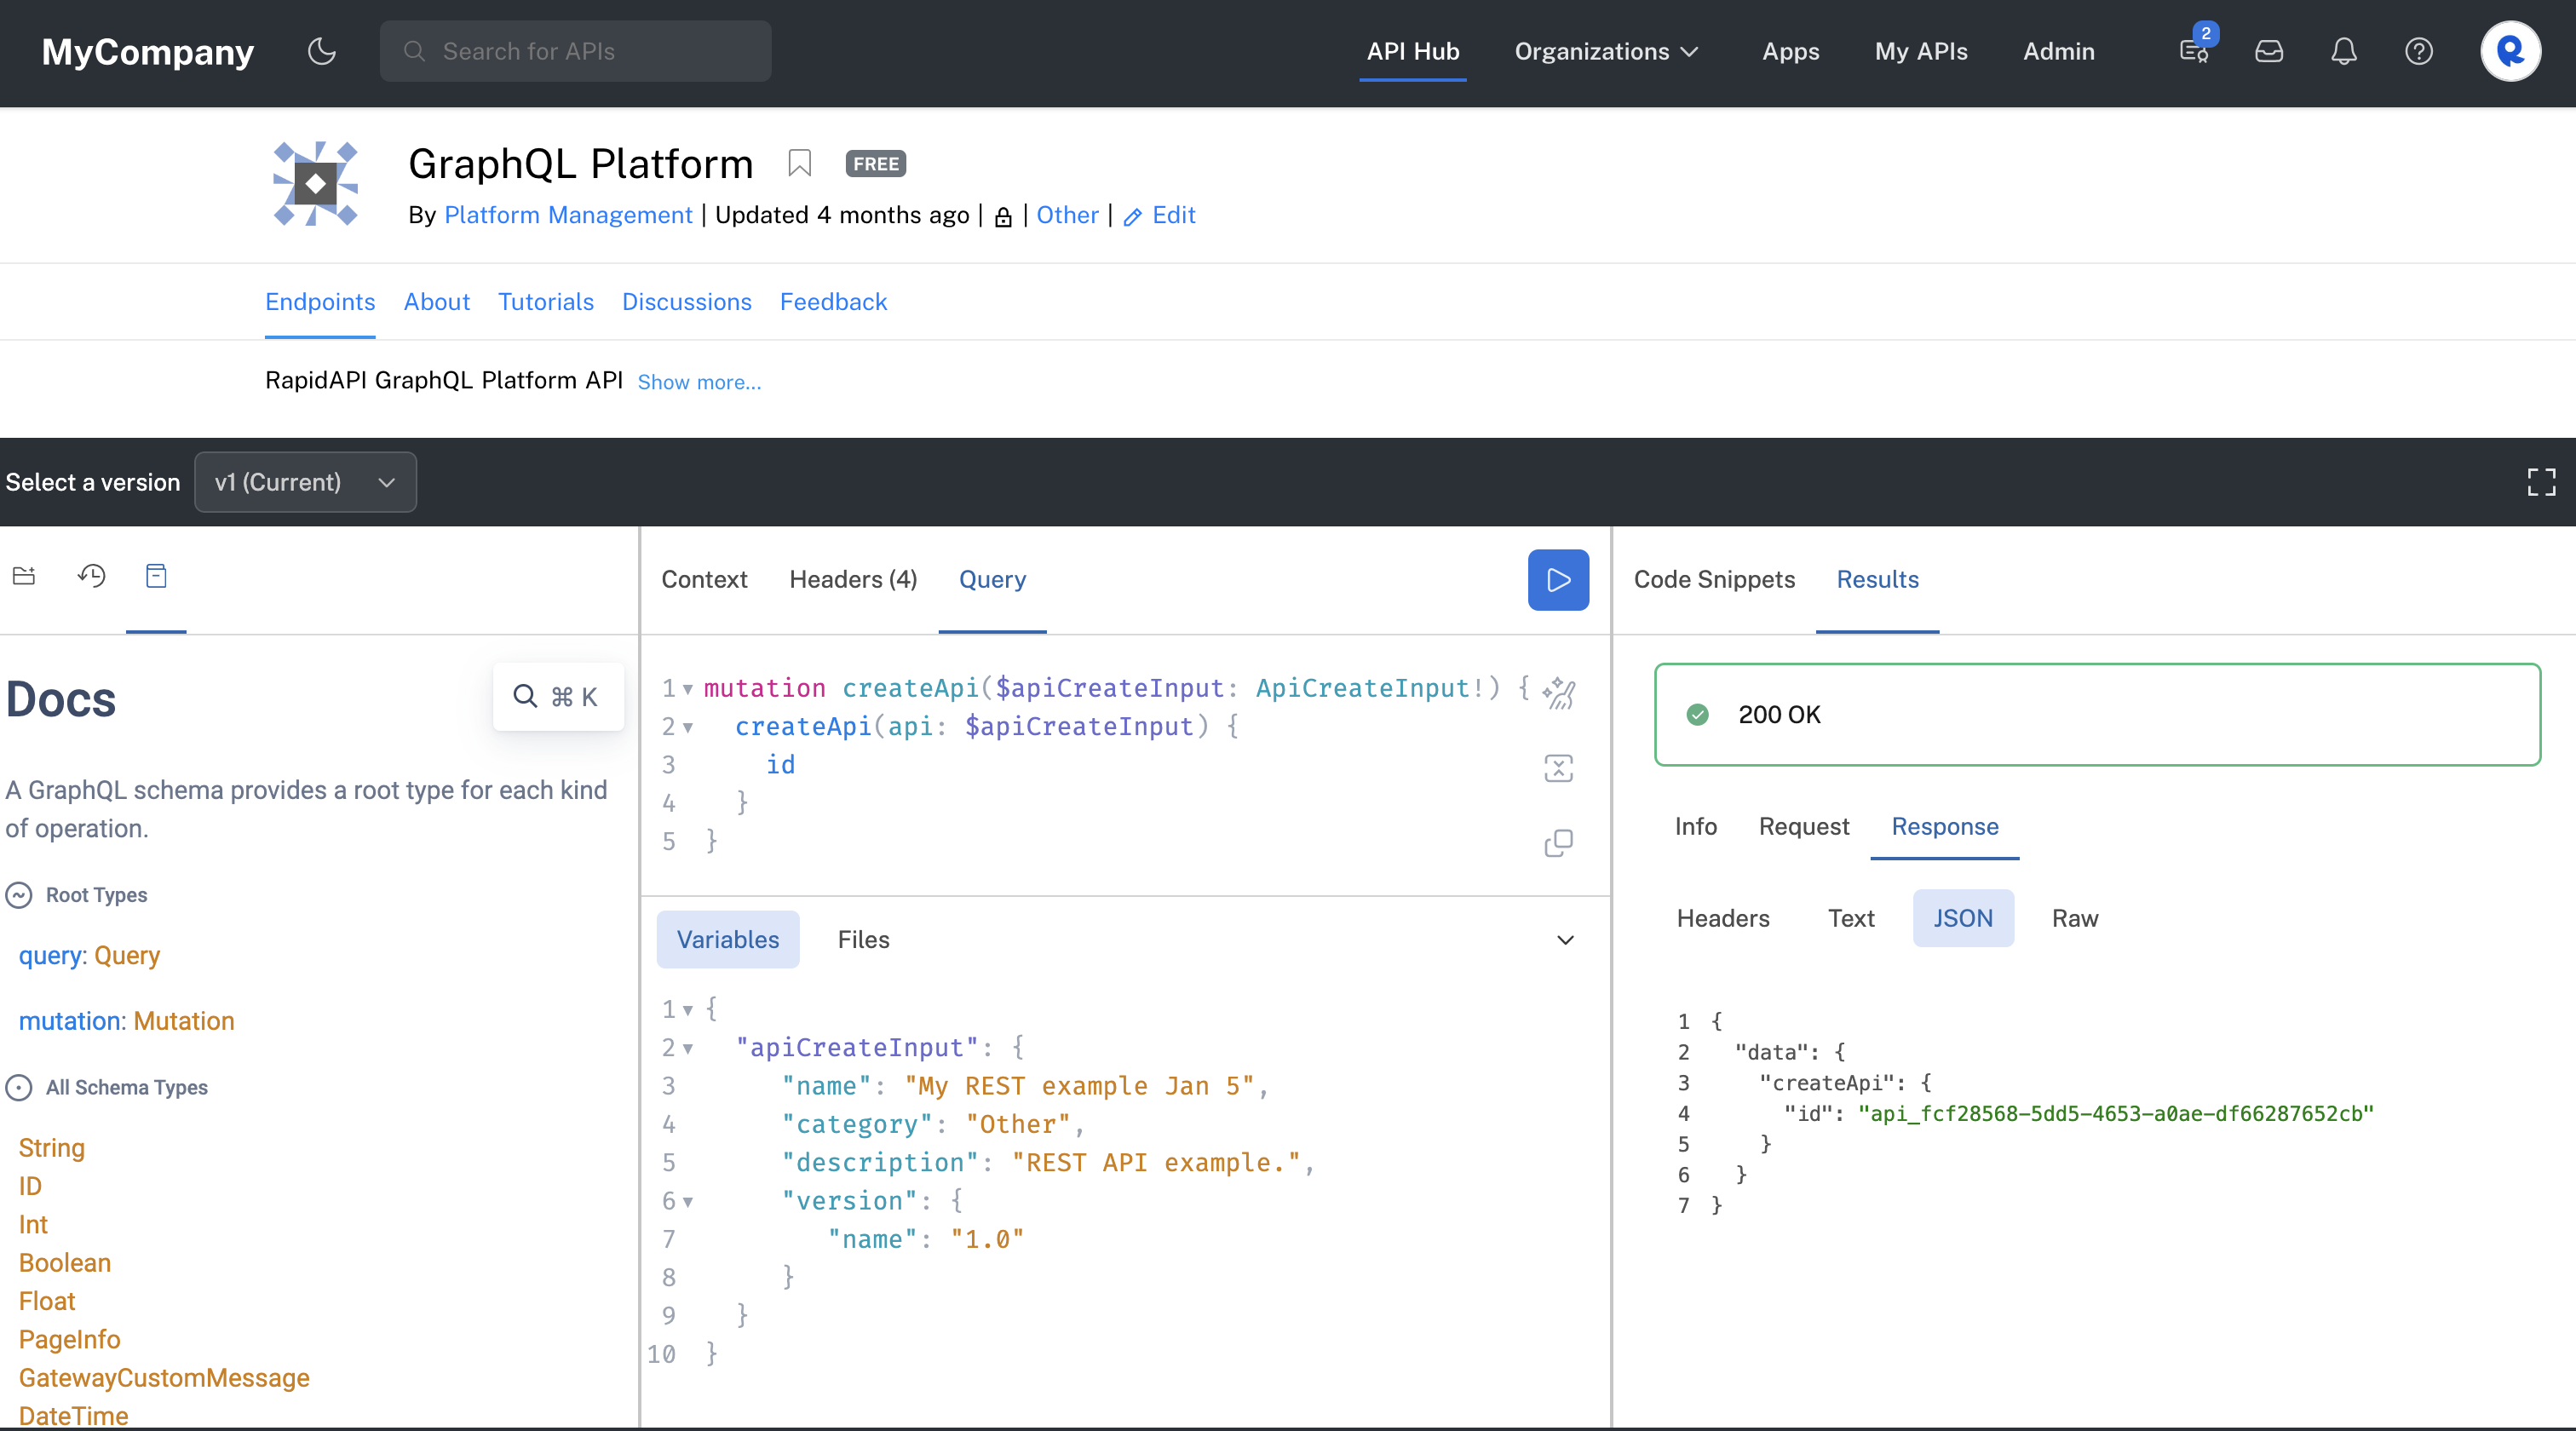
Creating a REST API using the createAPI mutation.
Creating an API in a team contextTo create an API in a team context, you must include the x-rapidapi-identity-key header parameter. This is used to identify the user creating the API, and to verify that they have the permission to create the API. The value of this header parameter is an app key from your Personal Account. You can obtain this key by selecting your Personal Account when testing any API’s endpoint and copying the X-RapidAPI-Key header parameter value.
See GraphQL Platform API Authorization for more information.
Update an API
Permissions to update a team's APIAn environment admin can update any API on the Hub using their personal account as the calling context.
To update a team's API, make sure that the
x-rapidapi-keyfor the team that owns the API that you want to modify is used in the mutation. Thex-rapidapi-identity-keymust be the personal accountx-rapidapi-keyfor a member of the team. One way to make this work is if the user calling the GQL Platform API is an org admin in the organization. They are automatically members of every team.Additionally, the team that owns the API to be modified must have access to the GraphQL Platform API. You can achieve this by making the GraphQL Platform API public, or by inviting the organization that contains the team that owns the API to use the GraphQL Platform API. In Studio: GraphQL Platform API > Hub Listing > Community > Invite Users.
Use the updateApi mutation to update a REST API. If you have an OAS document that describes the API, see Update an API from an OAS Document.
In the Variables, you must specify the API ID of the API. For information on obtaining the API ID, see Obtain an API's Details. This example changes the API's category and terms of service. The response contains the API's name, category, id, and termsOfService. You may need to change the category name to one that exists in your Enterprise Hub.
mutation updateApi($api: ApiUpdateInput!) {
   updateApi(api: $api) {
     name
     category
     id
     termsOfService {
        text
     }
   }
}
{
"api": {
"id": "[your API id]",
"category": "Data",
"termsOfService": {
"text": "https://example.com/tos"
}
}
}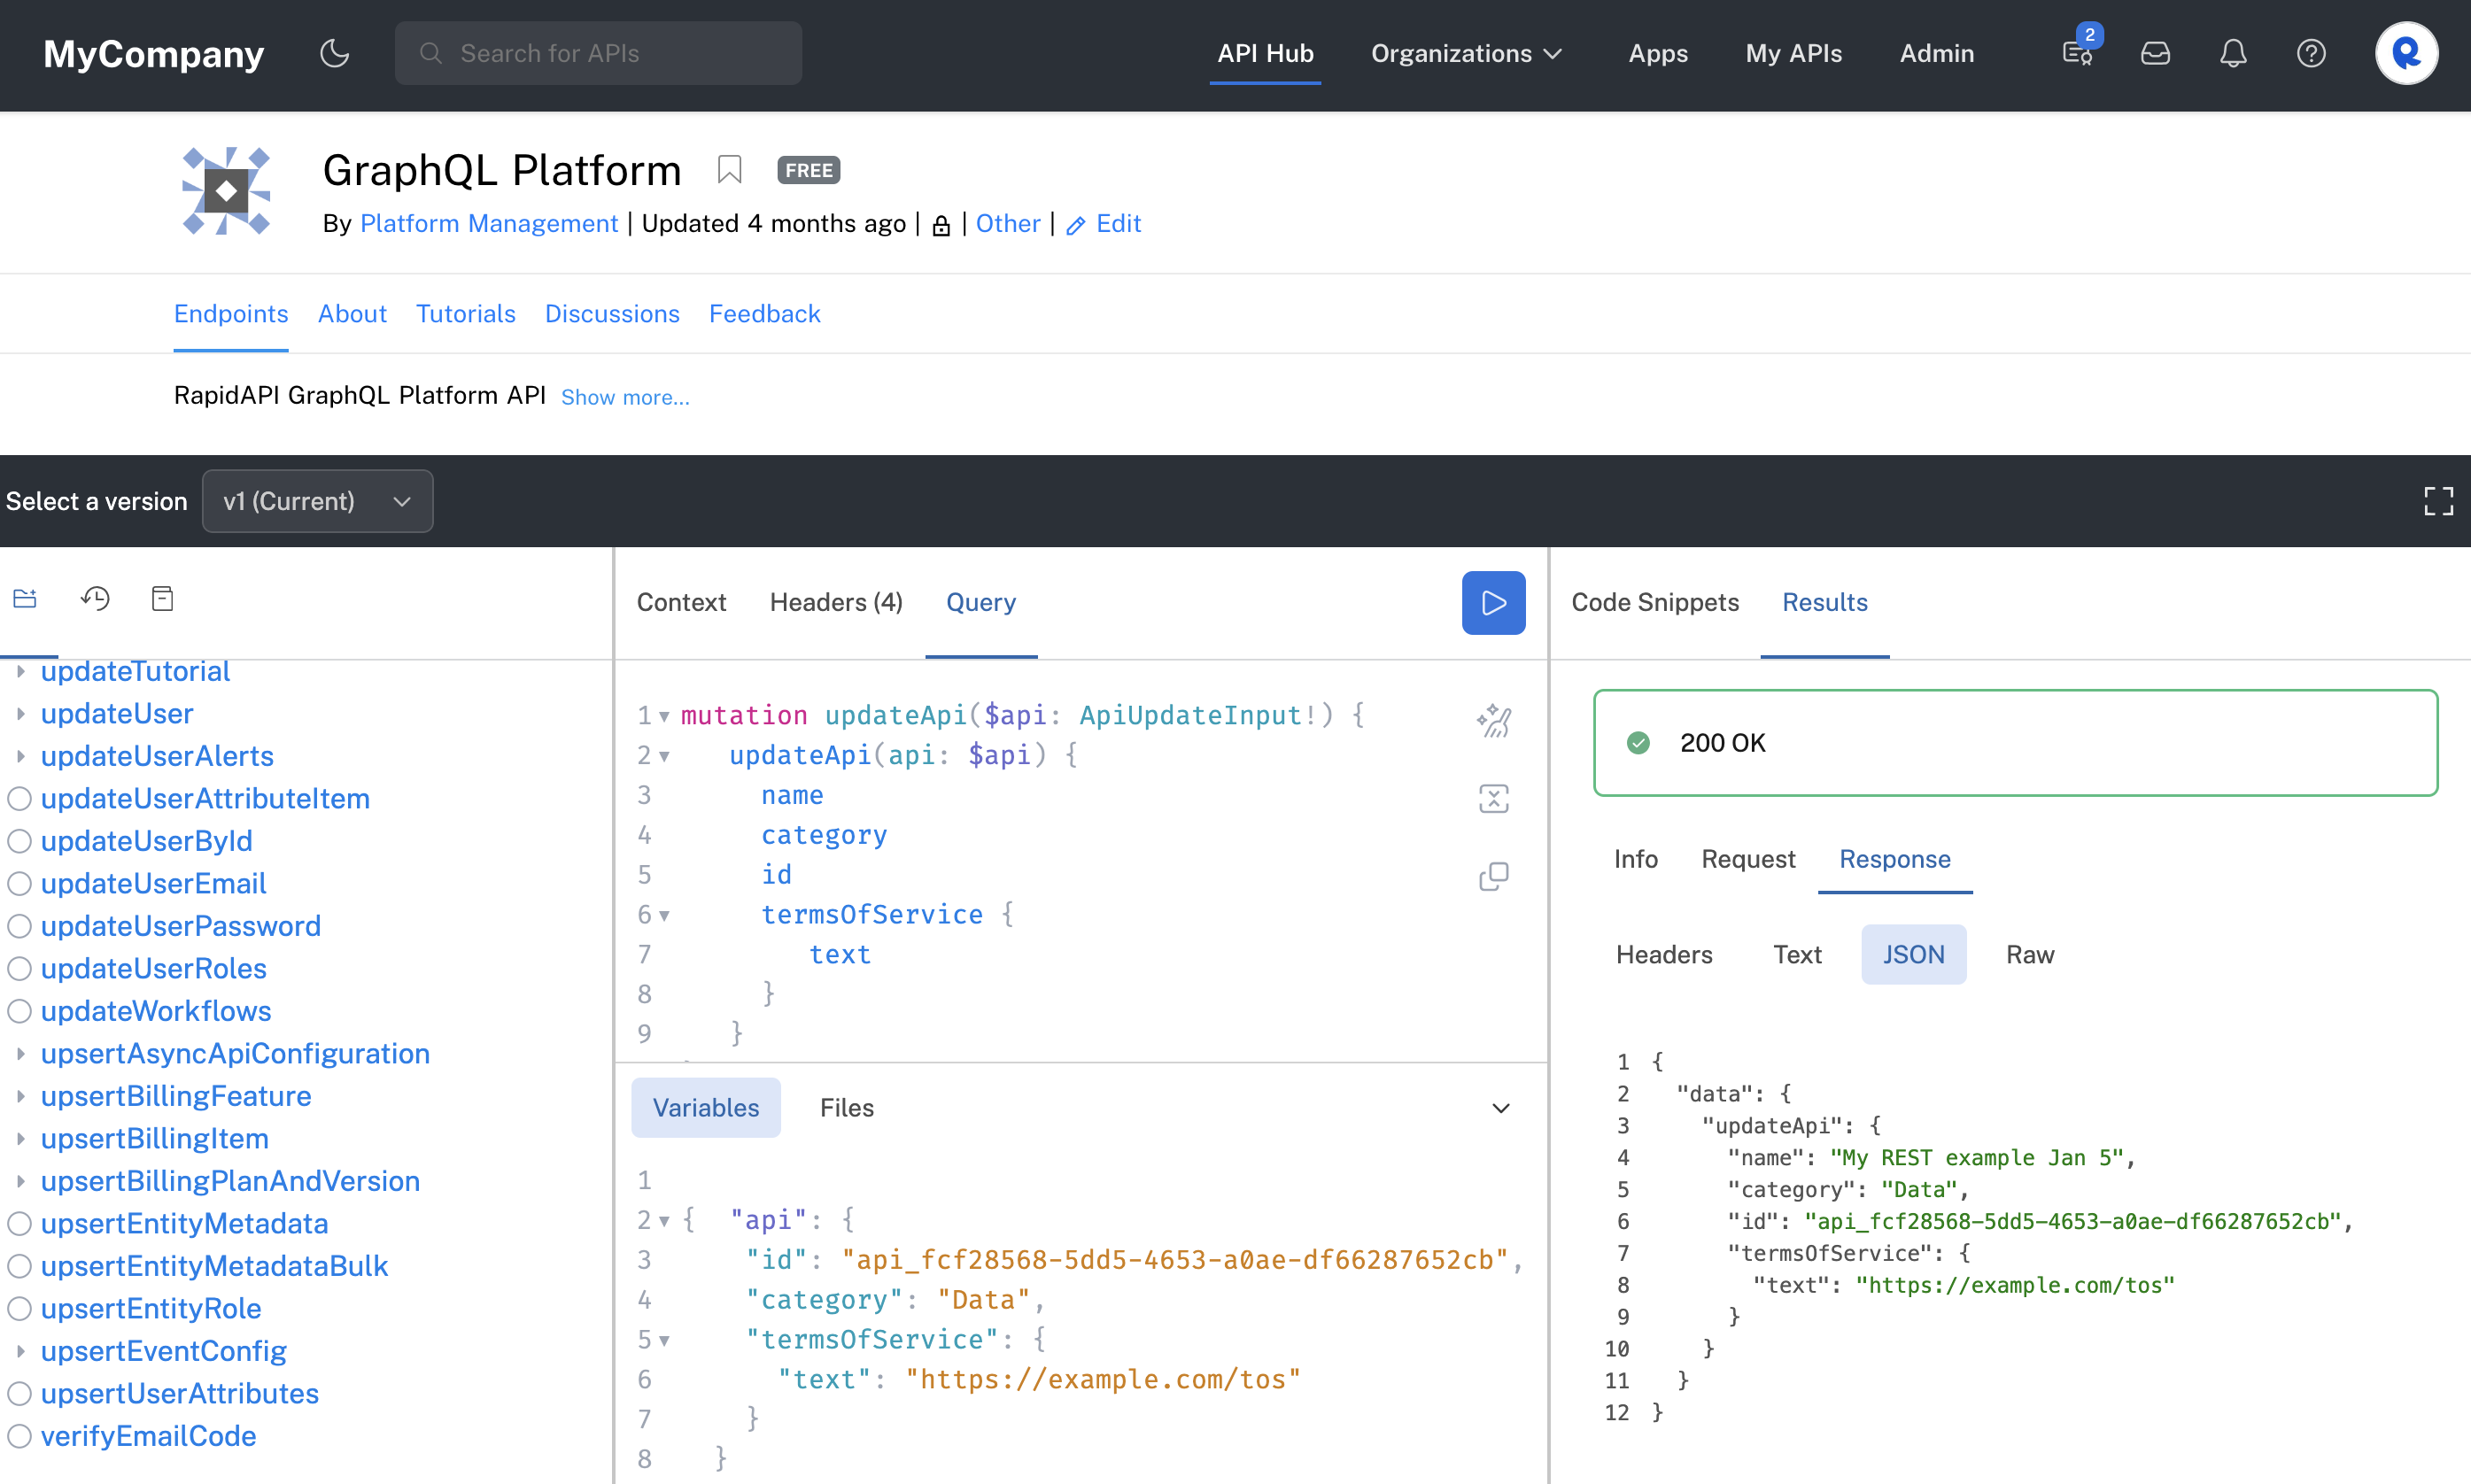
Updating a REST API using the updateAPI mutation.
Update an API's visibility
This example changes the API's visibility from private to public. This can be called by a team member owning the API, or an environment admin can call it for any API in the Enterprise Hub using their personal account as the calling context.
mutation updateApi($api: ApiUpdateInput!) {
   updateApi(api: $api) {
     name
     id
     visibility
   }
}
{
"api": {
"id": "[your API id]",
"visibility": "PRIVATE"
}
}Update an API's Base URL
To update an API's Base URL(s), you must know the target group ID for the version of the API that you want to update. This can be obtained using query.api, as shown on Obtain an API's Details.
Once you have obtained the target group ID, you can execute mutation.updateTargetGroups:
mutation ($updates: TargetGroupUpdateInput!) {
  updateTargetGroups (
    targetGroups: [$updates]
  ) {
    id
    loadBalancingStrategy
    name
    targetUrls {
      url
      loadBalancingStrategyValue
    }
  }
}
{
"updates": {
"id": "targetgroup_[YOUR ID]",
"targetUrls": [
{
"url": "https://[NEW BASE URL]"
}
]
}
}Create an API from an OAS document
The createApisFromRapidOas mutation creates an API from an OpenAPI 3.x specification document for the API. The OAS document includes Rapid's OAS extensions. See Adding and Updating OpenAPI Documents for more information on Rapid's OAS extensions.
Uploading of OAS documents is an asynchronous process. Monitoring for progress and completion of ongoing imports is done separately by polling the apiSpecImportProgresses query using the tracking ID that this mutation returns.
The OAS file provided under spec may be in either JSON or YAML format.
mutation createApisFromRapidOas($creations: [ApiCreateFromRapidOasInput!]!) {
  createApisFromRapidOas(creations: $creations) {
    apiId
    trackingId
    warnings {
      type
      critical
      text
      info
    }
  }
}
{
"creations": "[ApiCreateFromRapidOasInput!]!"
}Using the API Hub to create an API and upload an OAS file
You can use the API playground to upload a local OAS document when executing the createApisFromRapidOas mutation. Click the Filestab in the middle frame, click + and browse to your local OAS file. Note: This file must contain an info.x-category field. SeeAdding and Updating OpenAPI Documents for more information on RapidAPI's OAS extensions.
In the Path to variable text box above the file name, enter creations.spec. This assumes that you have named the GraphQL input variable creations, as in the example below.
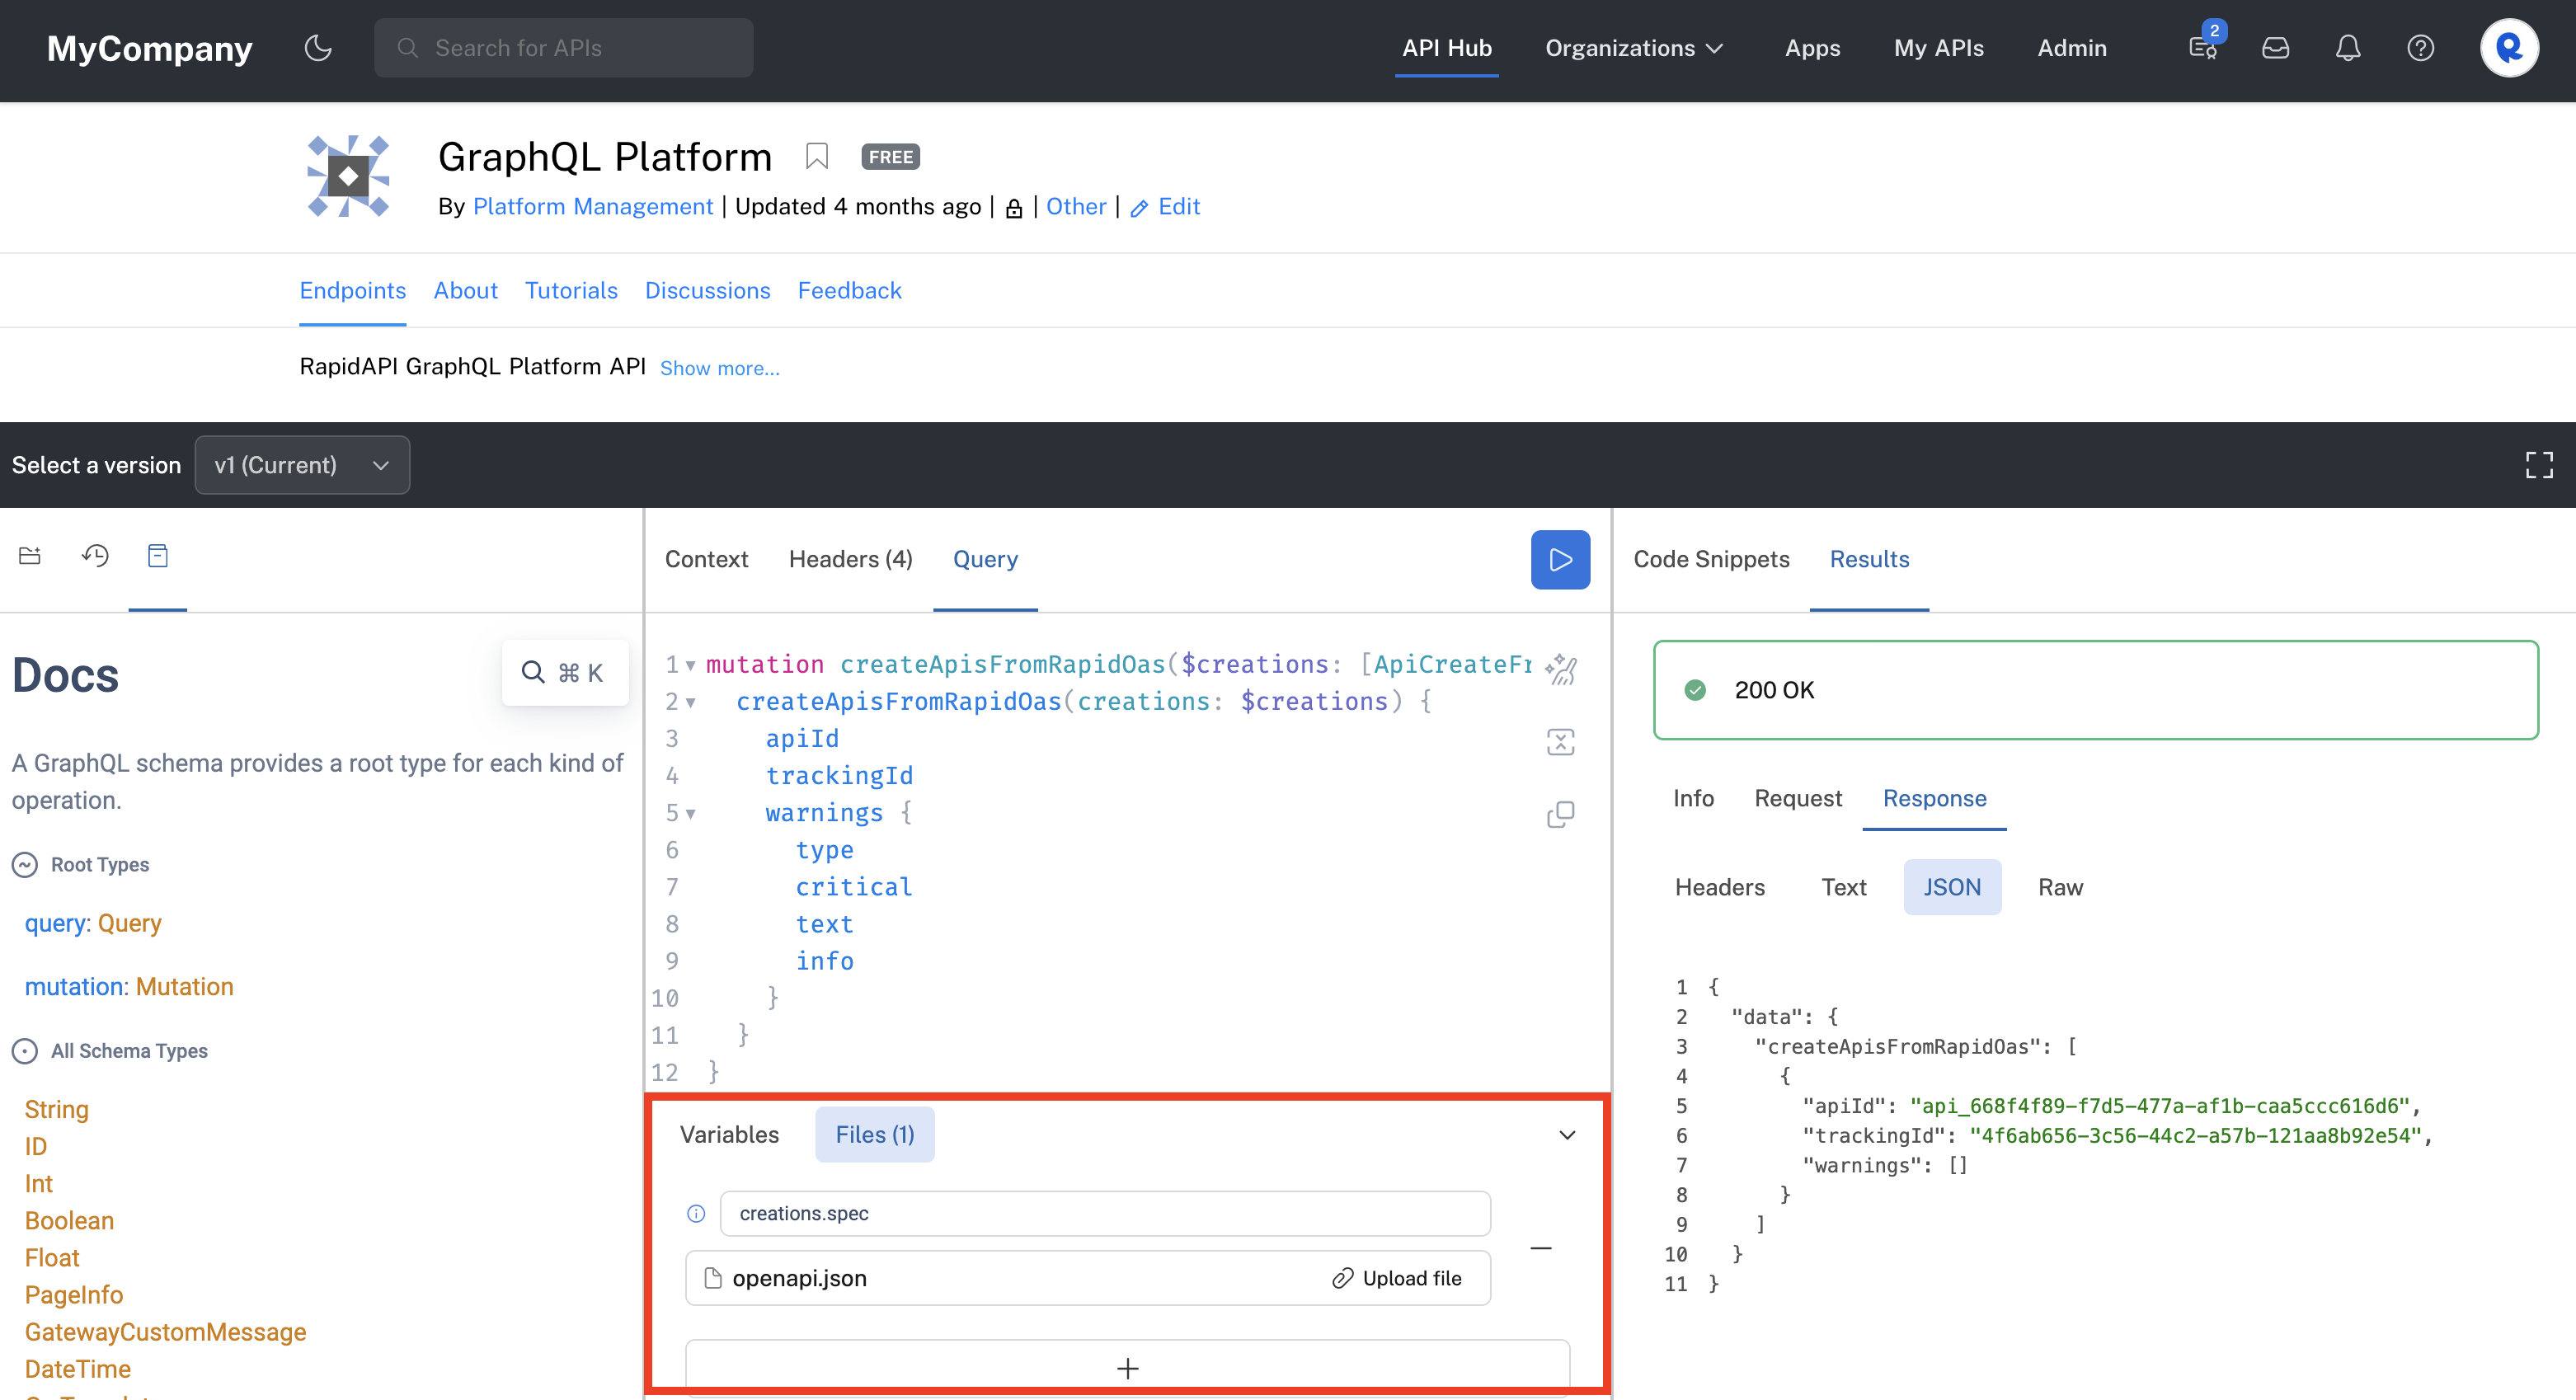
After executing the mutation, you should receive a 200 status. In the response, you should see the new apiId, the trackingID to track file upload progress and any warnings related to the file upload. See the screenshot above.
Creating an API and uploading an OAS file programmatically
Here is a sample Node.js file that creates a REST API by uploading an OAS file with Rapid extensions. A multipart HTML form is used to upload file and to specify the GraphQL mutation and variables.
If a team will own the API, specify the team's X-RapidAPI-Key in the header. If your personal account will own the API, specify your personal X-RapidAPI-Key in the header.
const FILENAME = '[YOUR FILE NAME]';
const axios = require("axios");
const FormData = require('form-data');
const fs = require('fs');

let file = fs.readFileSync(FILENAME);

// OPTIONALLY MODIFY OAS DOCUMENT HERE
file = JSON.parse(file);
file.info['title'] += new Date().toLocaleString().replace(",", "");
if (!file.info['x-category']) file.info['x-category'] = 'Other';
file = JSON.stringify(file);

const query = `
  mutation createApisFromRapidOas($creations: [ApiCreateFromRapidOasInput!]!) {
    createApisFromRapidOas(creations: $creations) {
      apiId
      trackingId
      warnings {
        type
        critical
        text
        info
      }
    }
  }`;

const variables = {
  creations: {
    spec: null // As dictated by the GraphQL upload specification, this null `spec` prop is intended as a mere placeholder while the ACTUAL file may be passed/streamed independently as a consequent multipart field as seen below.
  }
};

const formData = new FormData();
formData.append('operations', JSON.stringify({ query, variables }));
formData.append('map', '{"0":["variables.creations.spec"]}');
formData.append('0', file, FILENAME);

const options = {
  method: 'POST',
  url: '[YOUR URL FROM SAMPLE CODE]',
  headers: {
      ...formData.getHeaders(),
      'x-rapidapi-identity-key': '[YOUR PERSONAL KEY]',
      'X-RapidAPI-Key': '[YOUR PERSONAL OR TEAM KEY FROM SAMPLE CODE]',
      'X-RapidAPI-Host': '[YOUR HOST FROM SAMPLE CODE]'
  },
  data: formData,
};

axios.request(options).then(response => {
   console.log(JSON.stringify(response.data));
}).catch(error => {
    console.error(error.response.data);
});
Update an API from an OAS document
This mutation updates an API from an OpenAPI 3.x specification document for an API. See Adding and Updating OpenAPI Documents for more information on Rapid's OAS extensions.
In the variables, you must specify the apiVersionId for the version of the API that you want to update. This can be obtained using query.apiVersions, as shown on Obtain an API's Details.
mutation updateApisFromRapidOas($updates: [ApiUpdateFromRapidOasInput!]!) {
  updateApisFromRapidOas(updates: $updates) {
    apiId
    trackingId
    warnings {
      type
      critical
      text
      info
    }
  }
}
{
"updates": [{
"spec": null,
"apiVersionId": "apiversion_abcd"
}]
}Upload File and specify the path for the file in the Vars:
openapi.json -> updates.0.specYou can upload a local copy of your OAS document using the Files area in the API playground, as shown below. In the Path to variable text box above the file name, enter updates.0.spec. This assumes that you have named the GraphQL input variable updates, as in the example below.

Executing the updateApisFromRapidOas mutation from the playground to update an API.
Here is Node.js sample code for the updateApisFromRapidOas mutation:
const FILENAME = '[YOUR FILE NAME]';
const axios = require("axios");
const FormData = require('form-data');
const fs = require('fs');

let file = fs.readFileSync(FILENAME);

// OPTIONALLY MODIFY OAS DOCUMENT HERE
file = JSON.parse(file);
if (!file.info['x-category']) file.info['x-category'] = 'Other';
file = JSON.stringify(file);

const query = `
mutation updateApisFromRapidOas($updates: [ApiUpdateFromRapidOasInput!]!) {
  updateApisFromRapidOas(updates: $updates) {
    apiId
    trackingId
    warnings {
      type
      critical
      text
      info
    }
  }
}`;

const variables = {
  "updates": {
    "spec": null,
    "apiVersionId": "apiversion_[YOUR API's VERSION ID]"
  }
};

const formData = new FormData();
formData.append('operations', JSON.stringify({ query, variables }));
formData.append('map', '{"0":["variables.updates.spec"]}');
formData.append('0', file, FILENAME);

const options = {
  method: 'POST',
  url: 'https://graphql-platform1.p.rapidapi.com/',
  headers: {
      ...formData.getHeaders(),
      'x-rapidapi-identity-key': '[YOUR PERSONAL KEY]',
      'X-RapidAPI-Key': '[YOUR PERSONAL OR TEAM KEY FROM SAMPLE CODE]',
      'X-RapidAPI-Host': '[YOUR HOST FROM SAMPLE CODE]'
  },
  data: formData,
};

axios.request(options).then(response => {
   console.log(JSON.stringify(response.data));
}).catch(error => {
    console.error(error.response.data);
});
Delete an API
Use the deleteApi mutation to delete an API from the Hub. In Variables, replace ID with the value for the API that you created above.
mutation deleteApi($id: ID!) {
  deleteApi(id: $id)
}
{
"id": "ID"
}Updated about 1 year ago