API Access Provisioning
Configure an App to store and retrieve authorization credentials.
Overview
API Access Provisioning allows API consumers and organization admins to store and retrieve authorization credentials required by API gateways when calling certain APIs. The authorization credentials are stored by Rapid in a secure storage vault. The following types of authorization credentials are currently supported:
- RapidAPI (this is the default authorization)
- OAuth2
- CLIENT_CREDENTIALS grant type
- AUTHORIZATION_CODE grant type
- PASSWORD grant type
- Header Authorization
- Basic Auth
Values such as user names, passwords, Client IDs, and Client Secrets are securely stored in Apps in entities called Authorizations. Authorizations enable API consumers to obtain authorization credentials when testing an API in the API playground (see the first screenshot below) without needing to enter values such as the Client ID and Client Secret (see the second screenshot below).
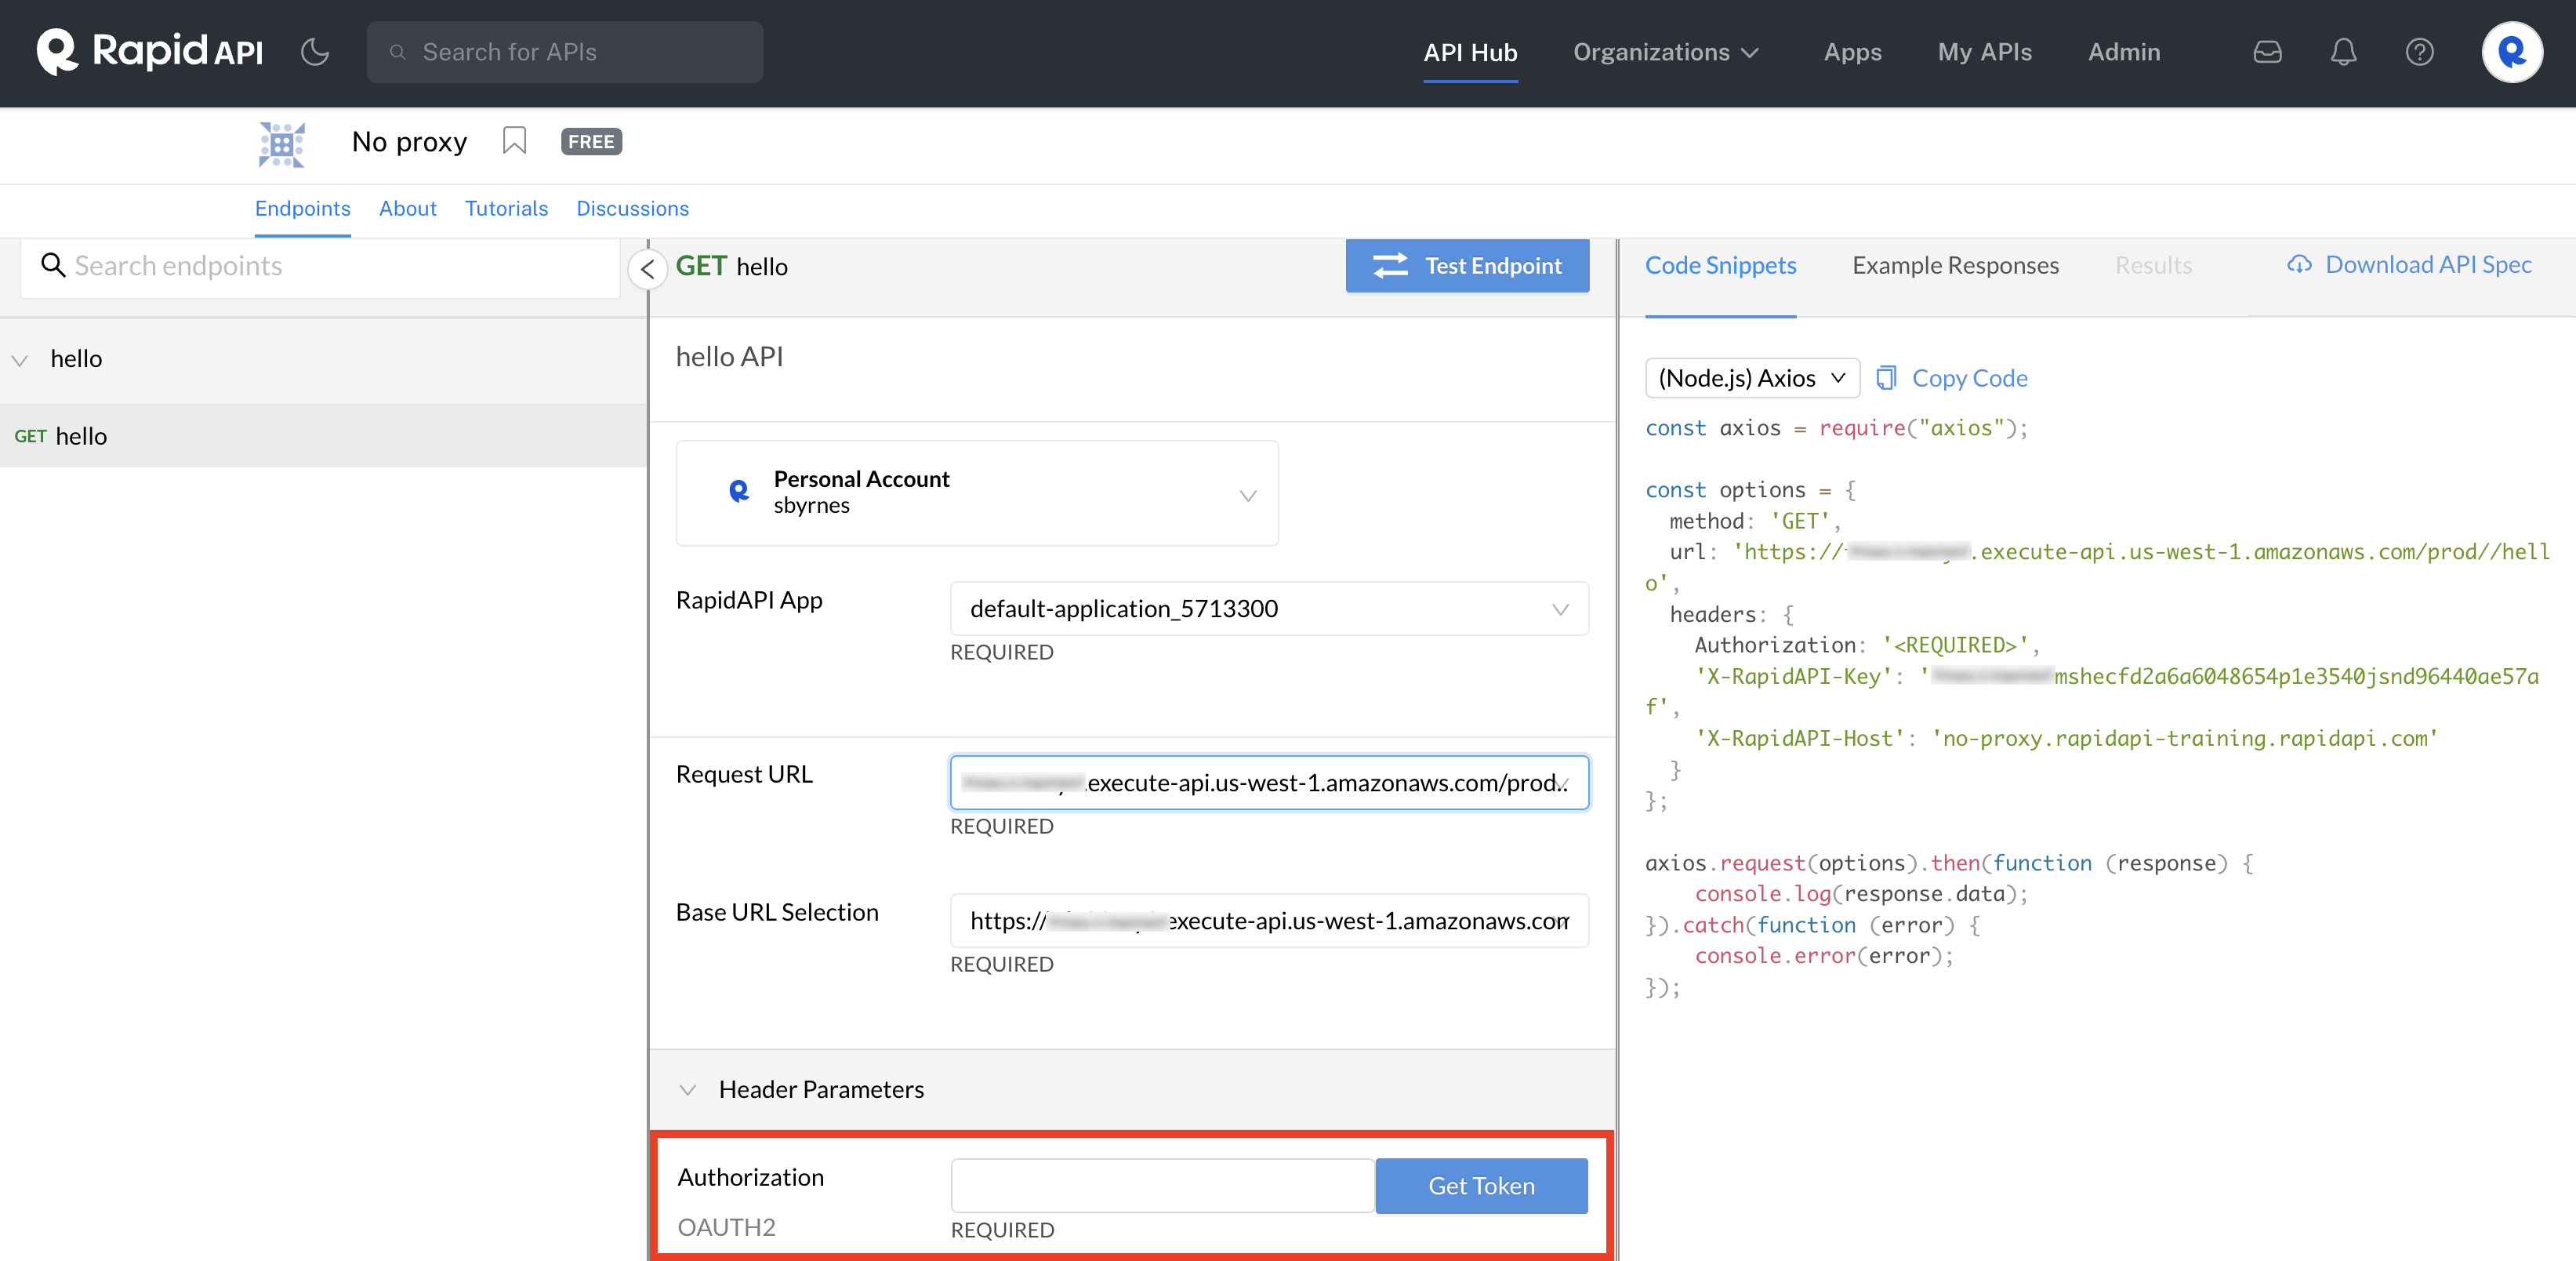
Obtain an OAuth token using Client IDs and Client Secrets stored in an App.
As an example with OAuth2, when an API consumer uses an Authorization, the Client ID and (optionally) Client Secret are populated automatically in the dialog that opens when they click Get Token in the API playground. If there were no Authorization, the consumer would need to enter the Client ID and (optionally) Client Secret manually.
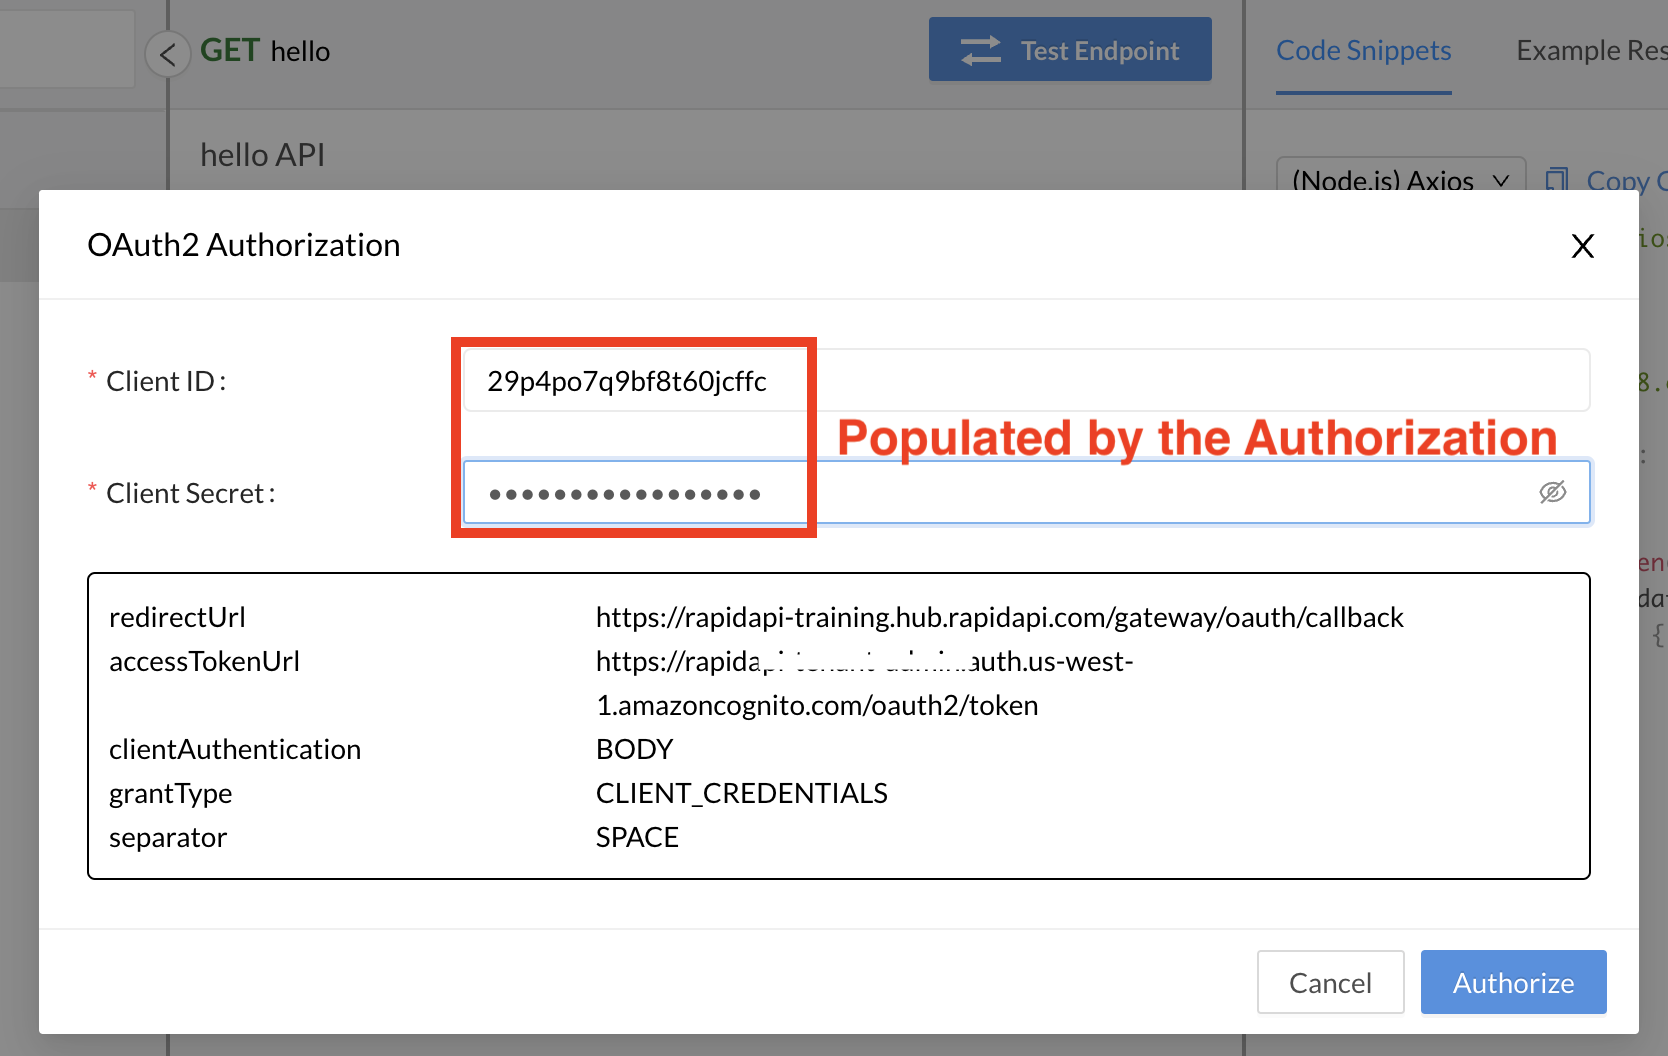
Client ID and Client Secret automatically populated for the API consumer after clicking the Get Token button.
An Authorization is configured for the Rapid Runtime (or for Enterprise Hub APIs that configure an API gateway) and can be used for multiple APIs that use that gateway.
Steps to creating and using Authorizations
- (Enterprise Hubs only: If your API does not use the Rapid Runtime) An external API gateway is configured by the Environment Admin and the API provider. This API gateway can be used by multiple APIs in the Hub.
- (Enterprise Hubs only: If your API does not use the Rapid Runtime) An API provider sets an API to use the external API gateway.
- An API provider configures the API to use OAuth 2, Header Auth, or Basic Auth.
- An API consumer or organization admin creates an App or chooses an existing app in which to add an Authorization.
- The API consumer or organization admin creates an Authorization that uses an external gateway or the Rapid Runtime. If the App is owned by a team, all members of the team can use the Authorization. See details of this step below.
- API consumers use the Authorization when calling the API from the API playground, avoiding the need to enter authorization credentials. See details of this step below.
Adding Authorizations to Apps
Authorizations are added to Apps. The App must be selected by the API consumer when testing the API in the API playground. Authorizations can be added to Apps in two main ways:
- Through the user interface in the Developer Dashboard (Apps).
- (Enterprise Hubs only) Through the GraphQL Platform API.
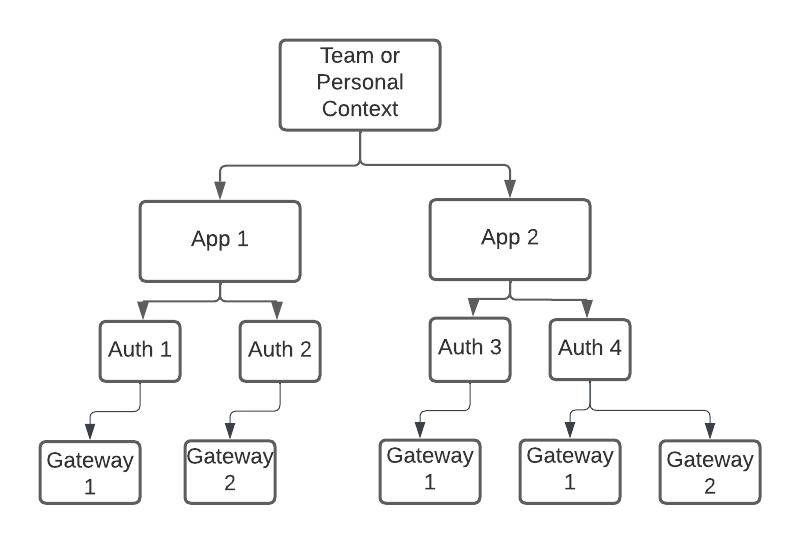
Apps contain Authorizations, which can store authorization credentials used by API gateways.
Adding Authorizations using the Developer Dashboard (Apps)
Authorizations can be added to new or existing Apps.
To add an Authorization to a NEW App:
- In the Developer Dashboard (Apps), in the upper left, select the team or personal context that will own the App. (In the example below, we selected a personal context). If you add an Authorization to a team context, all members of the team can use the Authorization.
- Click Add New App.
- Enter an App Name and Description.
- Under Add initial authorization, enter a good name for your Authorization. API consumers will select this Authorization when calling the API.
- Under Select gateways, select the gateway(s) that the API uses. If your API uses the Rapid Runtime, select rapidapi.com. If you API does not use the Rapid Runtime, select the external gateway from the list (these have been added to your Enterprise Hub by an environment admin). If your API has been configured to give API consumers a choice of gateways, select each gateway that applies.
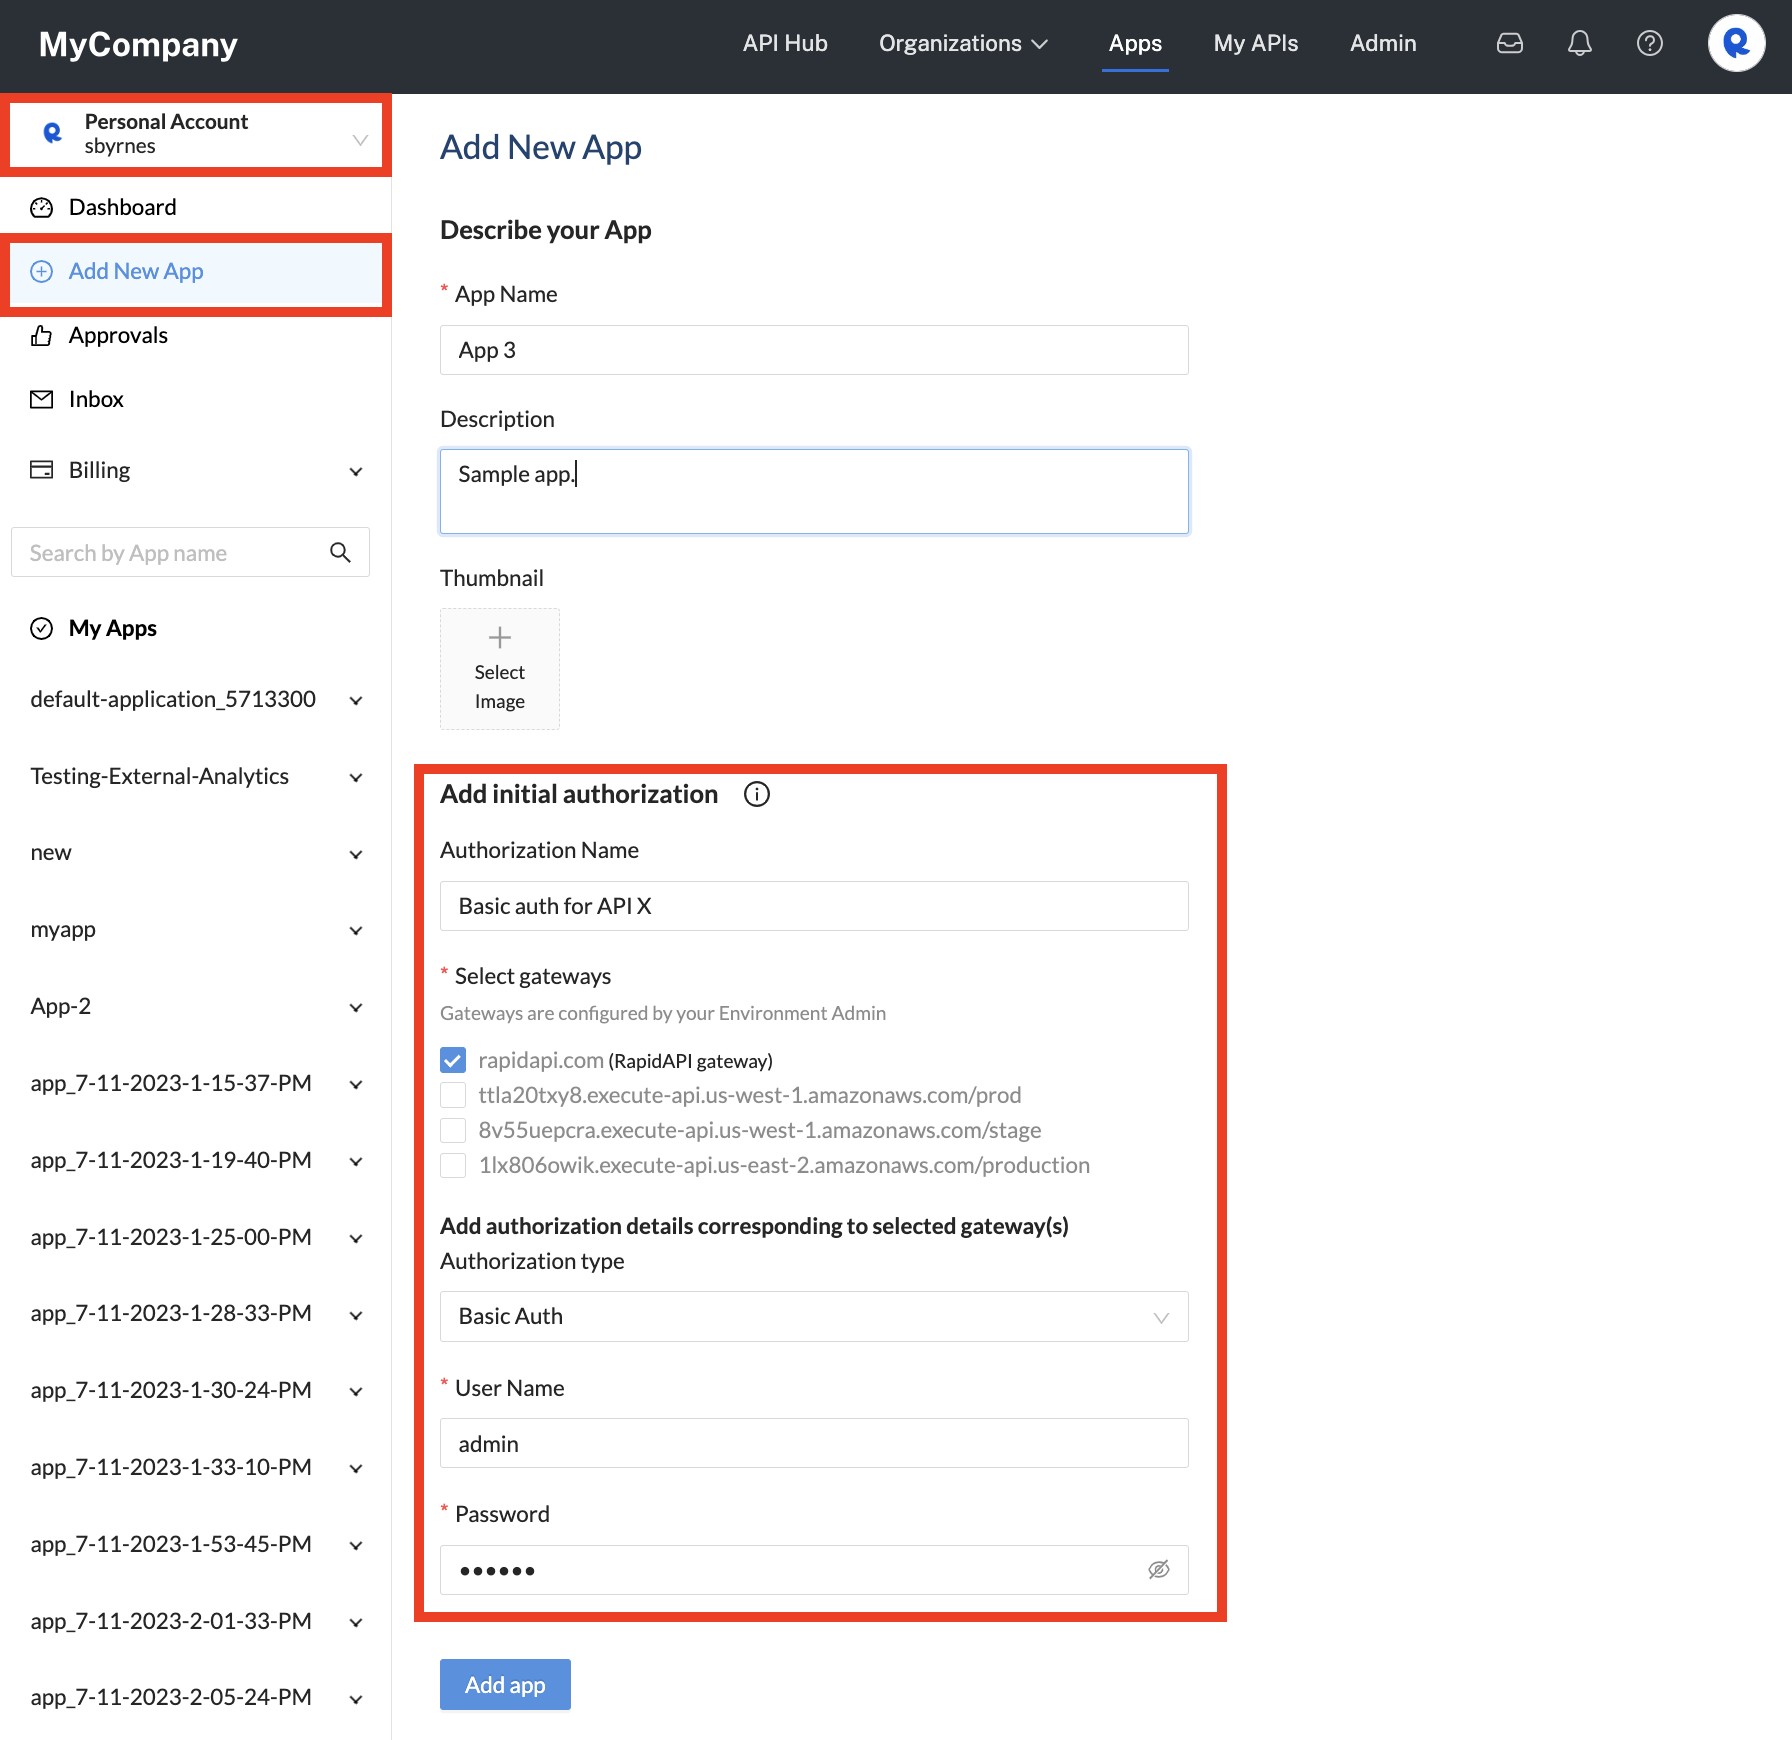
Adding a new App and Authorization for an API that uses the Rapid Runtime.
-
Under Authorization type, select one of the following:
1) RapidAPI: If you choose this option, you are not using API Access Provisioning. Choosing this option means that your API uses the Rapid Runtime only, which creates a
X-RapidAPI-Keythat must be passed to the Rapid Runtime as a header.2) OAuth2:
- For Grant type, select Client credentials, Authorization code, or Password.
- Enter the Client ID and (optionally) Client Secret for the external API gateway. Client Secret is optional for Authorization code and Password grant types.
For Client credentials grant types, you are also given the option to check JSON Web Token. You then need to upload the private key and specify the Algorithm that the JSON web token uses. A token will automatically be made available to API consumers when testing the API.
For Password grant types, you must also specify the Username and Password that is used to obtain tokens.
OAuth 2 authorization approval workflows(Enterprise Hubs only) For OAuth 2 authorizations, you have the option to request authorization details from your Environment Admin. For details, see API Access Provisioning Approvals.
3) Header:
i. For Name, enter the name of the authorization header that your API gateway expects to receive.
ii. For Value, enter the secret value of the authorization header that your API gateway expects to receive.
4) Basic Auth
i. For User Name, enter the user name that your API gateway expects to receive.
ii. For Password, enter the basic auth password that your API gateway expects to receive.
- Click Add app.
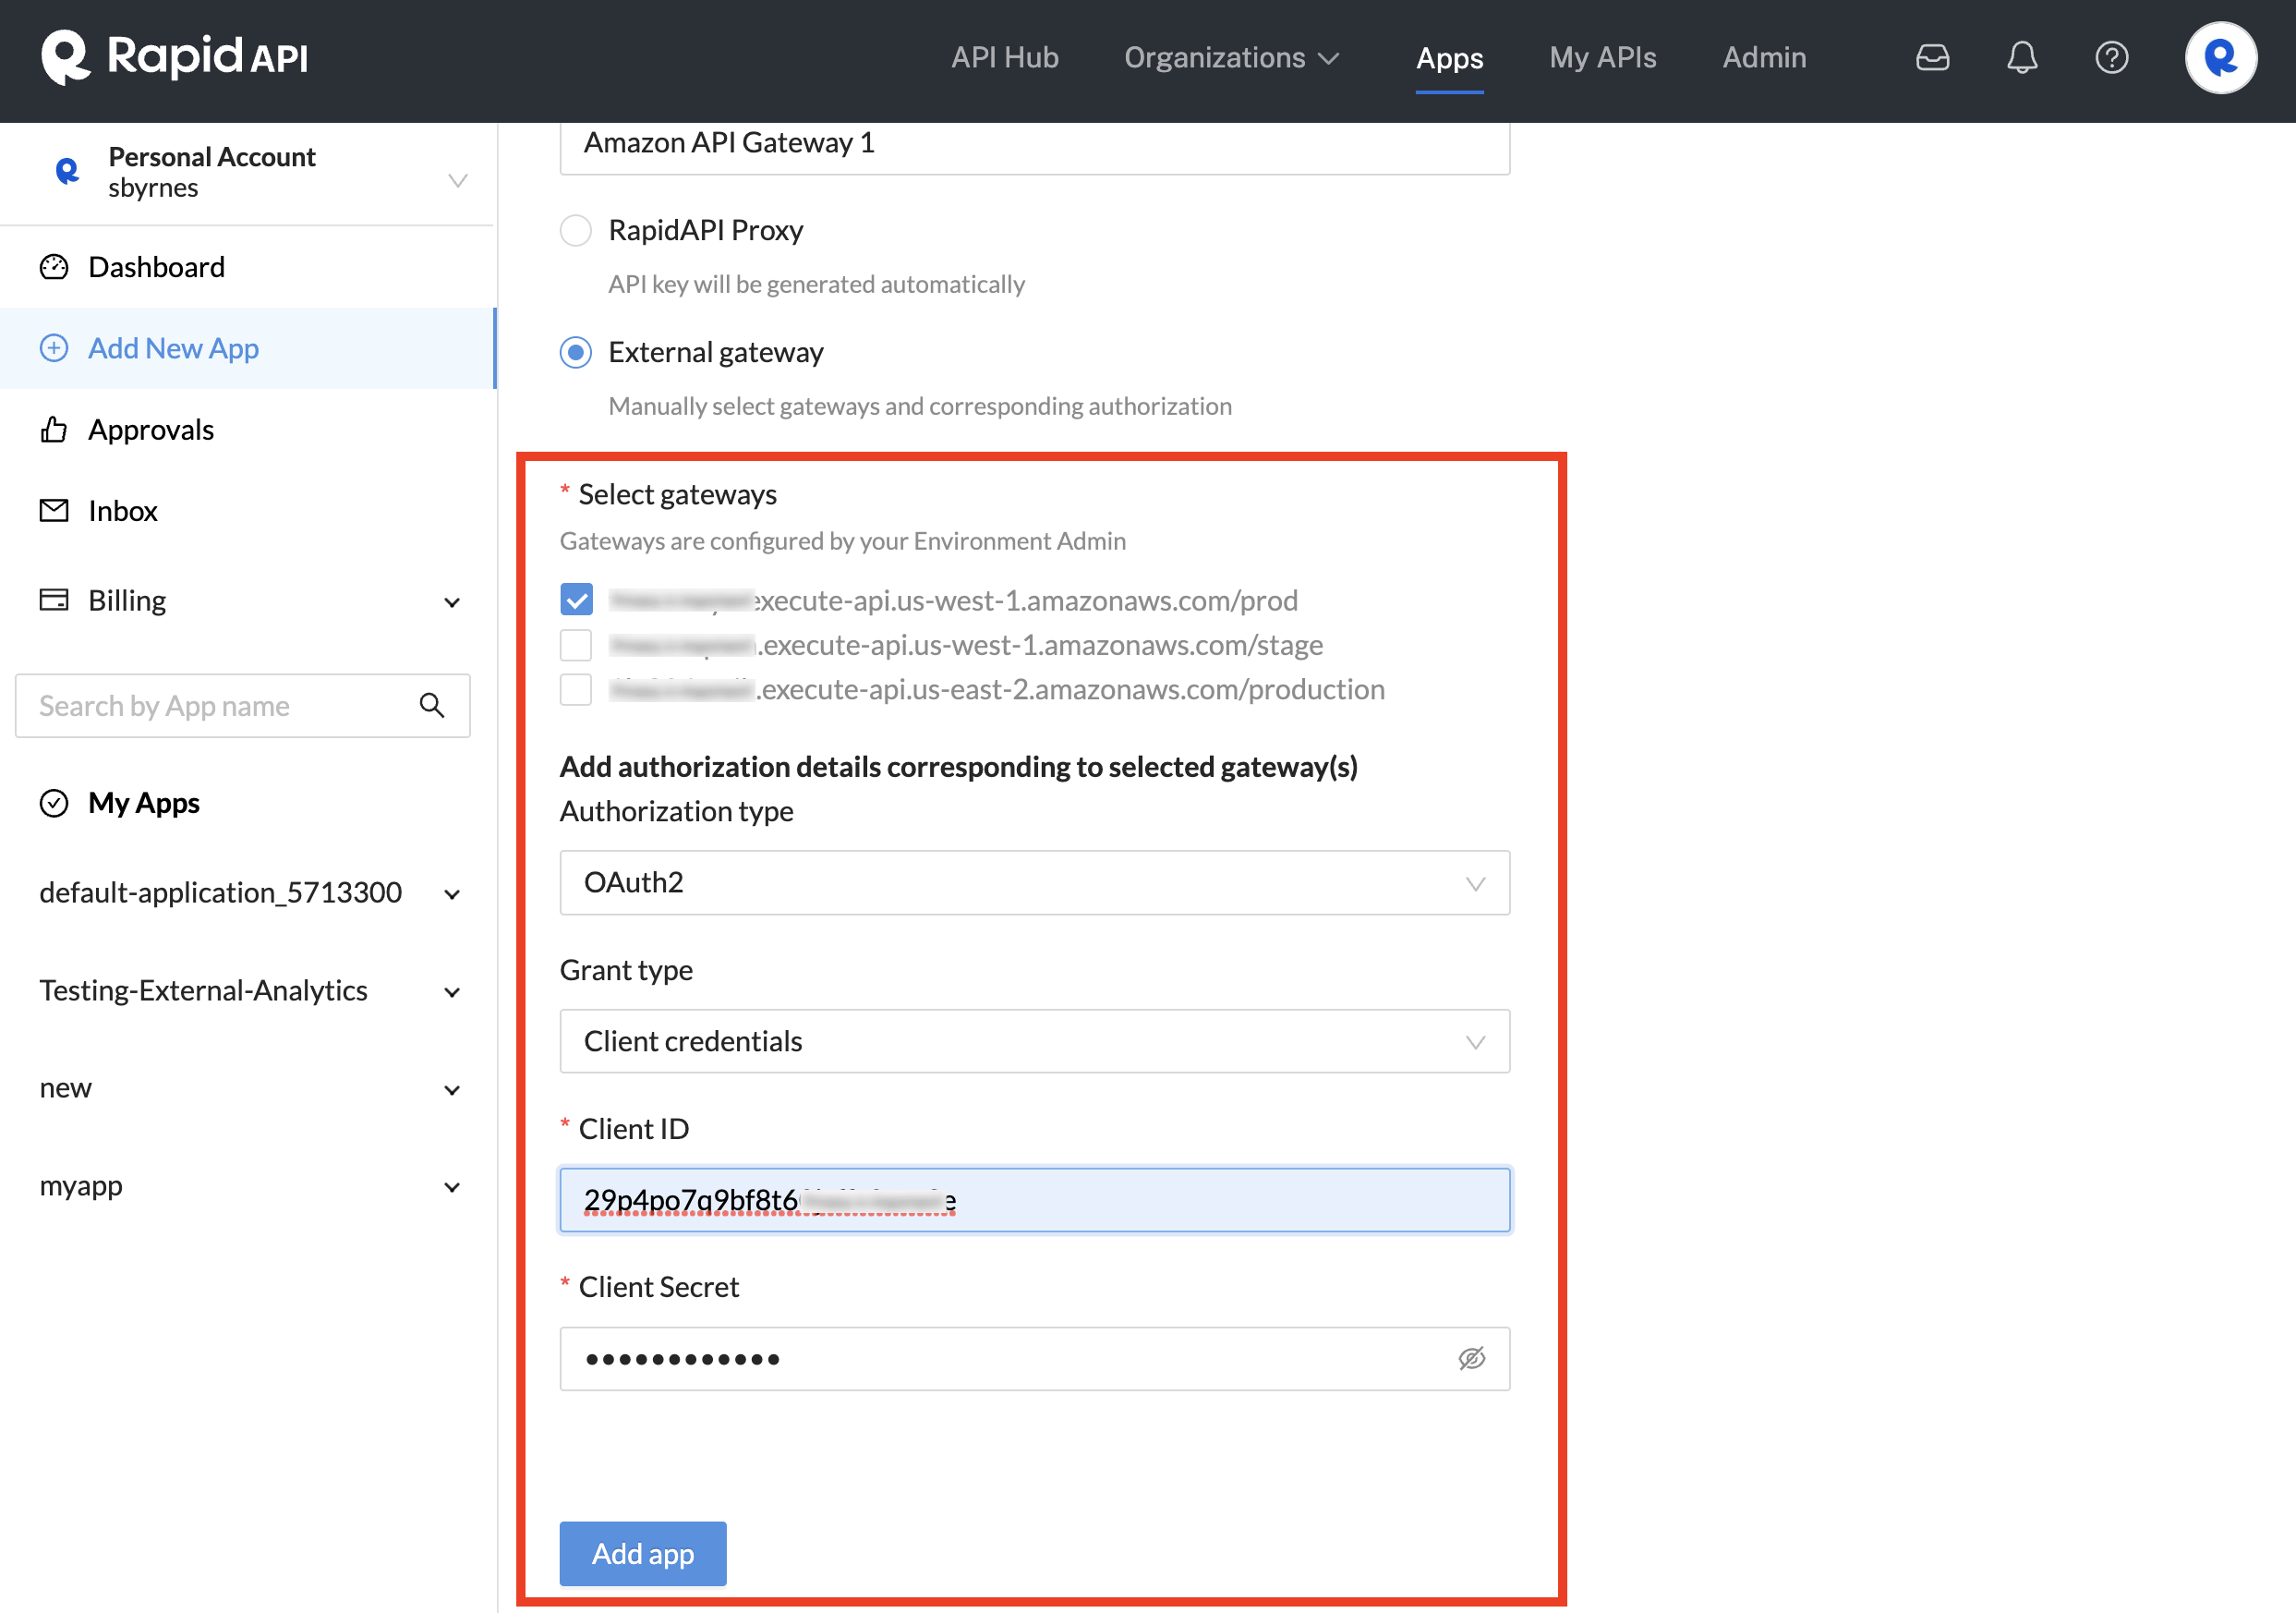
Adding an Authorization that uses an external gateway.
- You should now see that your Authorization was added to the app under the Authorization tab. You can click the Add authorization button to add more Authorizations to the app.
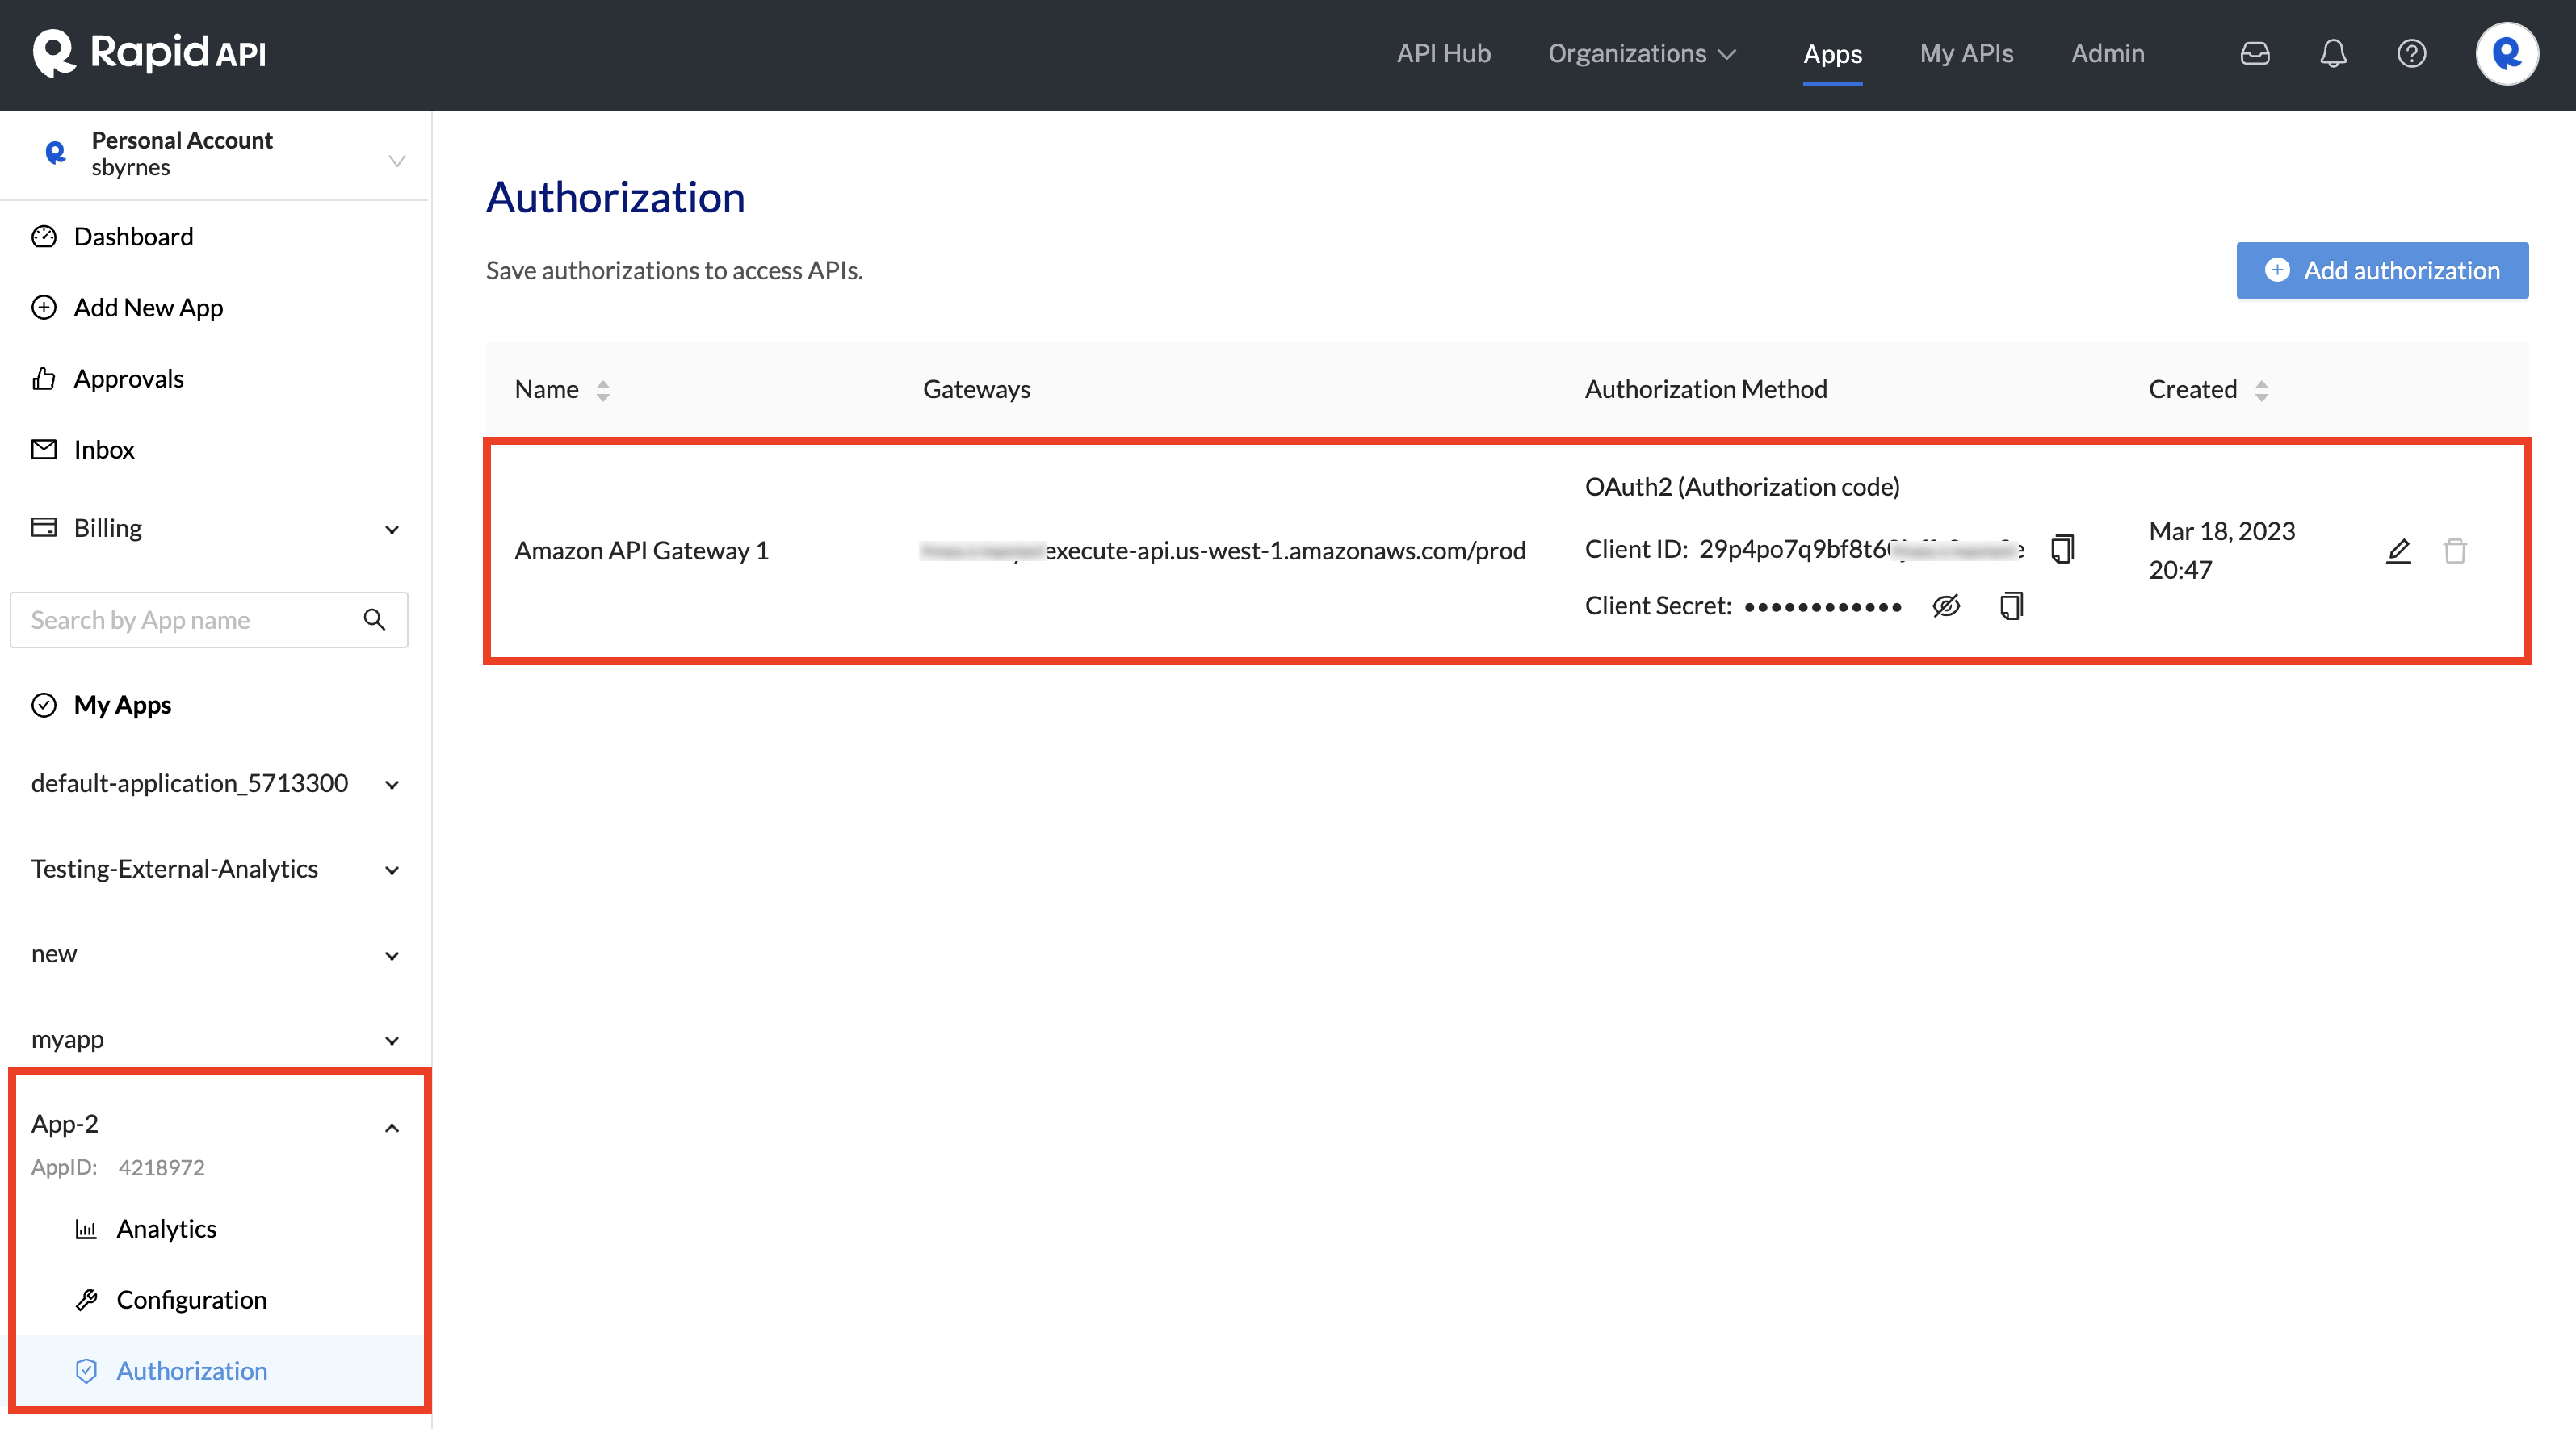
An Authorization that uses an external gateway has been added.
If you want to add one or more Authorizations to an EXISTING app, select the Authorization tab for the App instead (shown above) and follow the previous instructions starting with step 3.
Adding Authorizations to apps using the GraphQL Platform API
(Enterprise Hubs only) You can use the GraphQL Platform API to create apps and add Authorizations. This involves four main queries and mutations:
- query.users - To obtain your USER ID, see Users, Teams, and Roles (GQL). Save your USER ID (called "id" in the response) to be used in step 2 below if you are creating an App to be owned by a team, and in step 3 below if you are creating an App in your personal context.
- (optional) query.organizations - Used to obtain the TEAM ID or APP ID. See Organizations (GQL). This is skipped if you are creating an app in your personal context.
If you are creating an App to be owned by a team, you must obtain the TEAM ID for use later in the createProject mutation. You can obtain the TEAM ID, returned as organizations.teams.id.
If you are adding an Authorization to an existing App owned by a team, you can obtain the APP ID ( or PROJECT ID) (returned as organizations.teams.ProjectAcls.Project.id). You can then skip to step 4 below. - (optional) mutation.createProject - Used to create an App (project) in a team or personal context. See Apps and Authorizations. This is skipped if you are adding an Authorization to an existing app. Save your PROJECT_ID (called "id" in the response) to be used in the following mutation.
- mutation.createApplicationAuthorization - To save an Authorization in an App, see Apps and Authorizations.
Using Authorizations from the API playground
-
In the API Hub, search for and open an API that uses your saved Authorization.
-
In the team context dropdown (just under Test Endpoint), select the team or personal account that will act as the API consumer. This account owns the app configured with the Authorization above.
-
In the RapidAPI App dropdown, select the app that contains the Authorization configured above.
-
(If you are not using the Rapid Runtime) In the Request URL dropdown, select the URL to the API gateway.
-
(If needed) In the Authorization Name dropdown, select the name of the desired Authorization configured above.
-
If your Authorization is for an API protected by
OAuth2:- Click Get token.
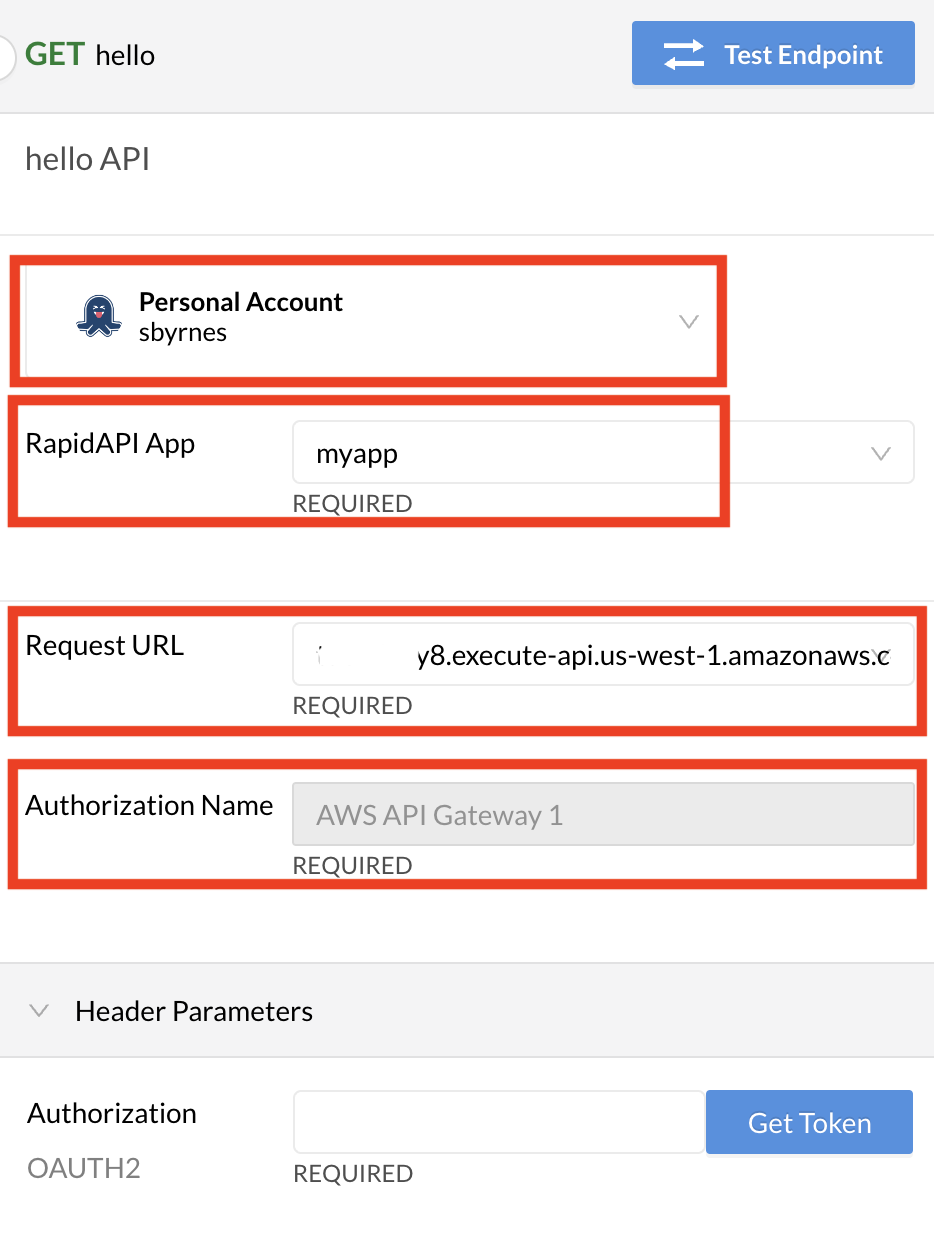
Selecting the Authorization to use when testing the API.
You will see the OAuth2 authorization dialog. Depending on the grant type, the Client ID, Client Secret, JSON Web token, username, and/or password specified in the Authorization will be automatically populated.
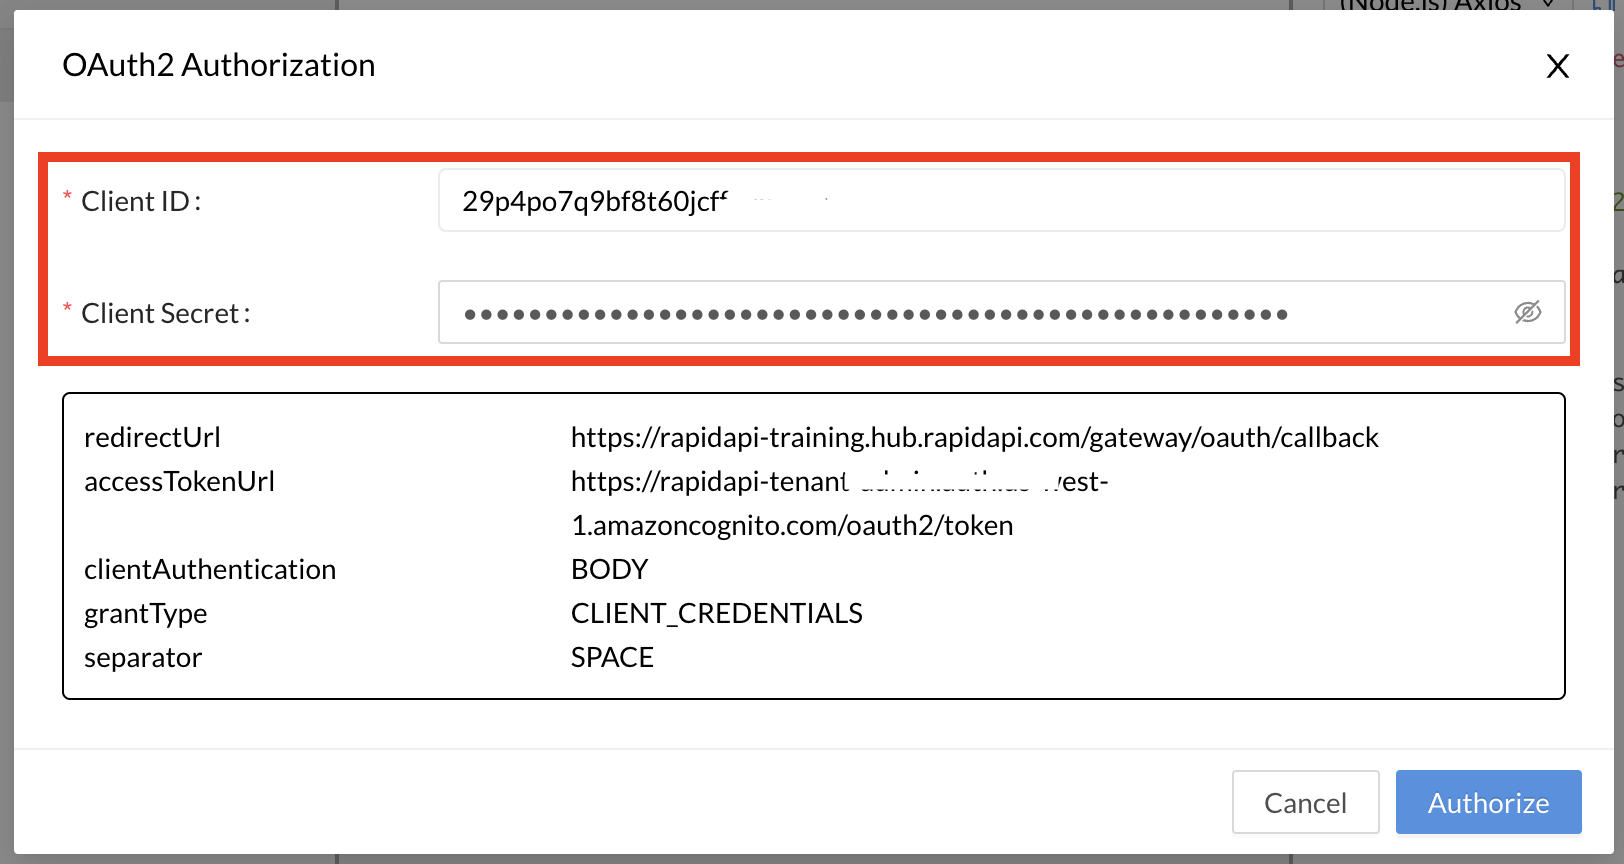
Automatically populated Client ID and Client secret using an Authorization.
Click Authorize and a valid token will be populated in the Authorization header.
Click Test Endpoint to call the API using your valid token in the Authorization header.
- If your Authorization is for an API protected by
Header:- The value of your authentication header should be populated for you. You can test your endpoints without having to manually populate this value.
- If your Authorization is for an API protected by
Basic Auth:- The value of your username and password will be automatically be populated for you. You can test your endpoints without needing to populate these values.
Updated 8 months ago