
Extensions
Add custom capabilities to the API Hub by adding tabs to an API.
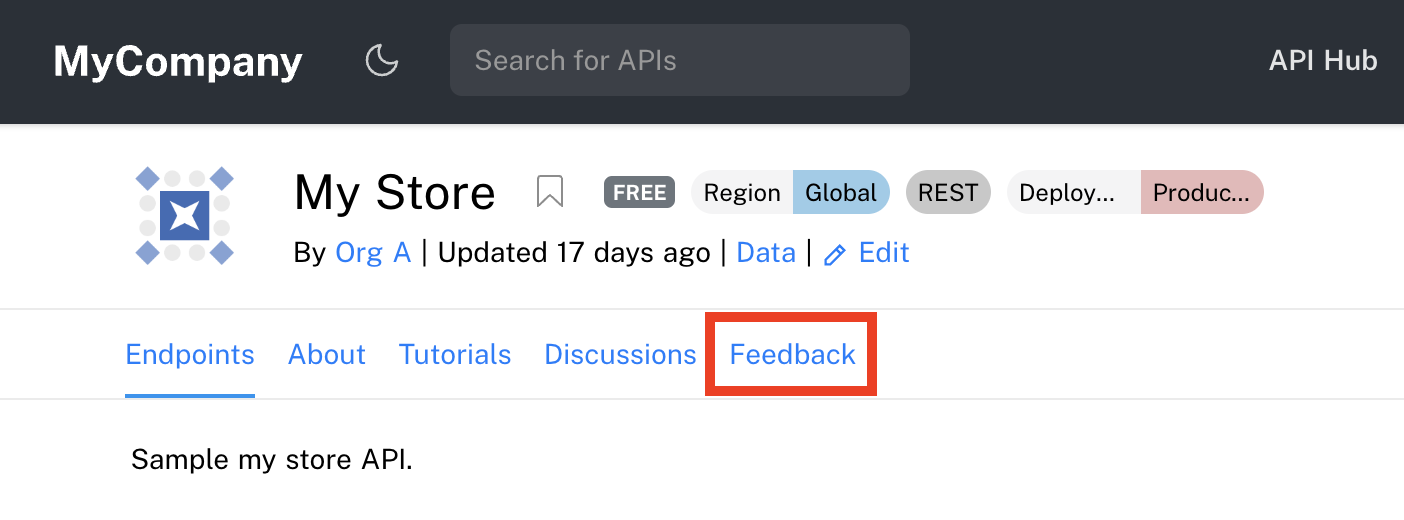
Extensions enable environment admins to add custom tabs when displaying an API's details in the API Hub. For example, in the screenshot below you can see the Feedback extension/tab.
Clicking on an extension's tab displays an HTML page in an iFrame. That HTML page can be hosted by you or can be uploaded to Rapid's infrastructure. That page can contain any visual elements that you would like. It can call the current API's endpoints, the Platform API's endpoints, or any other API's endpoints. This allows your enterprise to add functionality to your Hub, such as:
- Add a "Settings" tab for a particular API, allowing you to build a friendly user interface that API consumers can use when configuring or using an API.
- Provide an interactive demo of the API. For example, a facial recognition API can be tested by allowing the developer to drag a picture to the extension's page.
- Add an "SDK" or similar tab for an API so that API consumers can download documents (for example, Microsoft Word documents) related to the API. (This functionality can also be achieved, with Rapid hosting the documents, using Assets).
- Display a dashboard related to an API, displaying information not normally shown on the API Hub, such as monitoring information, open Jira issues related to the API, etc.
- Add a user interface used by administrators of the Hub to manage their Hub in a custom way. For example, an extension that calls the Platform API can be used to visually assign multiple APIs to a new category.
The extensions mechanism is simple yet powerful, because you can host any user interface and call any API from your custom page. This allows you to effectively "add your own features" to the API Hub.
An extension can be shown for all APIs in the Hub or can be limited to a single API. You can have multiple extensions (tabs) for each API.
Adding an extension
-
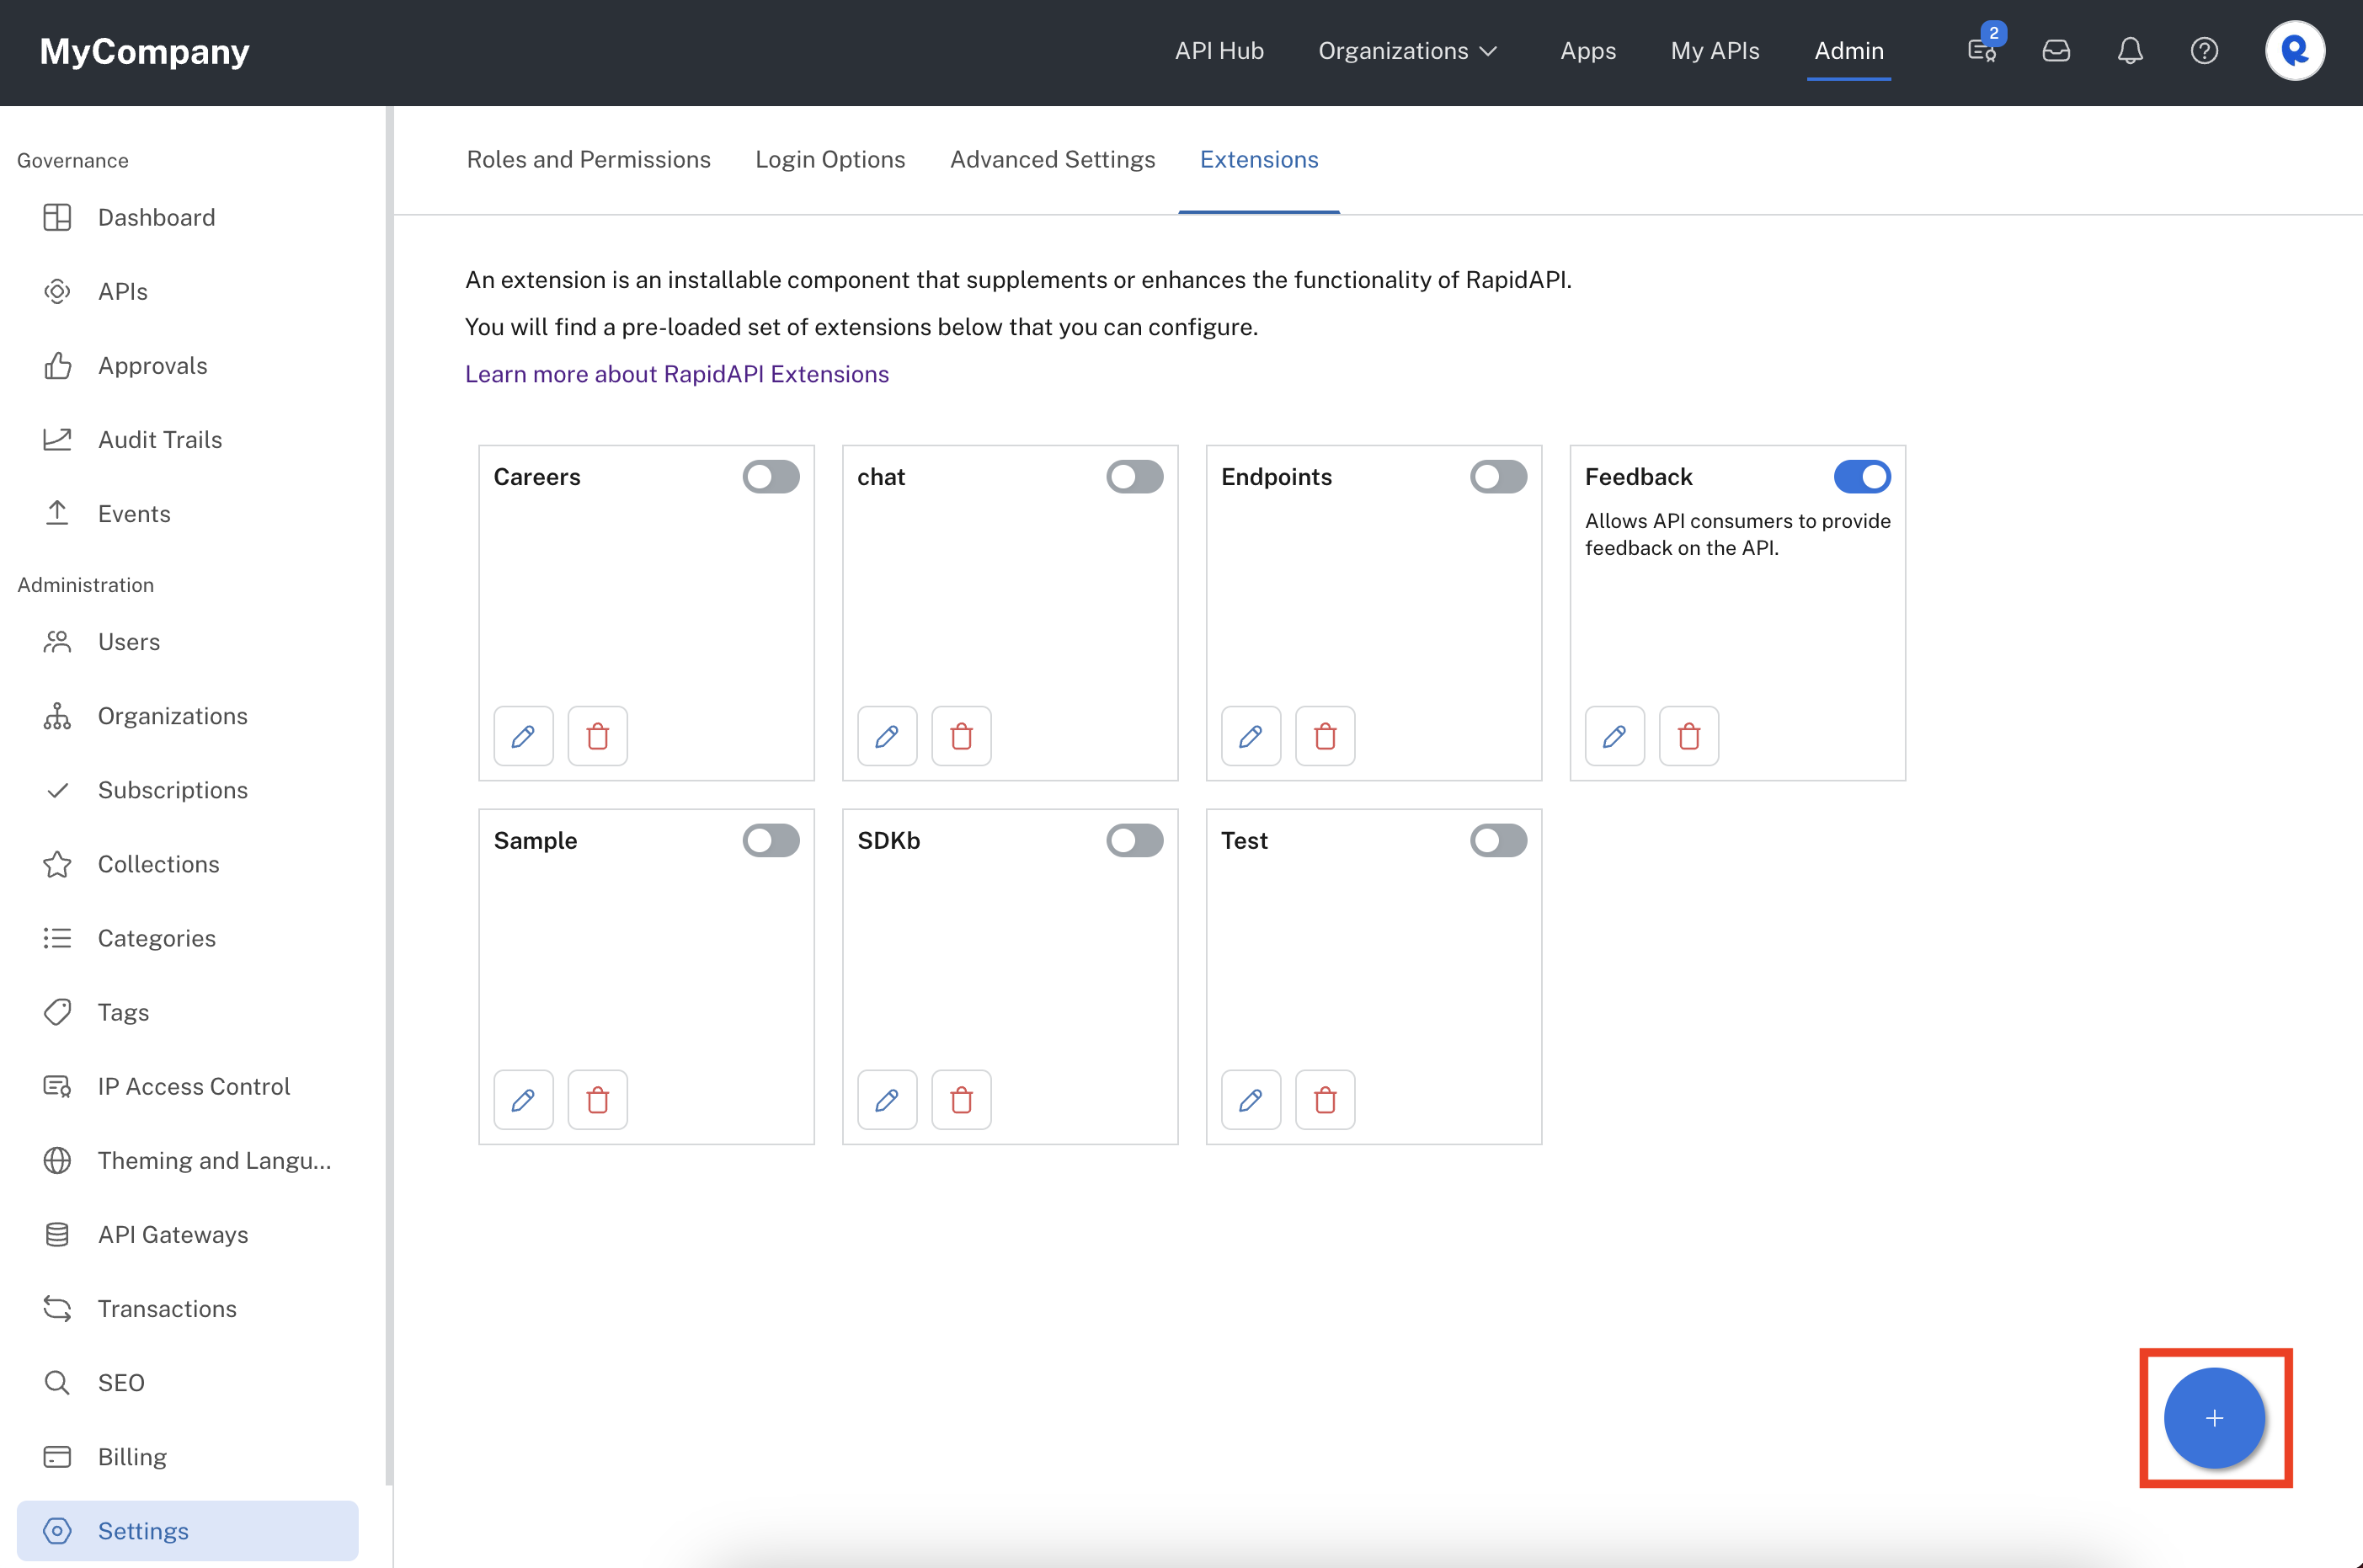
From the Admin Panel, click Settings in the sidebar, then select the Extensions tab.
-
Click the ➕ Add Extension icon in the lower-right corner to open the Add Extension dialog.
Adding an extension.
-
Choose how you’d like to provide your extension:
• Link to extension: Enter the public URL where your index.html is hosted.
• Upload extension: Upload a .zip bundle that includes your index.html and any supporting files.Archive.zip/ ├── styles.css # Stylesheet for the project ├── script.js # JavaScript file for interactivity or logic ├── index.html # Main HTML file (entry point) └── Rapid_Logo_Primary.png # Icon or branding imageTip: Ensure that index.html is in the root of the ZIP (not in a subfolder).
Bundling files into extensionsYou can include files of any type in your ZIP bundle and link to them in your index.html. API consumers can then download these files directly from your extension.
For example, you can provide a downloadable SDK: Download the SDK`. (This functionality can also be achieved using Assets.
- In Extension name, enter a unique name for your extension.
This name appears under Extensions in the Admin Panel and is used in the URL when displaying your custom extension/tab. - Enter a Description (optional) to provide more context about the extension for other admins in your environment.
- Under Tab label, enter the name of the tab that will be shown to API consumers.

Adding an extension using the Add extension dialog.
- Select how and where this extension should appear:
• Global extension – The extension will appear as a tab on every API in your Hub.
• Specific page – The extension will appear only for a single API.
If you choose Specific page, paste a portion of the API Hub URL that identifies the API, using this format:
{owner_name}/api/{api_slugified} - To make your extension visible only to logged-in users, toggle Visible only to logged in users.
- Click Save to create your new extension.
You’ll now see it listed under Extensions, where you can edit, disable, or remove it at any time.

Viewing an extension in the Admin Panel.
Using an extension
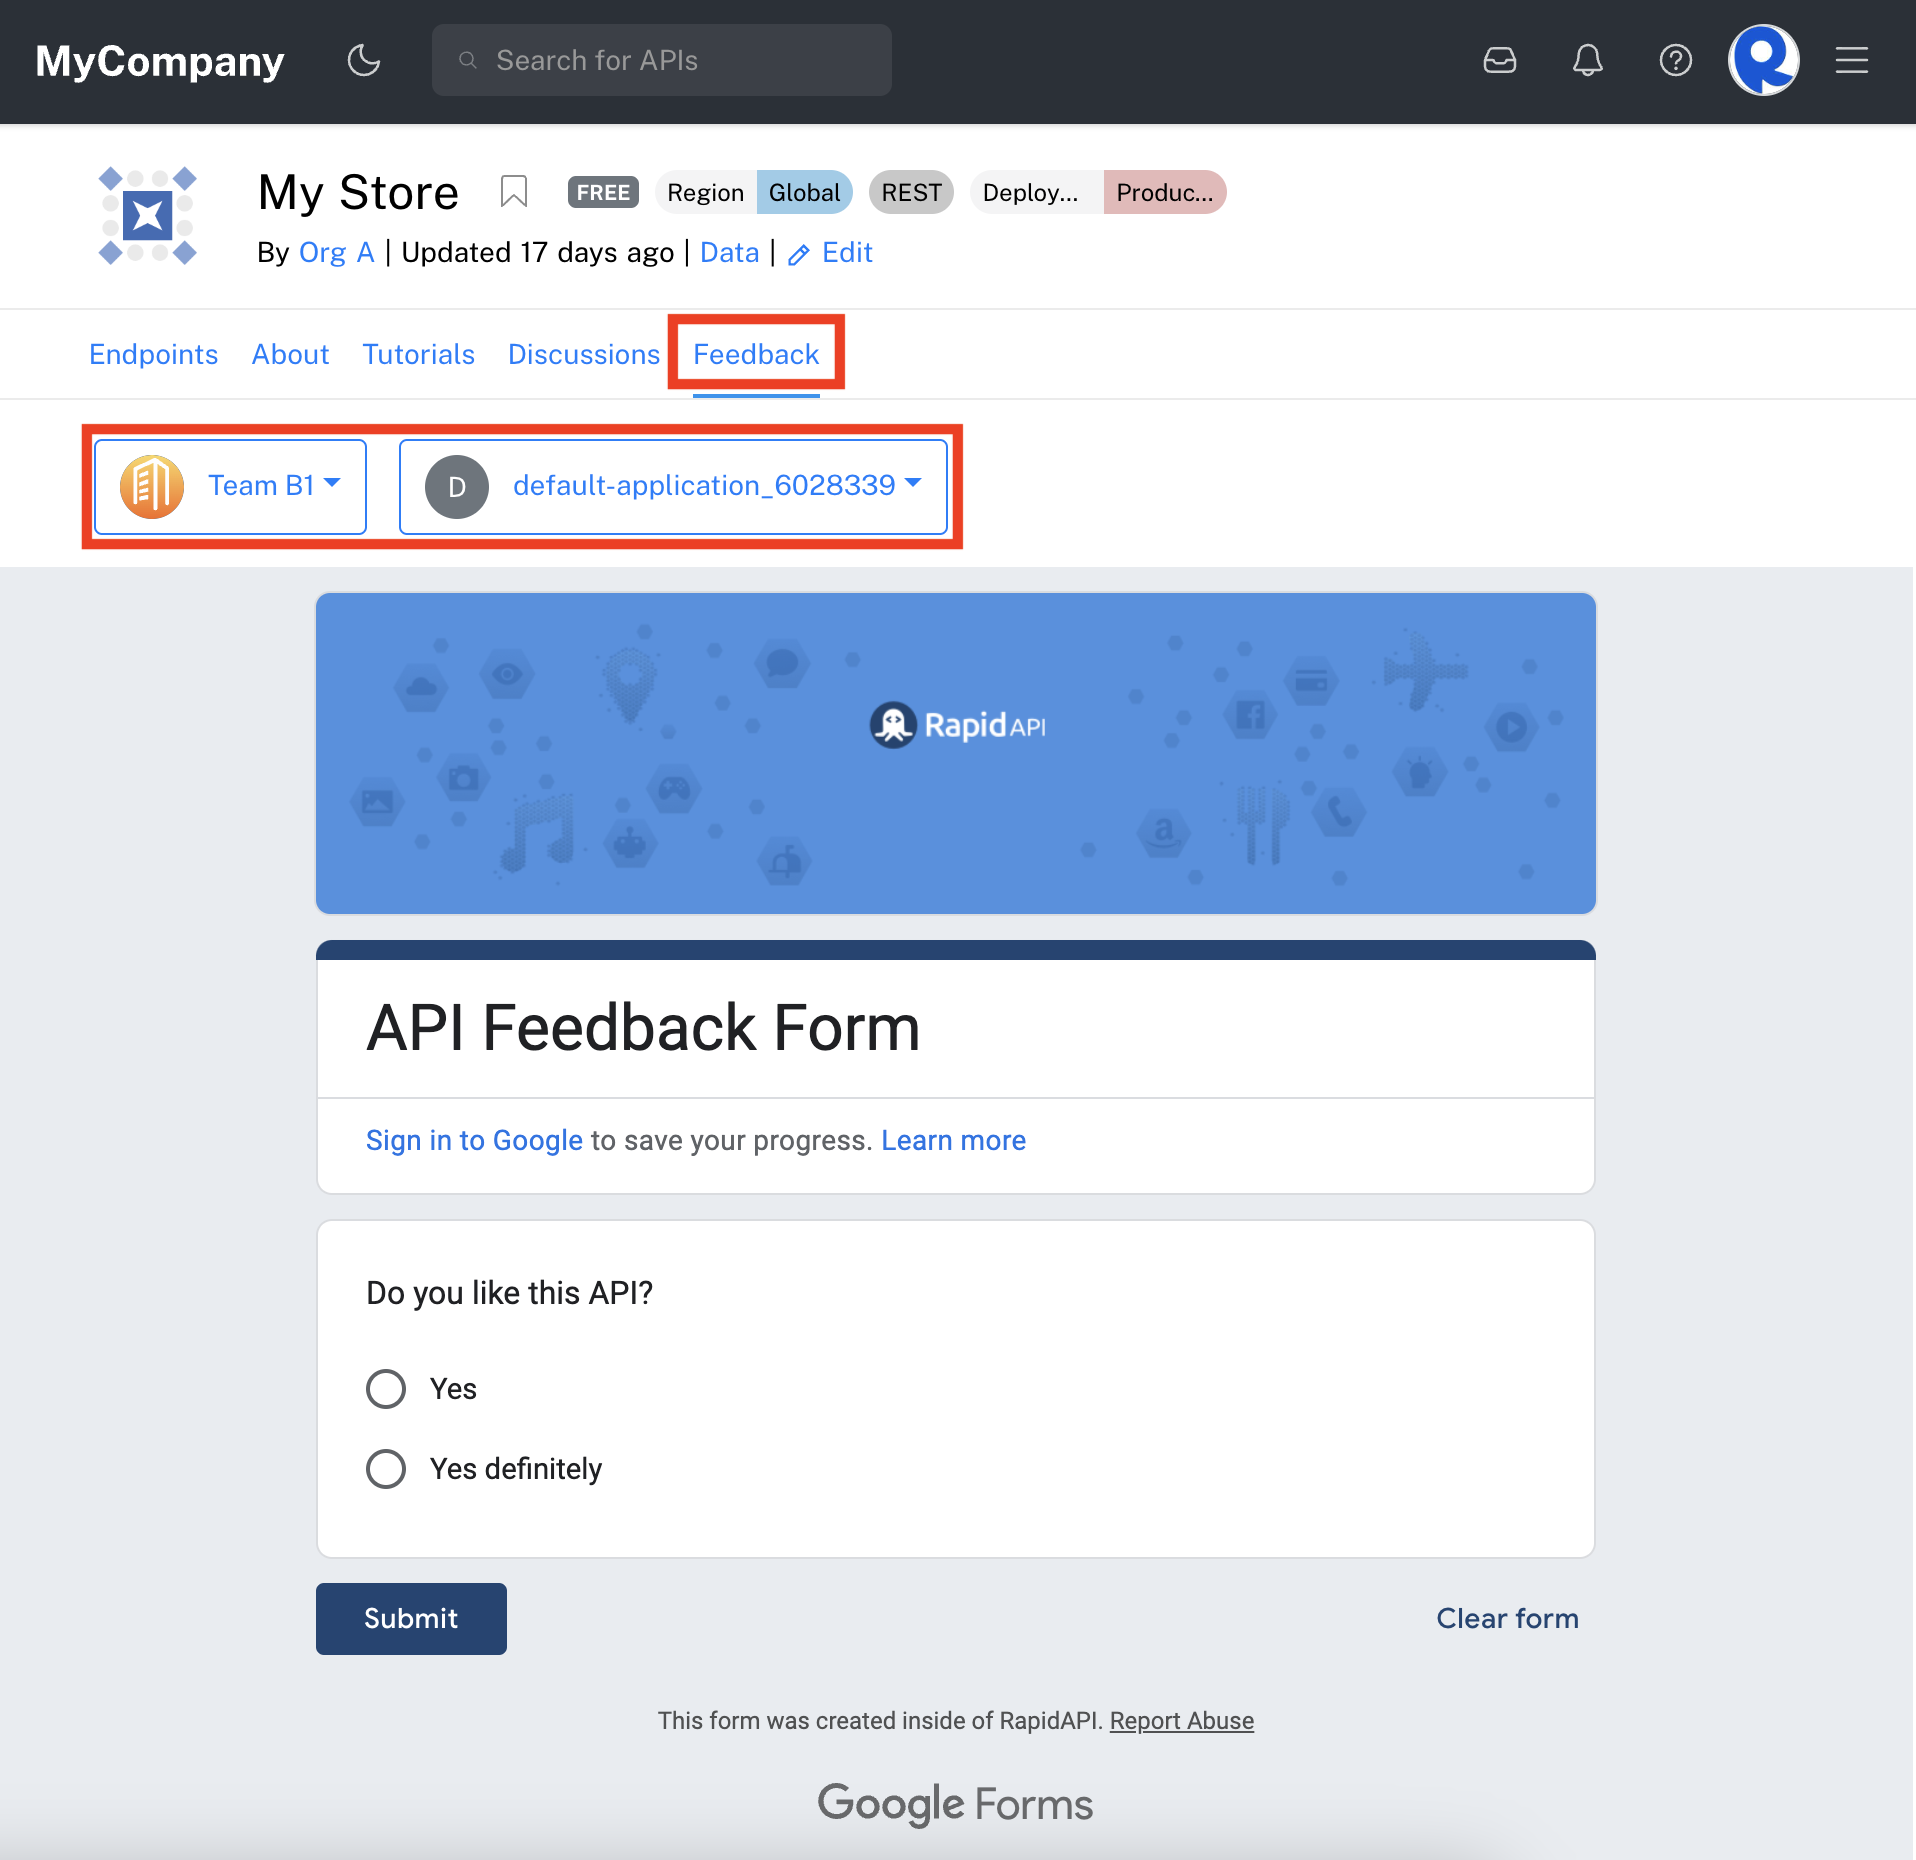
Once you have added an extension to your Hub, API consumers will see the new tab when viewing any API (for global extensions) or the specific API (for specific pages). In the example below, the tab is named "Feedback". When an API consumer clicks on the tab, they will see two dropdown boxes. These allow the API consumer to select the correct context and app when viewing/using the extension. These dropdown elements are part of the main Rapid page - the iFrame with custom content begins just below them.
The context dropdown (on the left below) allows API consumers to select which team or personal context they want to use if the extension makes API calls to the API's endpoints.
The app dropdown (on the right below) specifies which app is used for the API calls. Apps are created and used as part of the Developer Dashboard (Apps) and have one or more keys or Authorizations associated with them. If a team or user has only one app associated with it, the dropdown will contain only a single item.
Note: If the API consumer has selected values for the context and app dropdowns on the Endpoints tab (see screenshot below), those values will also be selected on the extension's tab.
These dropdown elements are mainly used to ensure that the correct API key is used for any API calls. The logged in userId and apiKey (as well as the apiId) are passed as query string parameters to the extension's iFrame. The extension can then use the apiKey to make calls to the associated API (more information on this below).
The API consumer view of an extension.
Creating an extension
When an API consumer clicks on a tab associated with an extension, the Hub loads your custom HTML page inside an iframe.
That iframe contains your own user interface and optional logic for interacting with the API being viewed.
To help your extension understand the current context, Rapid automatically appends a few query string parameters to the iframe URL:
userId - The Rapid user id for the currently logged-in user.
apiId - The unique ID for the API currently being viewed in the API Hub.
apiKey - A comma-separated list of API keys for the selected context and app. If multiple keys exist, they are returned in order. Changing the context or app updates this value.
Reading query parameters in your extension
You can easily extract these values in your JavaScript code using the URLSearchParams API.
For example:
// Read the query string parameters passed from Rapid
const params = new URLSearchParams(window.location.search);

const userId = params.get("userId");
const apiId = params.get("apiId");
const apiKey = params.get("apiKey")?.split(",")[0]; // use the first API key if multiple exist

console.log("userId =", userId);
console.log("apiId =", apiId);
console.log("apiKey =", apiKey);
Using the parameters in your extension UI
To get started, you can display these values directly in your extension’s HTML.
Below is a fully working example that reads the parameters,
<!DOCTYPE html>
<html lang="en">
  <head>
    <meta charset="utf-8" />
    <title>RapidAPI Extension</title>
    <script>
      (async () => {
        try {
          const cssRes = await fetch('./styles.css', { cache: 'no-cache' });
          const css = await cssRes.text();
          const styleTag = document.createElement('style');
          styleTag.appendChild(document.createTextNode(css));
          document.head.appendChild(styleTag);
        } catch (e) {
          console.error('CSS load failed', e);
        }

        try {
          const jsRes = await fetch('./script.js', { cache: 'no-cache' });
          const js = await jsRes.text();
          const scriptTag = document.createElement('script');
          scriptTag.appendChild(document.createTextNode(js));
          document.body.appendChild(scriptTag);
        } catch (e) {
          console.error('JS load failed', e);
        }
      })();
    </script>
  </head>

  <body>
    <div class="rapid-container">
      <header class="rapid-header">
        <img src="Rapid_Logo_Primary.png" alt="Rapid Logo" class="rapid-logo" />
        <h1>Welcome to Rapid Extension</h1>
        <p id="paragraph">Enhance your workflow with a clean, powerful extension experience.</p>
      </header>

      <section class="rapid-info">
        <h2>Connection Details</h2>
        <div id="params" class="params-grid"></div>
      </section>

      <footer class="rapid-footer">
        <button id="actionBtn" class="action-btn">Run Action</button>
      </footer>
    </div>
  </body>
</html>
console.log("RapidAPI script.js loaded");
const params = new URLSearchParams(window.location.search);
const apiId = params.get("apiId");
const userId = params.get("userId");
const apiKey = params.get("apiKey");
function truncate(str, len = 24) {
if (!str) return "N/A";
return str.length > len ? str.slice(0, len) + "…" : str;
}
function createParamRow(label, value) {
const truncated = truncate(value);
const item = document.createElement("div");
item.className = "param-item";
const labelEl = document.createElement("div");
labelEl.className = "param-label";
labelEl.textContent = label;
const valueEl = document.createElement("div");
valueEl.className = "param-value";
valueEl.textContent = truncated;
valueEl.title = value || "N/A";
const copyBtn = document.createElement("button");
copyBtn.className = "copy-btn";
copyBtn.textContent = "Copy";
copyBtn.addEventListener("click", () => {
navigator.clipboard.writeText(value || "N/A");
copyBtn.textContent = "Copied!";
copyBtn.style.background = "#43a047";
setTimeout(() => {
copyBtn.textContent = "Copy";
copyBtn.style.background = "var(--rapid-blue)";
}, 1200);
});
const controls = document.createElement("div");
controls.className = "param-controls";
controls.appendChild(copyBtn);
item.appendChild(labelEl);
item.appendChild(valueEl);
item.appendChild(controls);
return item;
}
const paramsContainer = document.getElementById("params");
paramsContainer.appendChild(createParamRow("apiId", apiId));
paramsContainer.appendChild(createParamRow("userId", userId));
paramsContainer.appendChild(createParamRow("apiKey", apiKey));
document.getElementById("paragraph").textContent += " (CSS & JS loaded)";
document.getElementById("actionBtn").addEventListener("click", () => {
alert("RapidAPI Action triggered!");
});:root {
--rapid-blue: #007fff;
--rapid-dark-blue: #0052cc;
--rapid-bg: #f5f9ff;
--rapid-light: #e6f0ff;
--rapid-text: #1c2c44;
--rapid-muted: #5b6e8b;
--radius: 12px;
--shadow: 0 6px 28px rgba(0, 82, 204, 0.1);
--transition: all 0.3s ease;
}
body {
font-family: 'Inter', system-ui, -apple-system, sans-serif;
background: var(--rapid-bg);
color: var(--rapid-text);
display: flex;
align-items: center;
justify-content: center;
height: 100vh;
margin: 0;
}
/* === CARD CONTAINER === */
.rapid-container {
background: #ffffff;
border-radius: 20px;
box-shadow: var(--shadow);
padding: 50px 60px;
max-width: 750px;
width: 90%;
transition: var(--transition);
}
.rapid-container:hover {
transform: translateY(-3px);
box-shadow: 0 8px 35px rgba(0, 82, 204, 0.15);
}
/* === HEADER === */
.rapid-header {
text-align: center;
margin-bottom: 40px;
}
.rapid-logo {
width: 160px;
height: auto;
margin-bottom: 20px;
}
h1 {
font-size: 28px;
color: var(--rapid-dark-blue);
margin-bottom: 10px;
}
#paragraph {
color: var(--rapid-muted);
font-size: 17px;
line-height: 1.5;
}
/* === PARAM BOXES === */
.rapid-info {
margin-bottom: 40px;
}
.rapid-info h2 {
font-size: 20px;
color: var(--rapid-dark-blue);
margin-bottom: 15px;
border-left: 4px solid var(--rapid-blue);
padding-left: 10px;
}
.params-grid {
display: grid;
gap: 16px;
}
.param-item {
background: var(--rapid-light);
border: 1px solid #d6e4ff;
border-radius: var(--radius);
padding: 14px 16px;
display: flex;
justify-content: space-between;
align-items: center;
font-family: 'JetBrains Mono', monospace;
font-size: 14px;
color: #24364b;
}
.param-label {
font-weight: 600;
color: var(--rapid-dark-blue);
margin-right: 10px;
}
.param-value {
flex: 1;
text-align: left;
overflow: hidden;
text-overflow: ellipsis;
white-space: nowrap;
}
.param-controls {
display: flex;
align-items: center;
}
.copy-btn {
background: var(--rapid-blue);
color: white;
border: none;
padding: 6px 10px;
border-radius: 6px;
font-size: 13px;
cursor: pointer;
transition: var(--transition);
margin-left: 8px;
}
.copy-btn:hover {
background: var(--rapid-dark-blue);
}
/* === FOOTER === */
.rapid-footer {
text-align: center;
}
.action-btn {
background: var(--rapid-blue);
color: white;
border: none;
padding: 12px 30px;
font-size: 16px;
font-weight: 600;
border-radius: var(--radius);
cursor: pointer;
transition: var(--transition);
box-shadow: 0 3px 8px rgba(0, 82, 204, 0.2);
}
.action-btn:hover {
background: var(--rapid-dark-blue);
transform: translateY(-2px);
box-shadow: 0 4px 12px rgba(0, 82, 204, 0.25);
}
.action-btn:active {
transform: translateY(0);
box-shadow: 0 2px 6px rgba(0, 82, 204, 0.2);
}To get started using those values, you could display them on your extension page:

A sample extension.
Supporting dark and light mode with your extensionTo ensure that the text on your extension's page is readable, it is recommended that you set the color and background-color CSS elements for your page's
<body>HTML element.