Apigee Analytics Integration
Preview Feature - Please Use with Caution and Provide FeedbackThis feature is currently in preview and may experience issues. Please note that it is still under development and should not be relied upon for critical tasks. Any feedback you can provide will be valuable in improving this feature for future releases. Thank you for your understanding.
This guide walks you through how to integrate Apigee with your Enterprise Hub, allowing you to display usage analytics for the API(s) on Apigee in Studio and the Developer Dashboard.
By default, logs sent are anonymousThe suggested integration will send API logs from Apigee to Rapid, but will not include the APP ID (consumer) by default. This can be solved by adding consumer logic to the script. Enhancing the solution to include easier consumer integration is a part of our backlog.
Installation
There are two main parts to this installation:
- Create an API Project that does not use the Rapid Runtime and has a base URL pointing to Apigee (skip if you already have this).
- Forward access logs from Apigee to the Platform Analytics API.
Create an API Project that has a base URL pointing to Apigee
The Platform Analytics API supports using the base URL as an API identifier (instead of the Rapid API ID). However for this to work, the base URL on the API Project listing must match the one being passed in from the gateway.
As an enterprise customer, you can enable external API Gateways through the Admin Panel. For this setup to work, the base URL you add to the API must contain the entire request URL except for the resource path.
Example
Depending on your setup, your API request URL might looks something like this:
Apigee uses the following structure:
http://{org-name}-{env-name}.apigee.net/{base-path}/{resource-path}
Using the above example, that would mean that:
Base Path = "/myapi"
Resource Path = "/hello"
Given that, the only part you want to include in the base URL field on Rapid is in bold:
Your gateway code template Request URL field for APIs using Apigee should simply concatenate the Base URL and the path:
Request URL: "{{API_BASE_URL}}{{PATH}}"

Configuring a code template to be used with Apigee.
Apigee Setup
This section will walk you through how to forward logs from Apigee to the Platform Analytics API
Apigee is very flexible, and there are many different ways of achieving the same thing. For this integration, we use the Assign Message & JavaScript policies offered by Apigee.
Install the Response PostFlow Javascript Policy on the proxy
We will use a Apigee’s JavaScript policy to send logs to the Platform Analytics API. The first thing to do is create a new JavaScript Resource. The code we will upload will execute with each API call, transform the metadata into the right format for the Platform Analytics API, and call the API.
- On Apigee, open a proxy on the develop tab.
- Select + on the resources section.
- On the 'Add resource' pane, select the 'Javascript' resource type.
- For 'Source' select 'Import file' and upload the JavaScript file provided here.
- Name your resource (we recommend "ForwardLogsToRapidAPI.js").
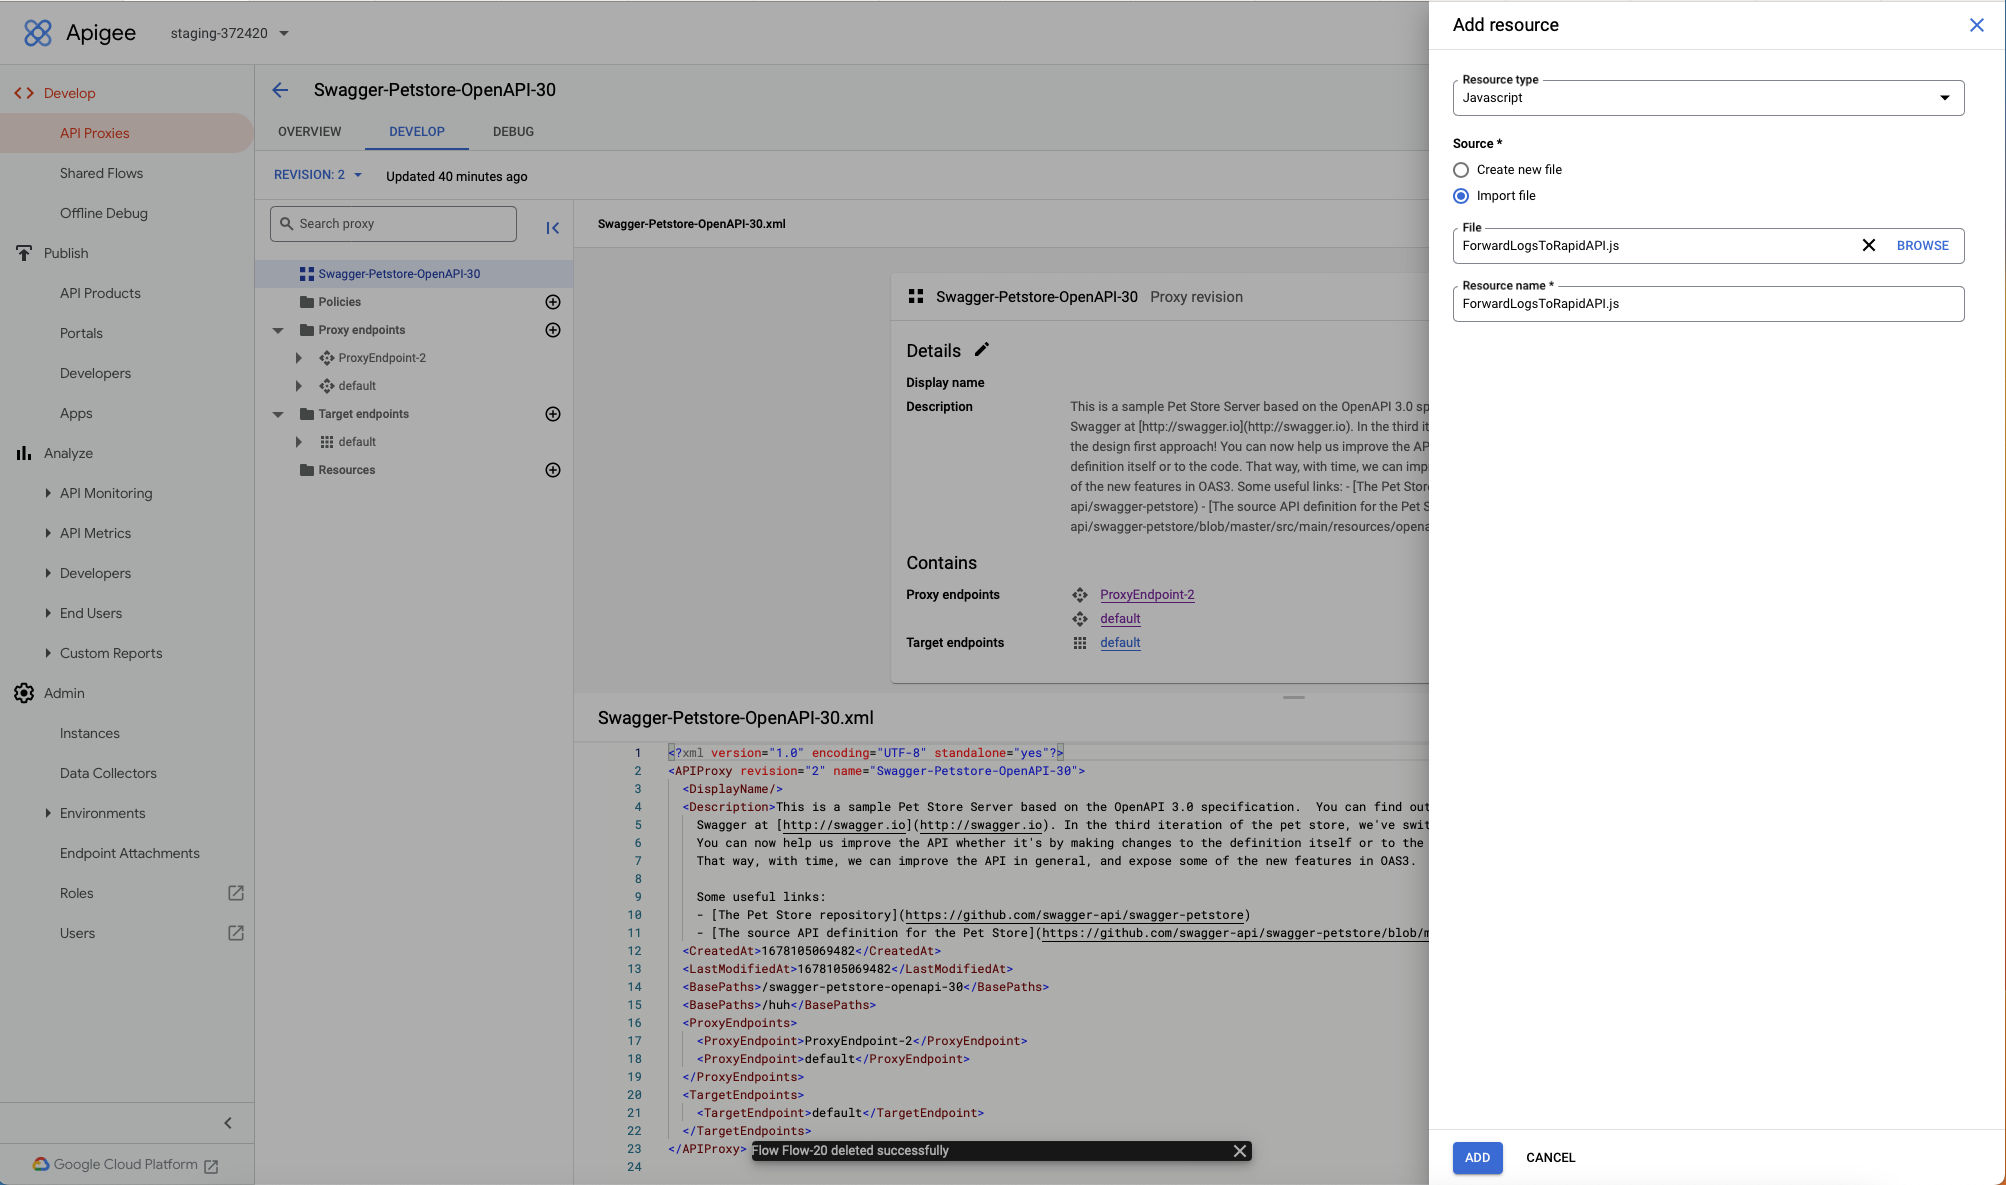
Configuring a JavaScript Resource in Apigee.
The next step is to create the actual JavaScript Policy.
- Click the + on the Policies section.
- Select "Javascript" under the "Select policy type" dropdown.
- Add a name and display name for your policy. (we use "JS-ForwardLogsToRapidAPI" in our example)
- Click "Create".
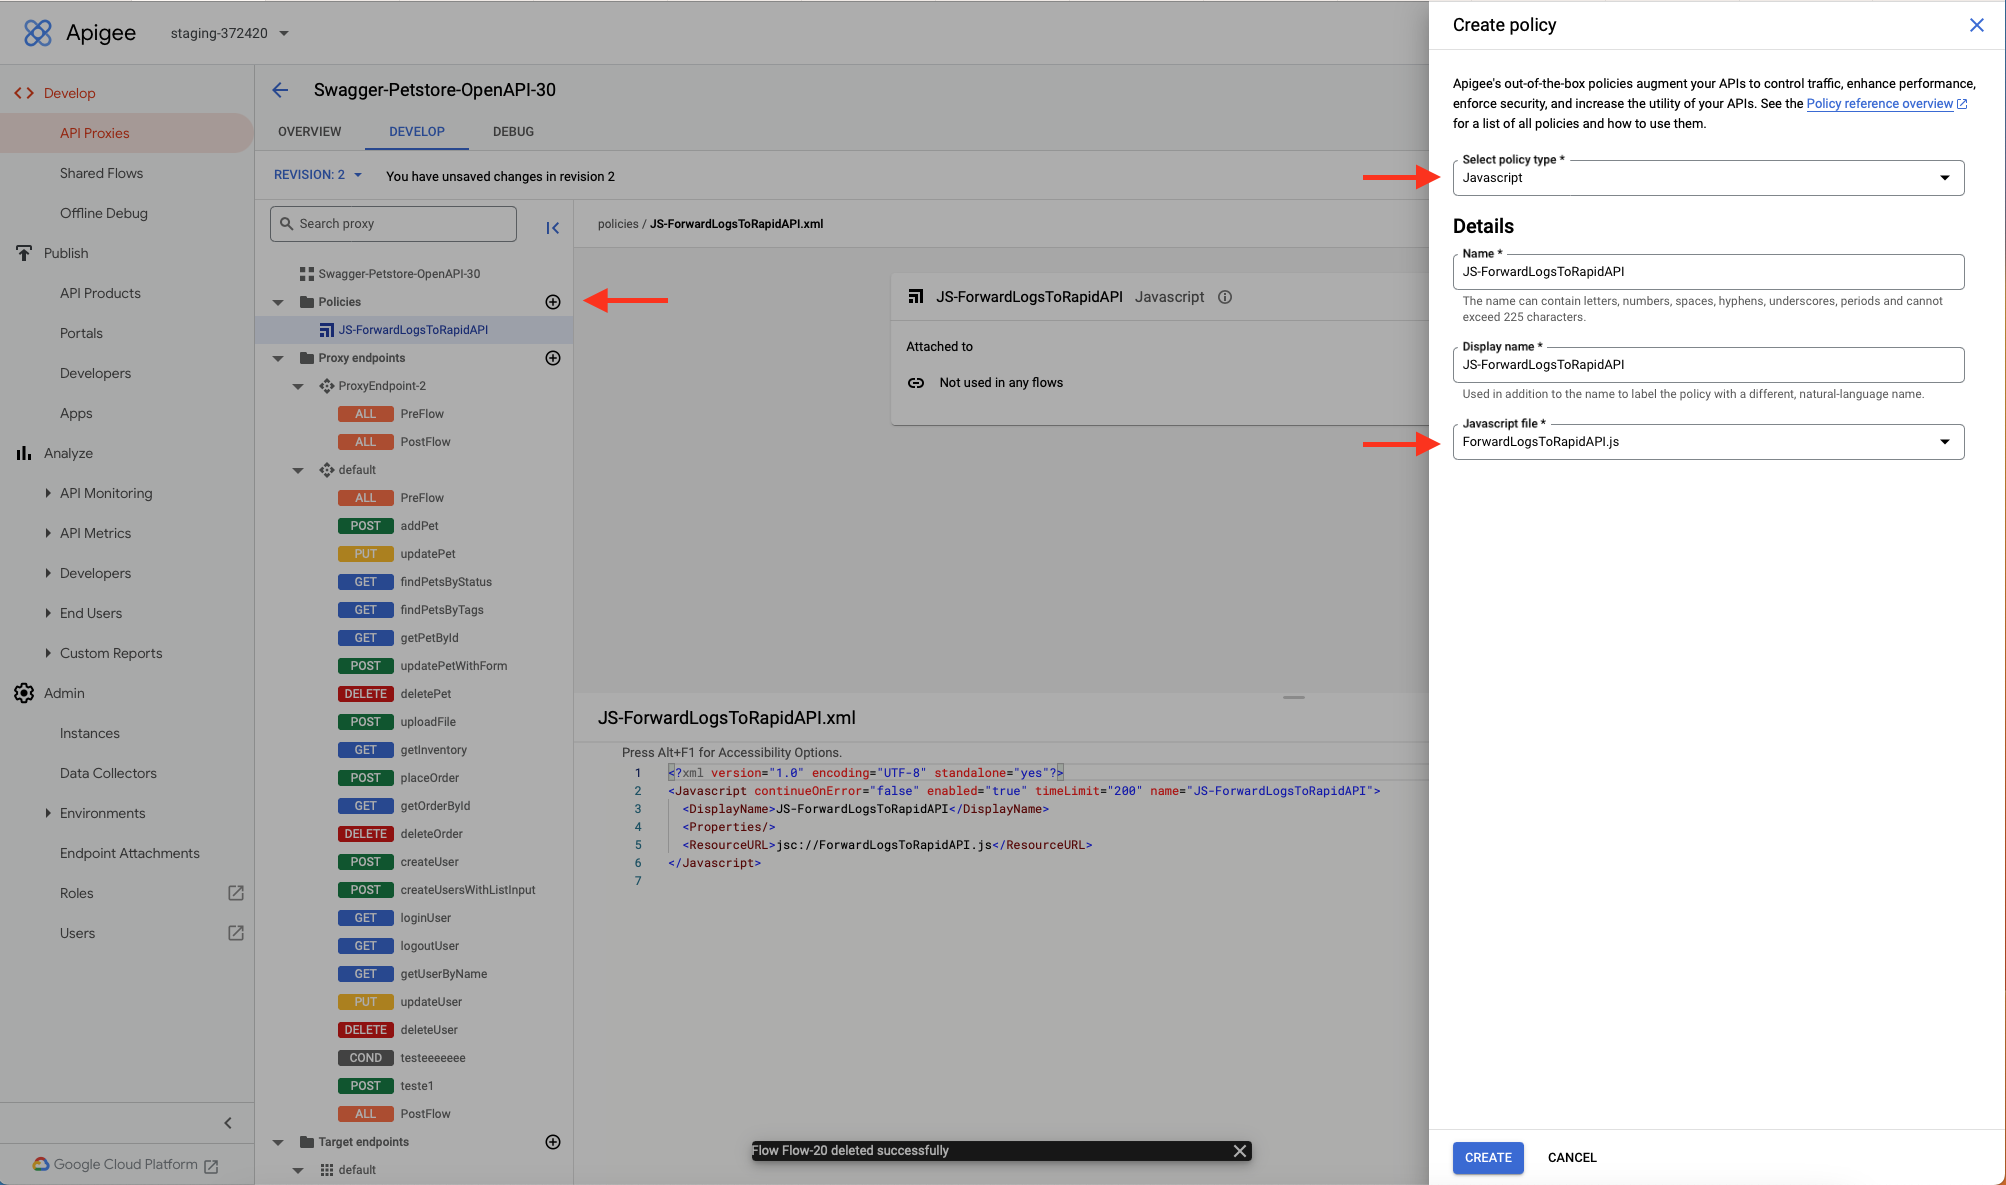
Creating the JavaScript Policy in Apigee.
Tip: Create a reusable environment resourceWhen using the Apigee UI, the resource file created is associated with the API proxy revision. It is possible to programmatically create an environment resource which can then be re-used across all your APIs and revisions.
1. Upload the env file: here is an example of how to do that using Shell:
curl --request POST
--url 'https://apigee.googleapis.com/v1/organizations/{YOU ORG}/environments/{YOUR ENV}/resourcefiles?name=ForwardLogsToRapidAPI.js&type=jsc'
--header 'Authorization: Bearer {GENERATE TOKEN FROM GOOGLE SHELL}'
--header 'Content-type: application/octet-stream'
--header 'X-Goog-User-Project: {YOUR ENV}'
--data '{COPY PASTE THE CONTENTS OF THE JS FILE HERE}
2. Update the name of the ResourceURL in the Apigee Policy XML\
Great! You now have a Javascript policy that executes your newly uploaded Javascript code. In the next step, we will configure your proxy to execute this code. The reason we use the Response PostFlow as the context is that it contains critical information we need like the Latency and Response Code.
- Select your endpoint under the Proxy endpoints section.
- Click the + on the Response PostFlow 'All' object. (If you want to forward logs from all endpoints of the API)
- Add the JavaScript policy you created in the step above.
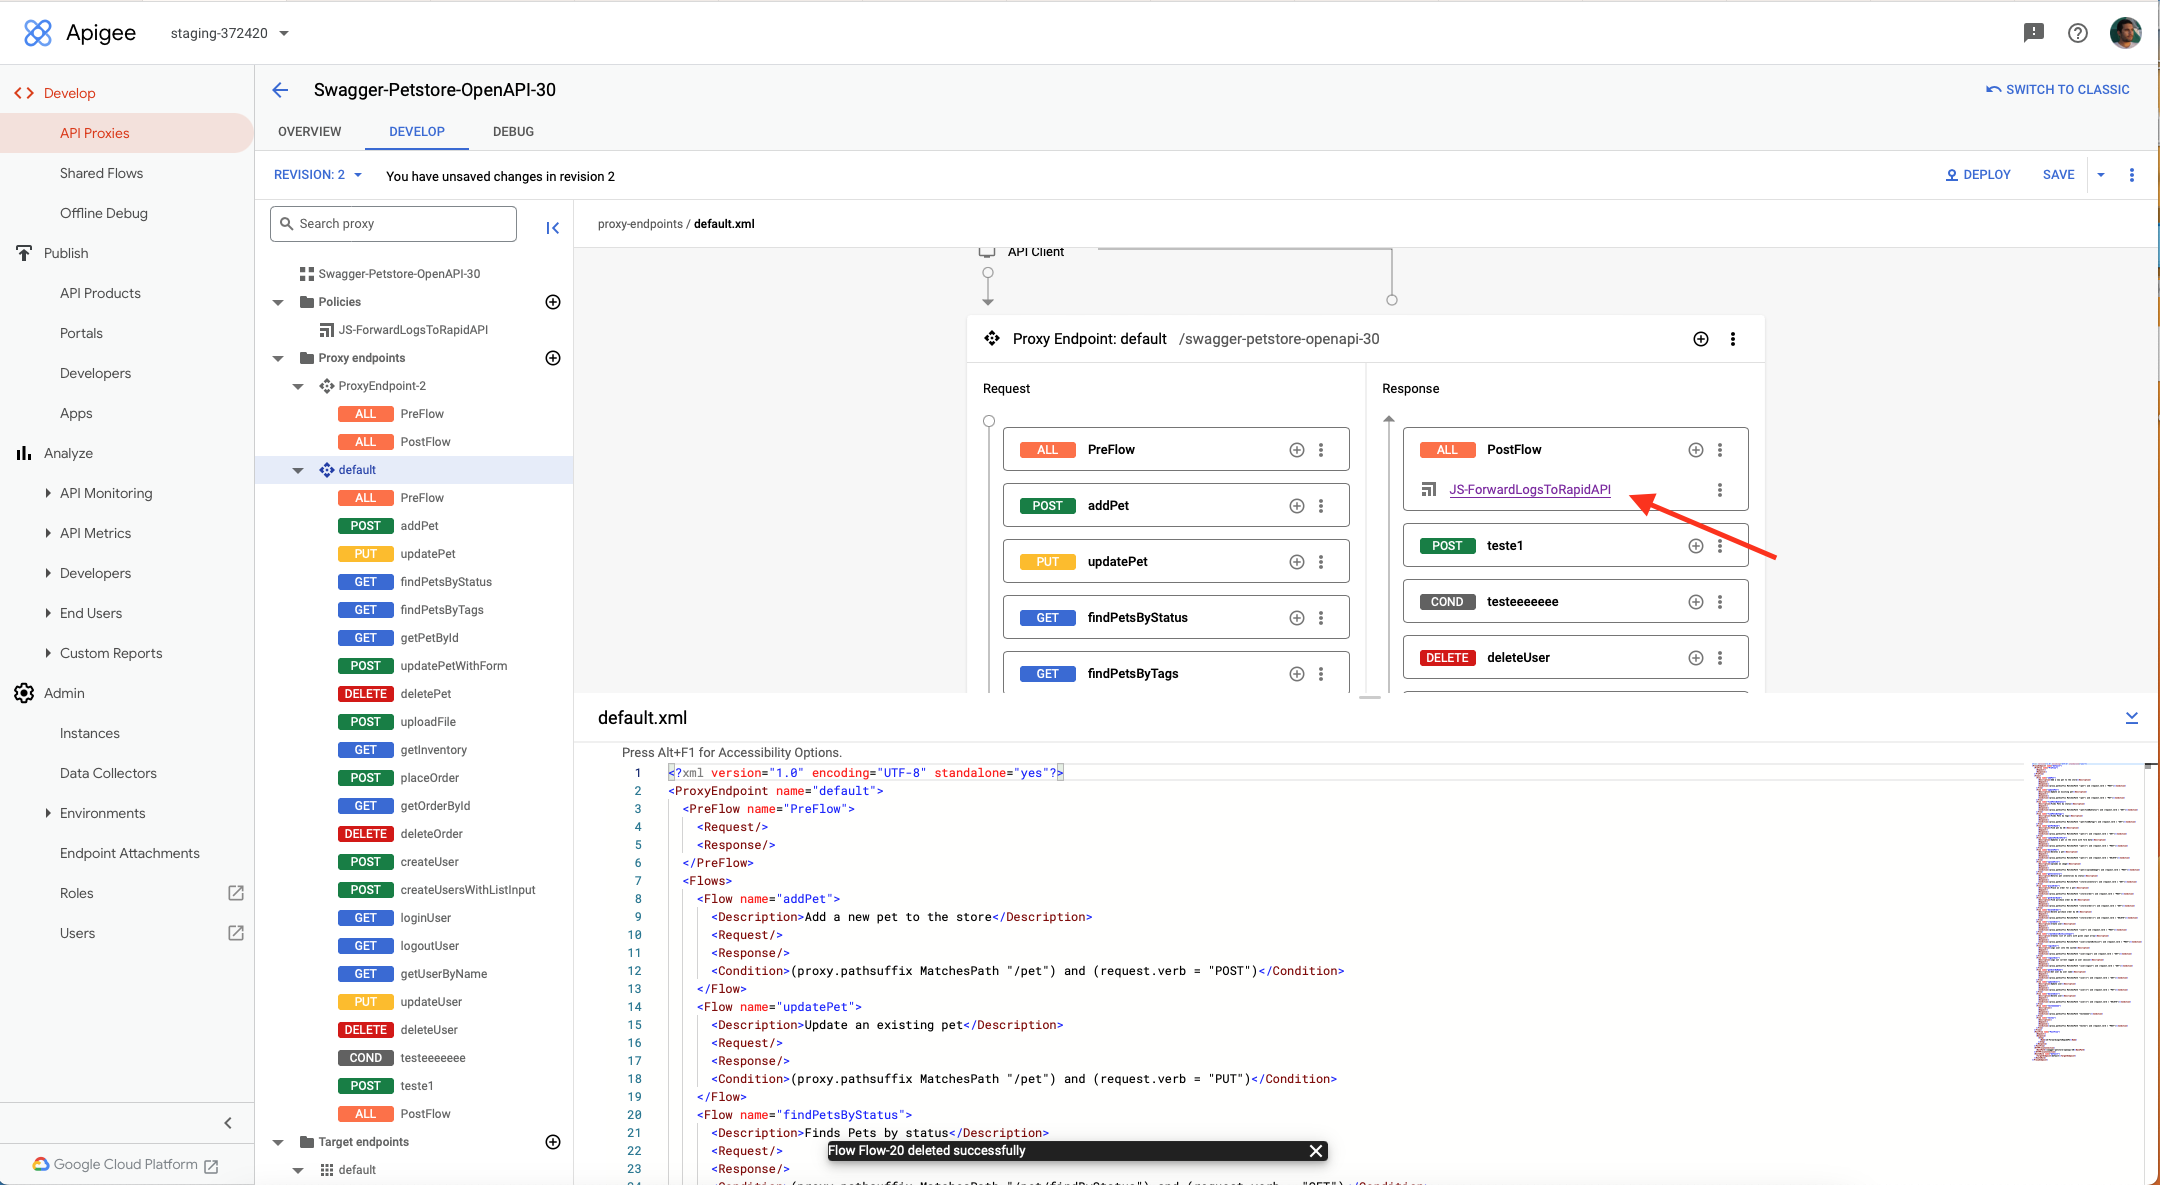
Configuring your proxy to execute the code in Apigee.
Install the Request PreFlow AssignMessage on the proxy
Almost there! If you deployed your proxy now, logs would be forwarded. However, they will miss a critical piece of information needed to process them. In order to know which API on your Enterprise Hub matches with the proxy API, we need the BaseURLs to match. However, by default Apigee's response context object is not aware of the request data. In the next step, we will use the AssignMessage policy to pass the needed context to the response, so our JavaScript policy can use that context to extract the BaseURL as well as HTTP Method used.
- Select the + on the Policies section.
- Select Assign Message in the Select policy type dropdown.
- Add a name and display name (in the example we use "AM-CopyMessage").
- Click Create.
- Click on the new Assign Message policy.
- Update the xml file in the editor with the text provided here.
- Click Save.
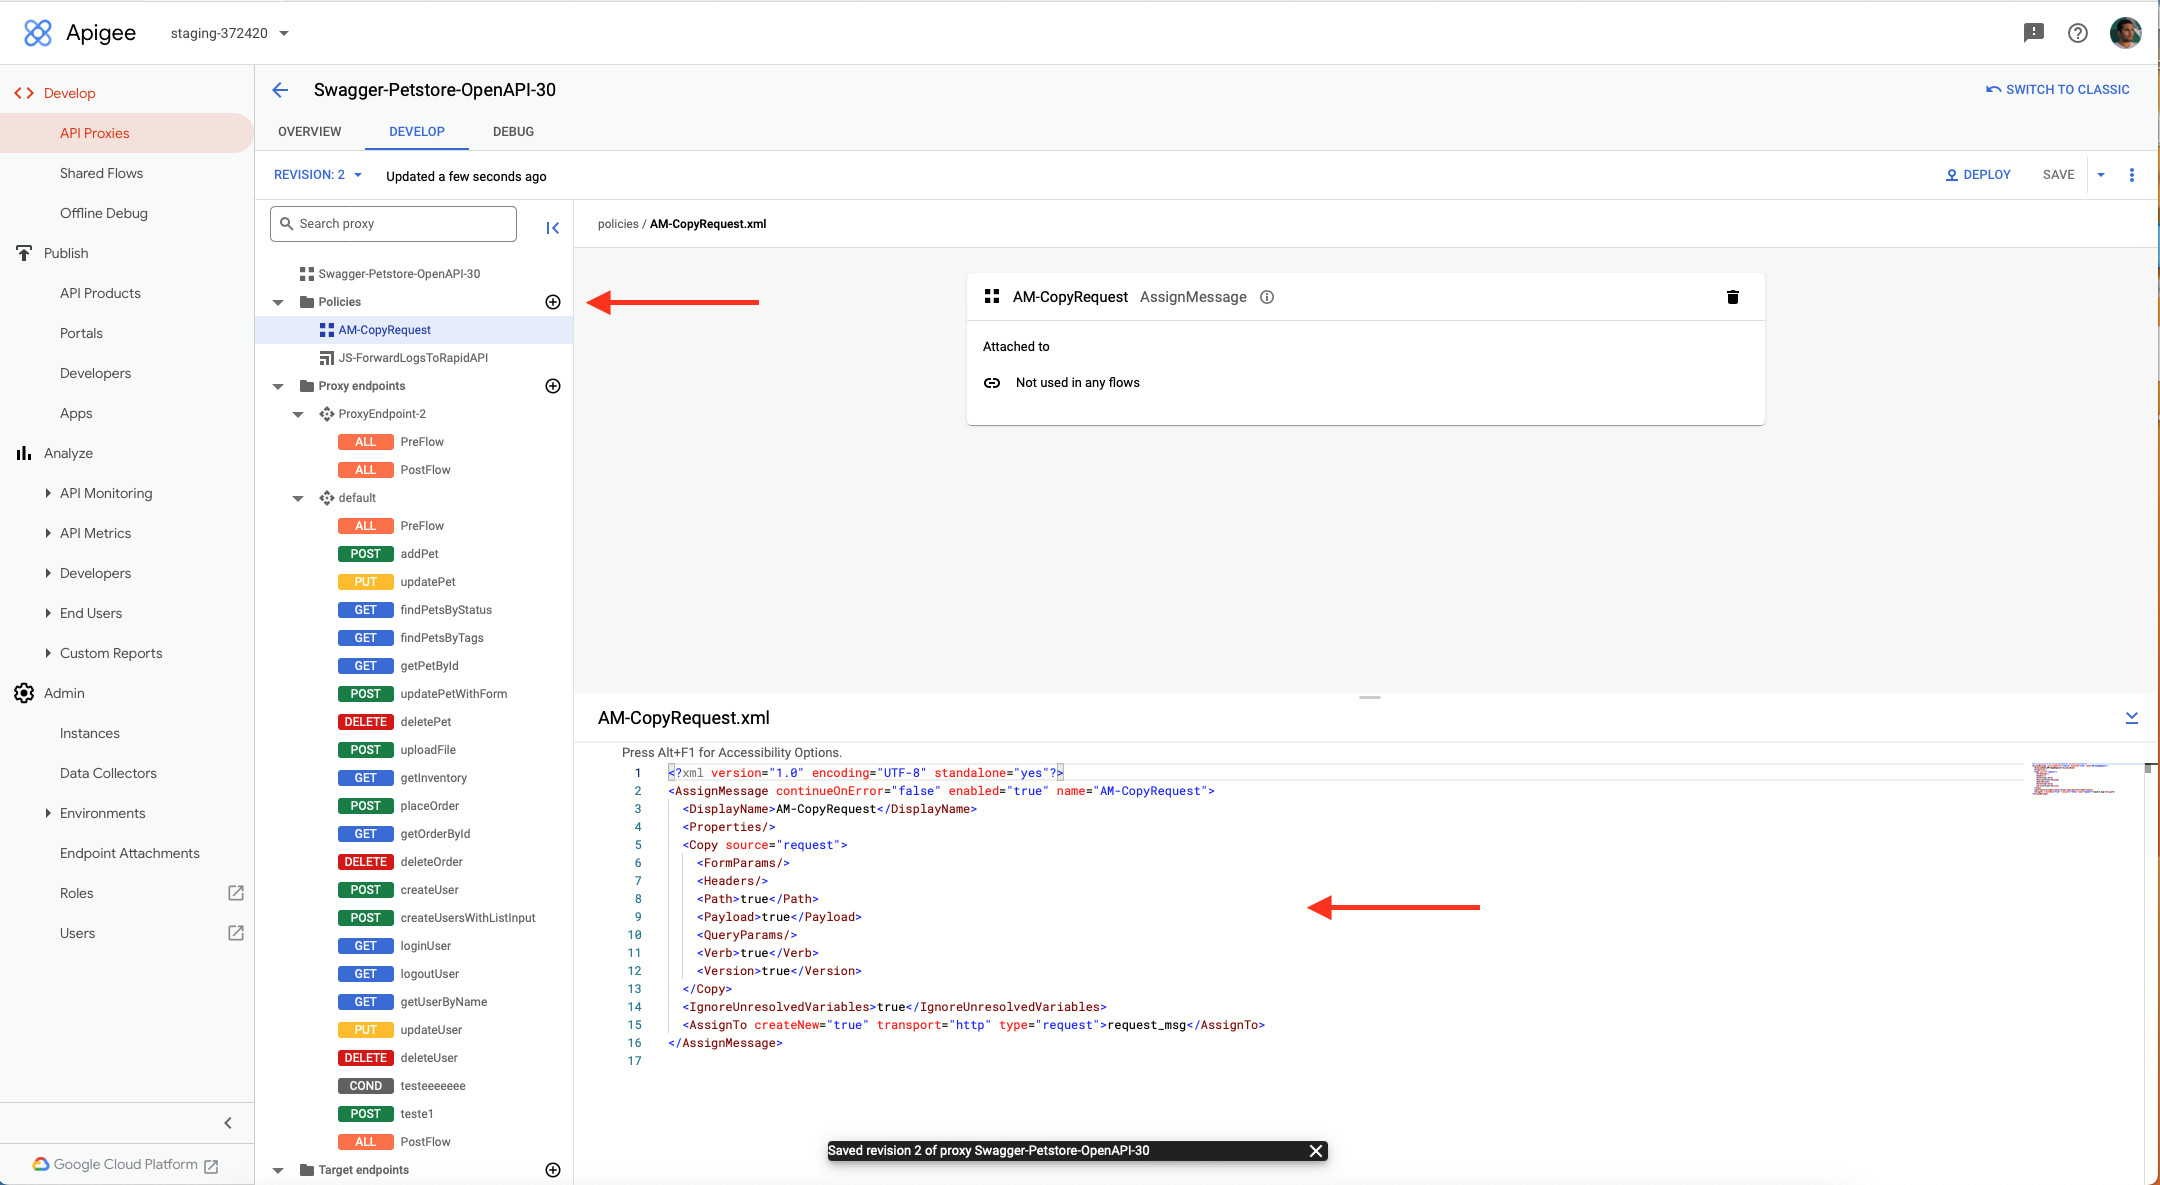
Assigning a policy in Apigee.
In the final step, we need to assign this new policy to the RequestPreFlow, so that the context it has can be used by our JavaScript policy in the Response PostFlow.
- Select your endpoint under the Proxy endpoints section.
- Click the + on the Request PreFlow 'All' object.
- Add the AssignMessage policy you created in the step above.
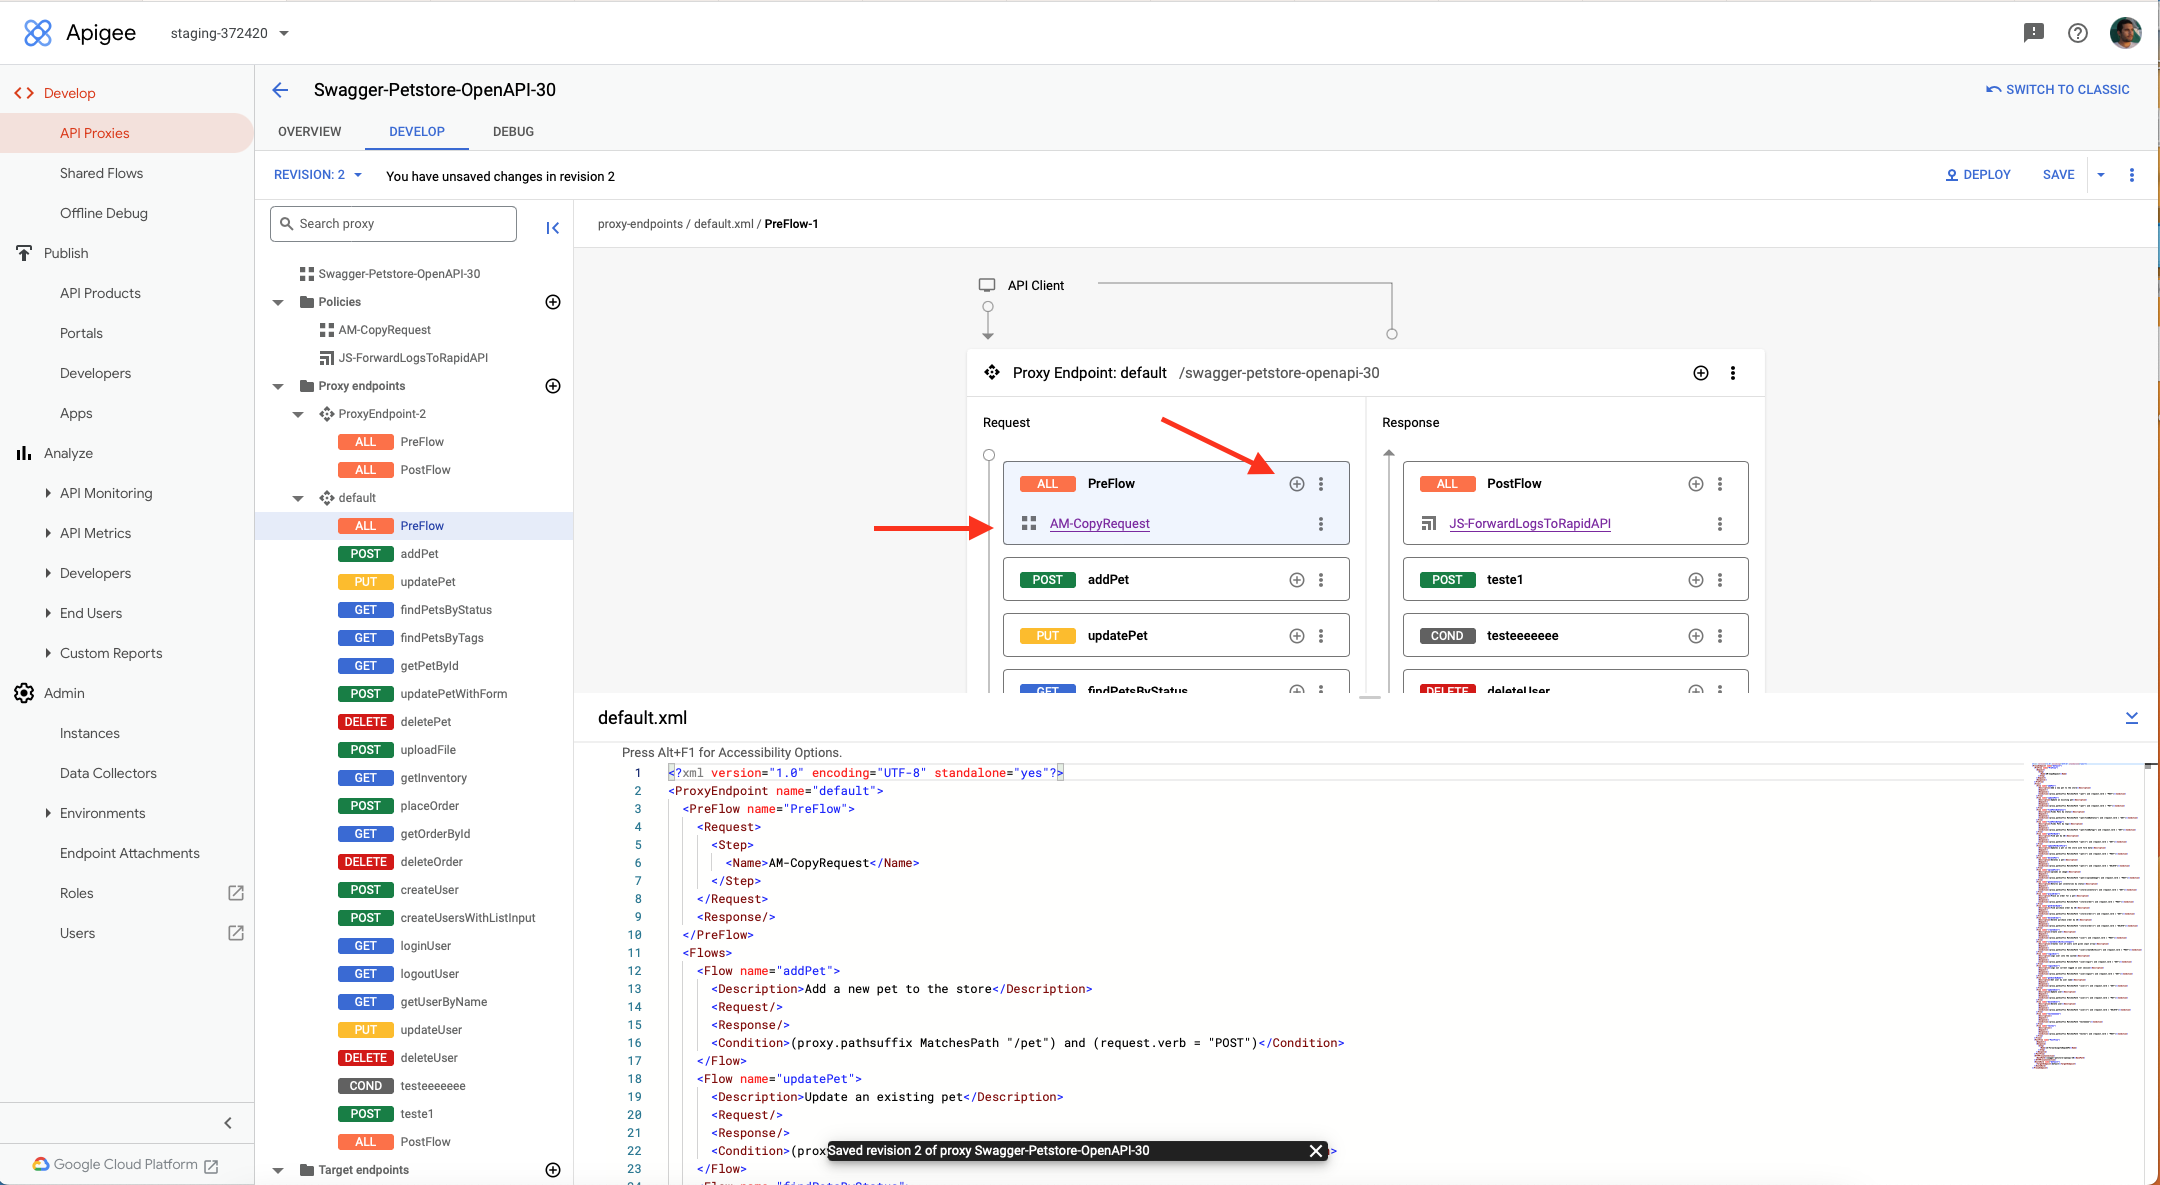
Assigning the policy in Apigee.
Add Support for Error Codes
By design, Apigee does not call the postflow steps when an error is returned from the service. In order to also send error responses to Rapid, you will need to add a small XML snippet.
- Click on the "Target endpoints" proxy (most likely default)
- Add a fault rule that calls the above configured JS policy.
<FaultRules>
    <FaultRule name="default-fault">
      <Step>
        <Name>JS-ForwardLogsToRapidAPI</Name>
        <Condition>fault.name = "ErrorResponseCode"</Condition>
      </Step>
    </FaultRule>
  </FaultRules>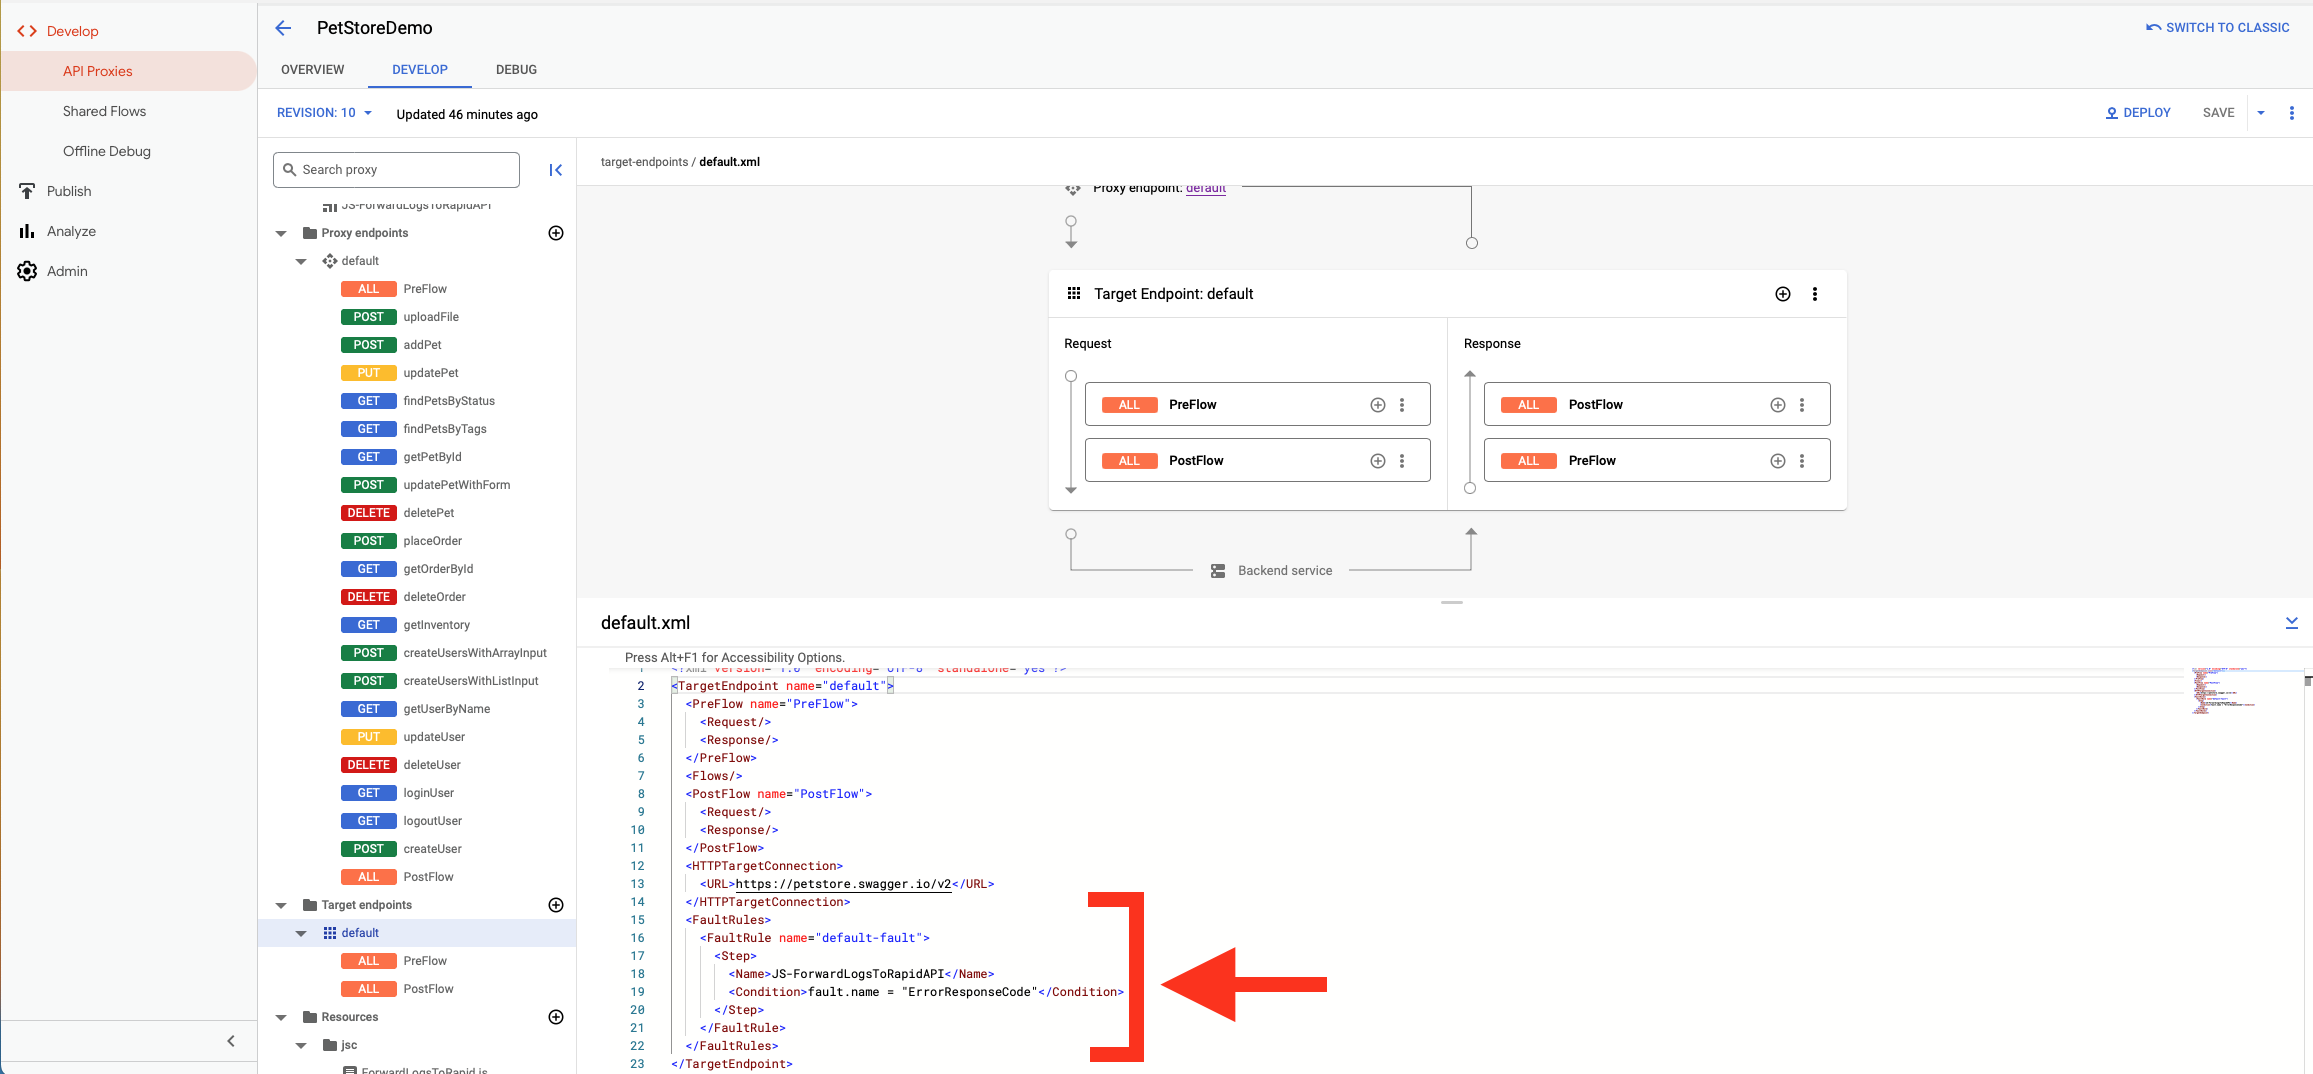
Finishing Up
This Apigee proxy is now configured to forward logs to the Platform Analytics API for each API call it receives. Test this using the following:
- Create an API call.
- Validate the call was made to the Platform Analytics API(Open the Apps dashboard, select analytics on the App you used and view the logs).
- Validate the log is available on your API.
Tip: Automate using Apigee Proxy BundlesOne of the methods for creating and updating Apigee API proxies is by using an API proxy configuration bundle. All the above configurations can be saved within the template once and reused when creating our updating proxy listings.
Updated 8 months ago