Custom Tokens
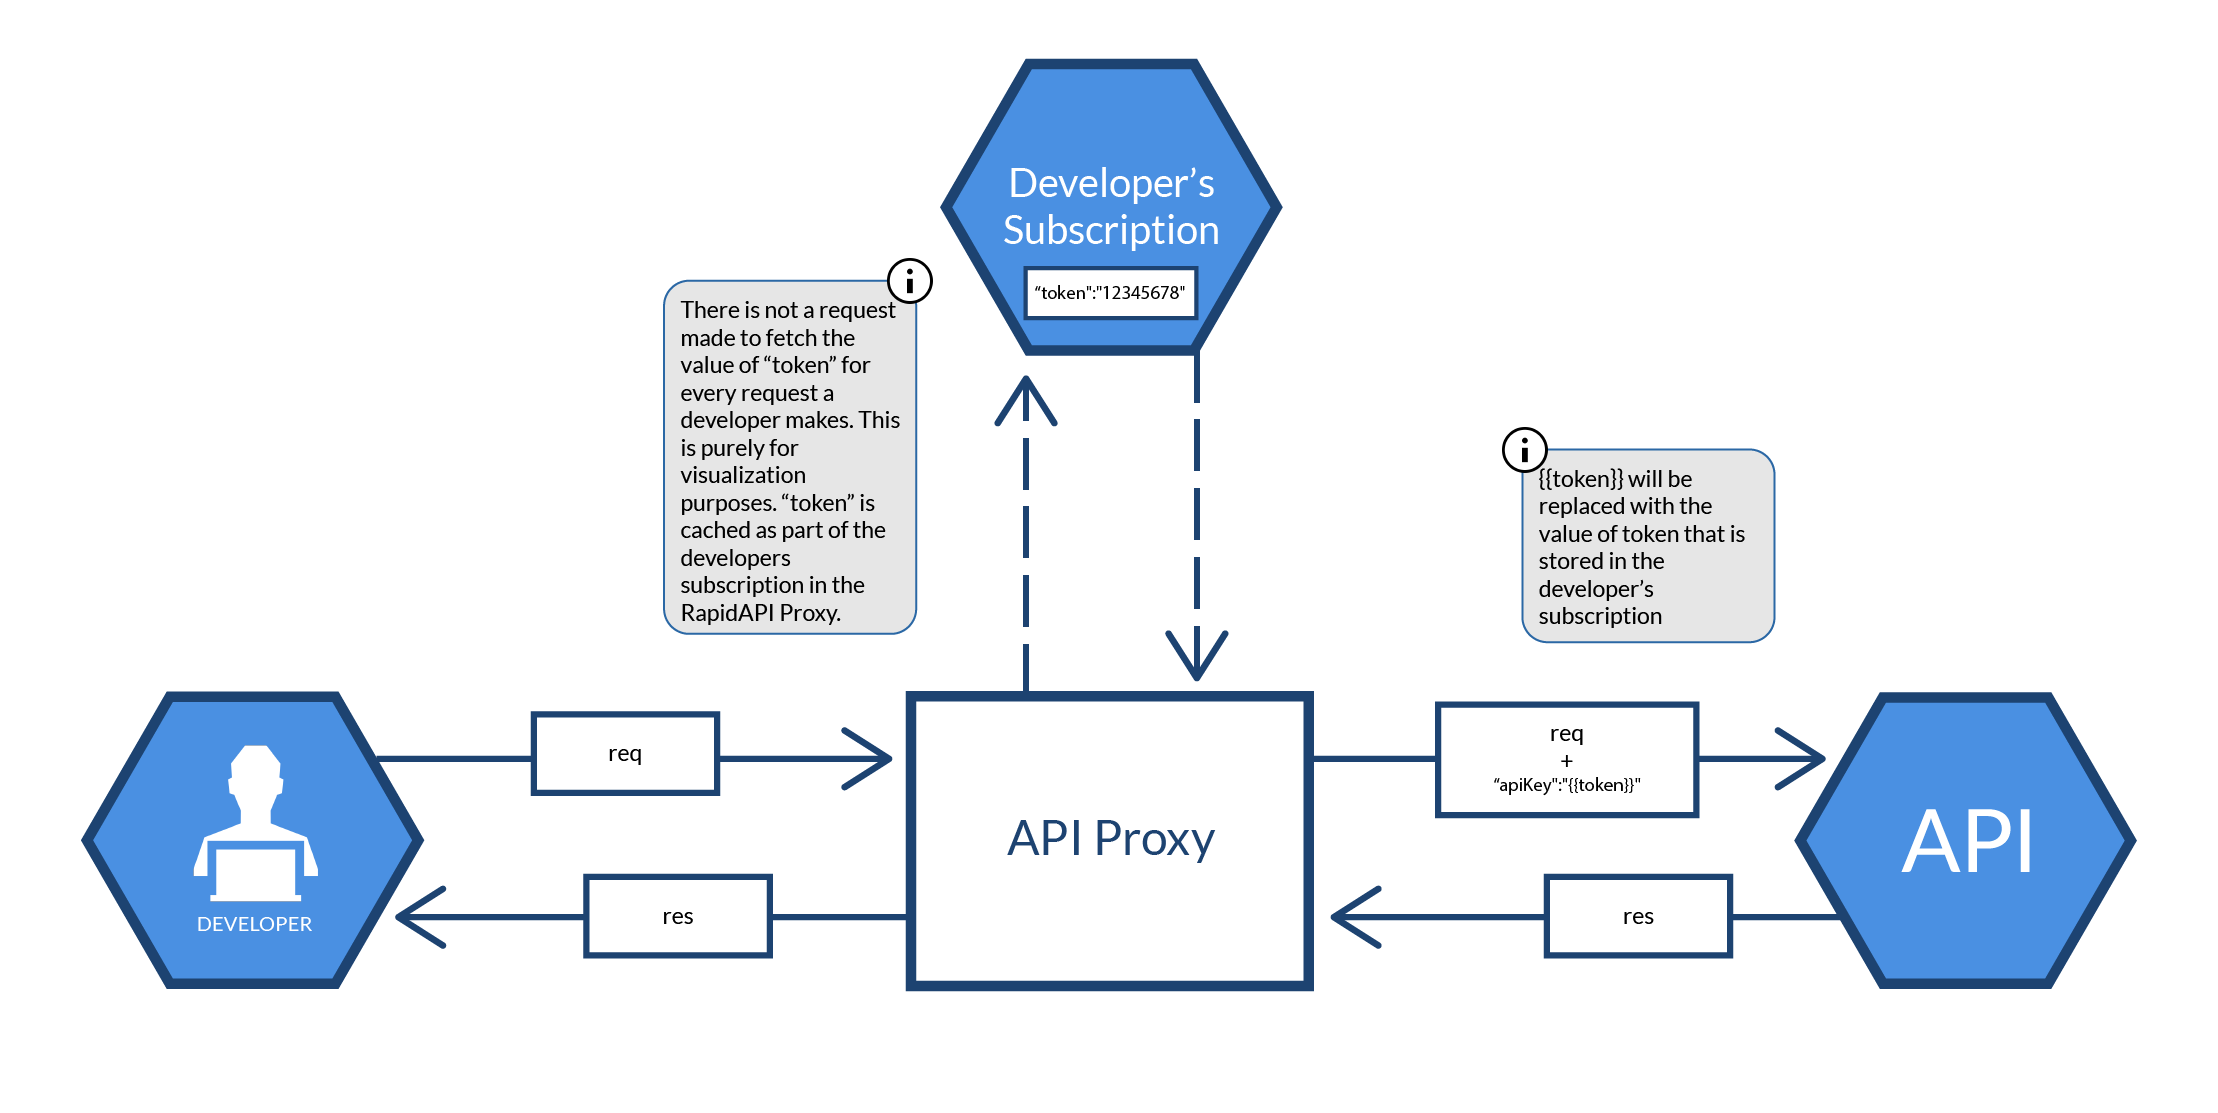
A custom token integration allows you to have a unique API key assigned to every user who subscribes to your API. When a user makes an API request, this unique API key is sent by the Rapid Runtime to your API as a secret header or parameter. Similar to a static secret header or parameter, the unique custom token is always hidden from the developer.
Getting Started
Currently, the Custom Token feature is in private beta. Please contact our team at https://support.rapidapi.com/ to request access.
Create a Custom Token Service
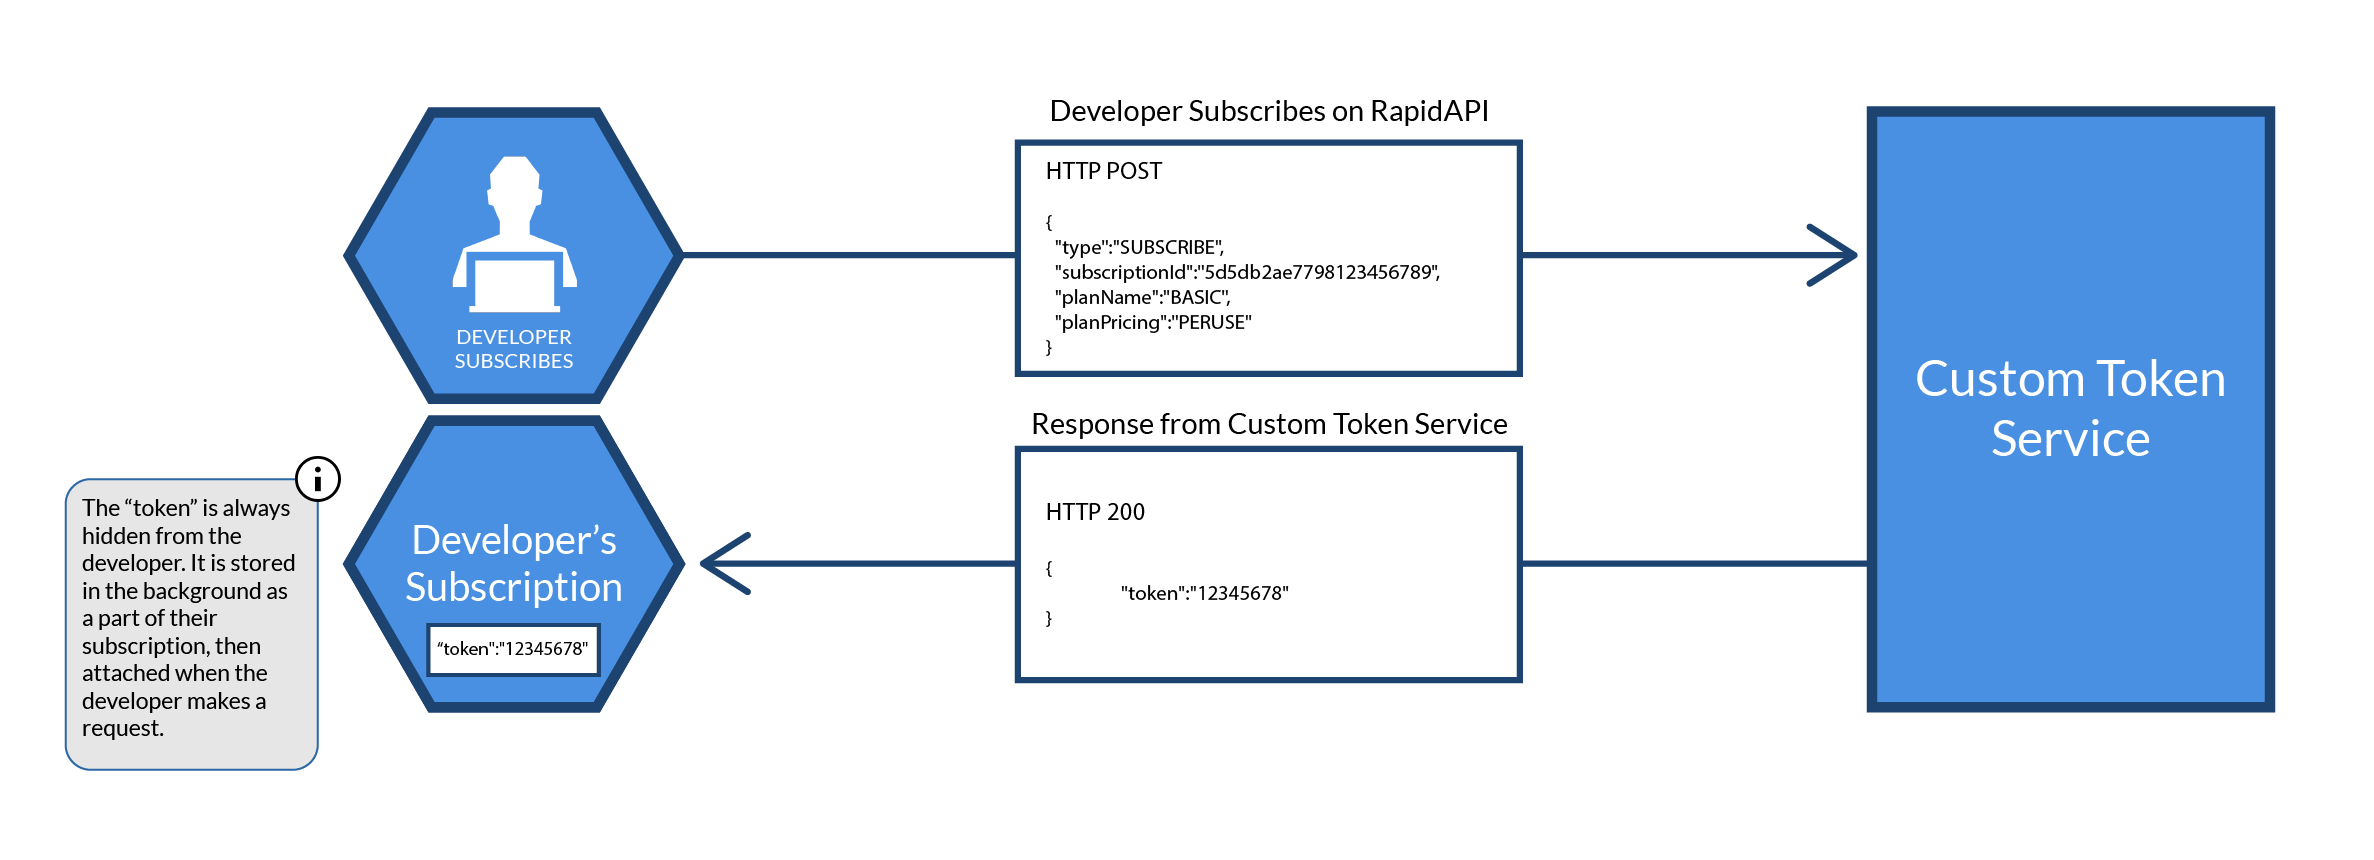
First, you will need to create a public HTTP endpoint that will return the new token generated for a Rapid developer. When a developer subscribes to your API, an HTTP POST request will be sent to the HTTP endpoint you provide to our team.
Example POST Request
POST / HTTP/1.1
Host: HOST
Accept: */*
Content-Type: application/json

{
  "type":"SUBSCRIBE",
  "subscriptionId":"5d5db2ae7798123456789",
  "planName":"BASIC",
  "planPricing":"PERUSE"
}
The message body of the request is a JSON that includes the following values:
- type: The type of the subscription event [UNSUBSCRIBE or SUBSCRIBE]
- subscriptionId: The ID of the subscription.
- If you are utilizing your API's sub-user management, we recommend assigning the subscription ID as the name of the sub-user. This will help when identifying which user is using a particular API key in your system.
- planName: The plan type [BASIC, PRO, ULTRA, MEGA, CUSTOM]
- planPricing: The pricing model of the subscription [FREE, FREEMIUM, PAID, PERUSE]
Required Response
In the body of the response, you are required to include a parameter called token. The value of this parameter will be the API key that is assigned to the user on RapidAPI.
HTTP/1.1 200
Content-Type: application/json

{
	"token":"12345678"
}
Add the Custom Token to Your API Listing
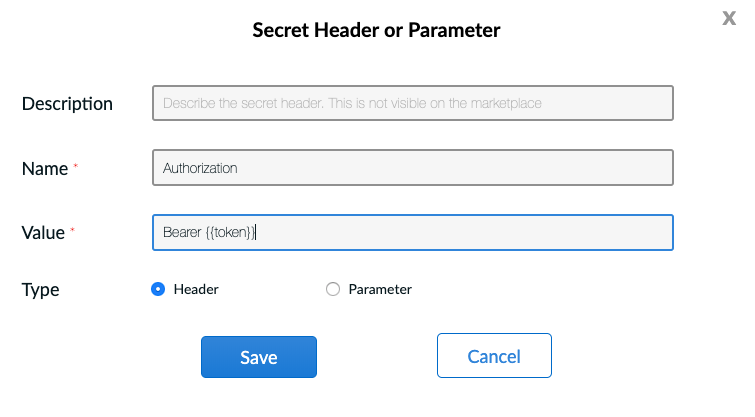
Once you have developed your service and had the Rapid team assign the HTTP endpoint URL to your API listing, you will need to add the custom token to your API listing's hidden headers. To do this, we use the syntax of {{token}}.

Example Usecases
- apiKey: {{token}}
- Authorization: Bearer {{token}}
Within the Rapid Runtime, the string {{token}} will be replaced by the real custom token assigned to a developer in the response of your Custom Token Service.

Example Lambda Functions
Sub-user API Service
If your API has a sub-user management system, you can utilize a custom token service to create a new sub-user for each Rapid developer that subscribes to your API.
To do this, create a single master account for all Rapid developers. Then, when a developer subscribes(causing a subscription event to be sent to your custom token service), create a new sub-user for the master Rapid account and return the new API key assigned to the sub-user.
const request = require('superagent');

exports.handler = (event, context, callback) => {
  const MASTER_ACCOUNT_API_KEY = "**************************";
  const BASE_URL = "https://api.example.com/";

  const params = (typeof event.body === "object") ? event.body : JSON.parse(event.body)

  if(params['type'] === 'SUBSCRIBE'){
    request.post(`${BASE_URL}/subusers`)
      .set('Content-Type', 'application/json')
      .set('Authorization', `Bearer ${MASTER_ACCOUNT_API_KEY}`)
      .send({
        "username": params["subscriptionId"], // subscriptionId passed from the marketplace by default as an identifier, you can use it as username or any other identity helper on the 3rd party API
      })
      .then(subaccount => {
        console.log(subaccount)
        callback(null, { statusCode: 200, body: JSON.stringify({ token: subaccount.apiKey }) });
      })
      .catch(err => {
        console.log(err)
        callback(null, { statusCode: 400, body: JSON.stringify({ message: "an error occurred" }) });
      })
    } else if(params['type'] === 'UNSUBSCRIBE'){
      request.delete(`${BASE_URL}/subusers`)
      .set('Content-Type', 'application/json')
      .set('Authorization', `Bearer ${MASTER_ACCOUNT_API_KEY}`)
      .send({
        "username": params["subscriptionId"]
      })
      .then(subaccount => {
        callback(null, { statusCode: 200, body: JSON.stringify({ message: 'success' }) });
      })
      .catch(err => {
        console.log(err)
        callback(null, { statusCode: 400, body: JSON.stringify({ message: "an error occurred" }) });
      })
    }
};
Multiple API Keys with Different Access Control
exports.handler = (event, context, callback) => {
  const BASIC_ACCESS_API_KEY = "**************************";
  const FULL_ACCESS_API_KEY = "**************************";
  const CUSTOM_ACCESS_API_KEY = "**************************";

  const params = (typeof event.body === "object") ? event.body : JSON.parse(event.body);

  if(params["type"] == 'SUBSCRIBE') {
    if(params["planName"] == 'BASIC') {
      callback(null, { statusCode: 200, body: JSON.stringify({ token: BASIC_ACCESS_API_KEY }) });
    } else if(params["planName"] == 'PRO') {
      callback(null, { statusCode: 200, body: JSON.stringify({ token: FULL_ACCESS_API_KEY }) });
    } else if(params["planName"] == 'ULTRA') {
      callback(null, { statusCode: 200, body: JSON.stringify({ token: FULL_ACCESS_API_KEY }) });
    } else if(params["planName"] == 'MEGA') {
      callback(null, { statusCode: 200, body: JSON.stringify({ token: FULL_ACCESS_API_KEY }) });
    } else {
      callback(null, { statusCode: 200, body: JSON.stringify({ token: CUSTOM_ACCESS_API_KEY }) });
    }
  }
};
Updated 8 months ago