
Configuring API Authentication
Configure additional API authentication mechanisms used by your API.
This is a legacy documentation page for the previous interface.For the latest page, see Configuring API Security.
Authentication overview
By default, when you add an API to the Hub and use the Rapid Runtime, authentication called RapidAPI Authentication is used. This is the simplest form of authentication for consumers of the API, and the other types of authentication described here can be "added on" to this default authentication. It is up to the API provider to implement these other forms of authentication and authorization on the API itself.
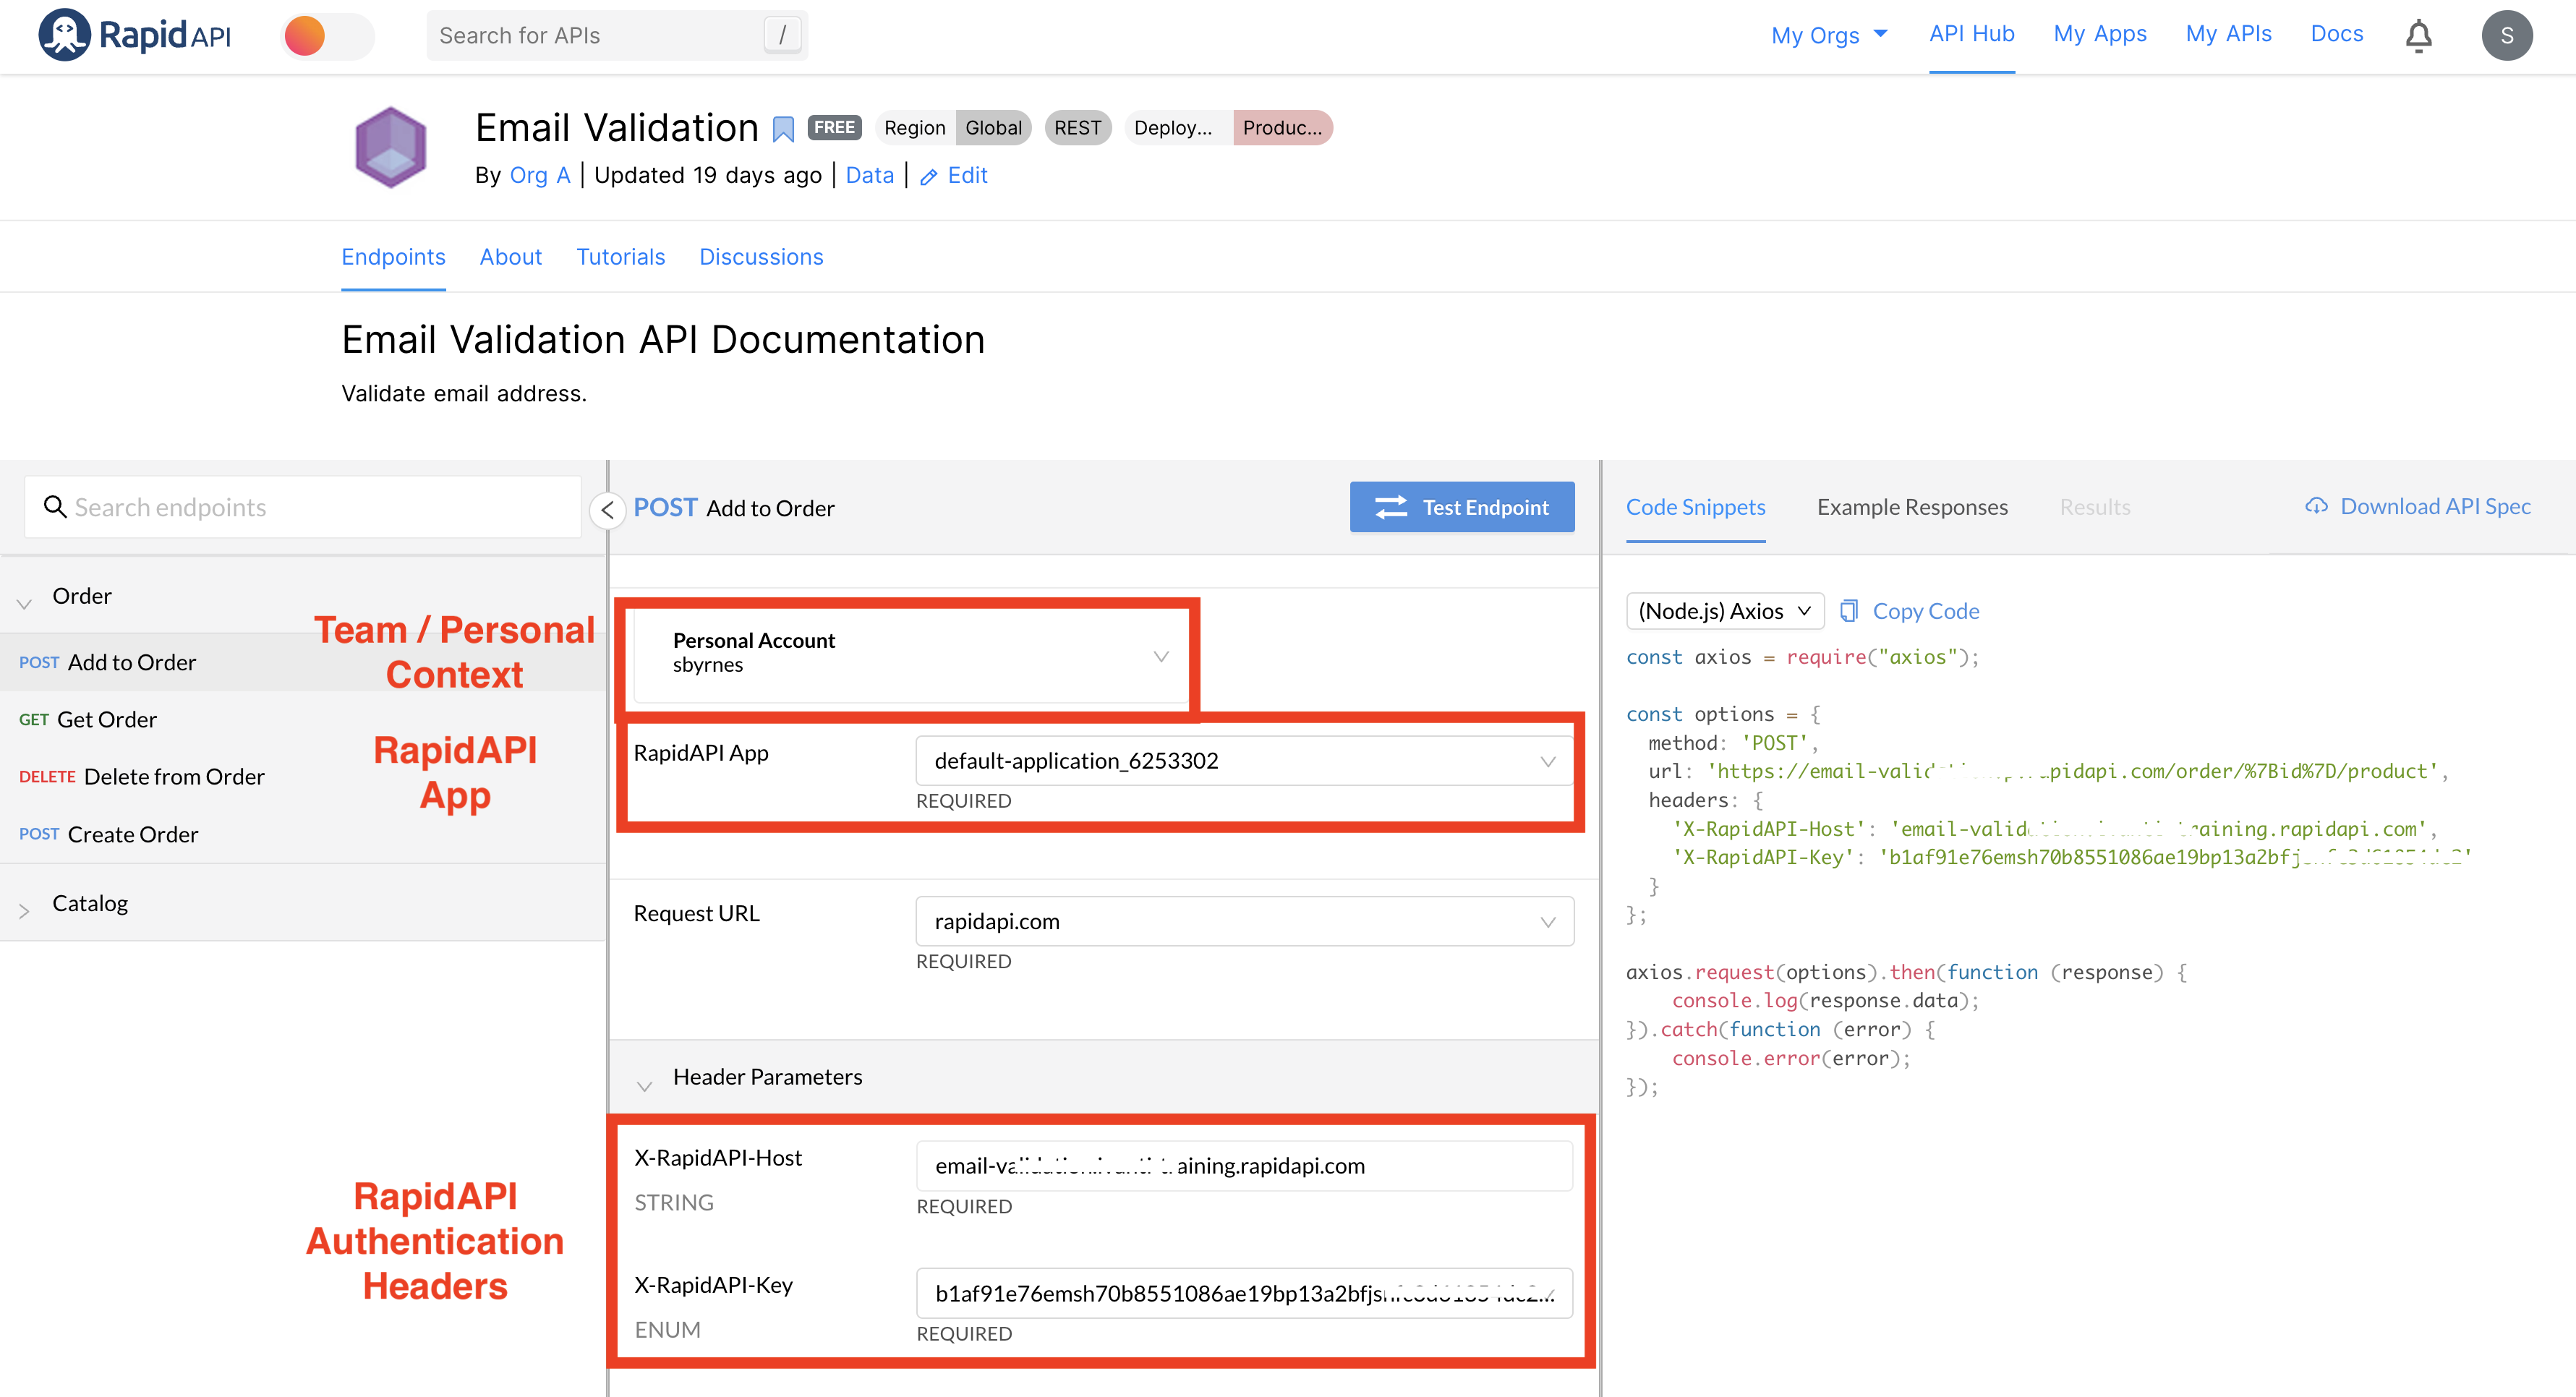
With RapidAPI Authentication, headers named X-RapidAPI-Host and X-RapidAPI-Key must be sent with each API request. The value of the X-RapidAPI-Host header uniquely identifies the API being called, and is defined by RapidAPI. The value of the X-RapidAPI-Key header corresponds to an app key in a RapidAPI app. These apps and keys can be found in the Developer Dashboard (My Apps). The values of these headers are automatically populated for you when testing an endpoint by selecting the correct context from the team/personal context (shown below). If the context has multiple apps, you can select the app from the RapidAPI App dropdown (shown below). The values of these headers are also automatically added to the sample code.
If the header information is incorrect, API calls will receive a 4xx client error response.
RapidAPI Authentication has multiple purposes. The RapidAPI Authentication header values must be valid for API calls to be successfully made via the Rapid Runtime. In addition, these values are used to track usage and billing data, and to rate-limit requests (if necessary). If you are using the Rapid Runtime, you must pass valid RapidAPI Authentication headers, even if you choose additional forms of authentication, as described below.
Not using the Rapid RuntimeIf your API does not use the Rapid Runtime, the RapidAPI Authentication described above is not used. This is because calls to the API's endpoints are made directly to the API itself. In this case, the X-RapidAPI-Host and X-RapidAPI-Key header parameters are not used, since only the Rapid Runtime understands their meaning.
The other types of authentication described below can still be used with the API, assuming the API itself uses some form of authentication. Choosing one of these authentication methods has the effect of changing the API consumer experience when testing the API via the API Hub, and helps provide accurate sample code.
The additional forms of authentication described below are used if the API itself requires authentication and/or authorization. Choosing one of these authentication methods has the effect of changing the API consumer experience when testing the API, and helps provide accurate sample code. For example, if the API uses basic authentication, the user interface will prompt the user to authenticate while testing the API.
In addition to RapidAPI Authentication, you can require these other forms of authentication for your API:
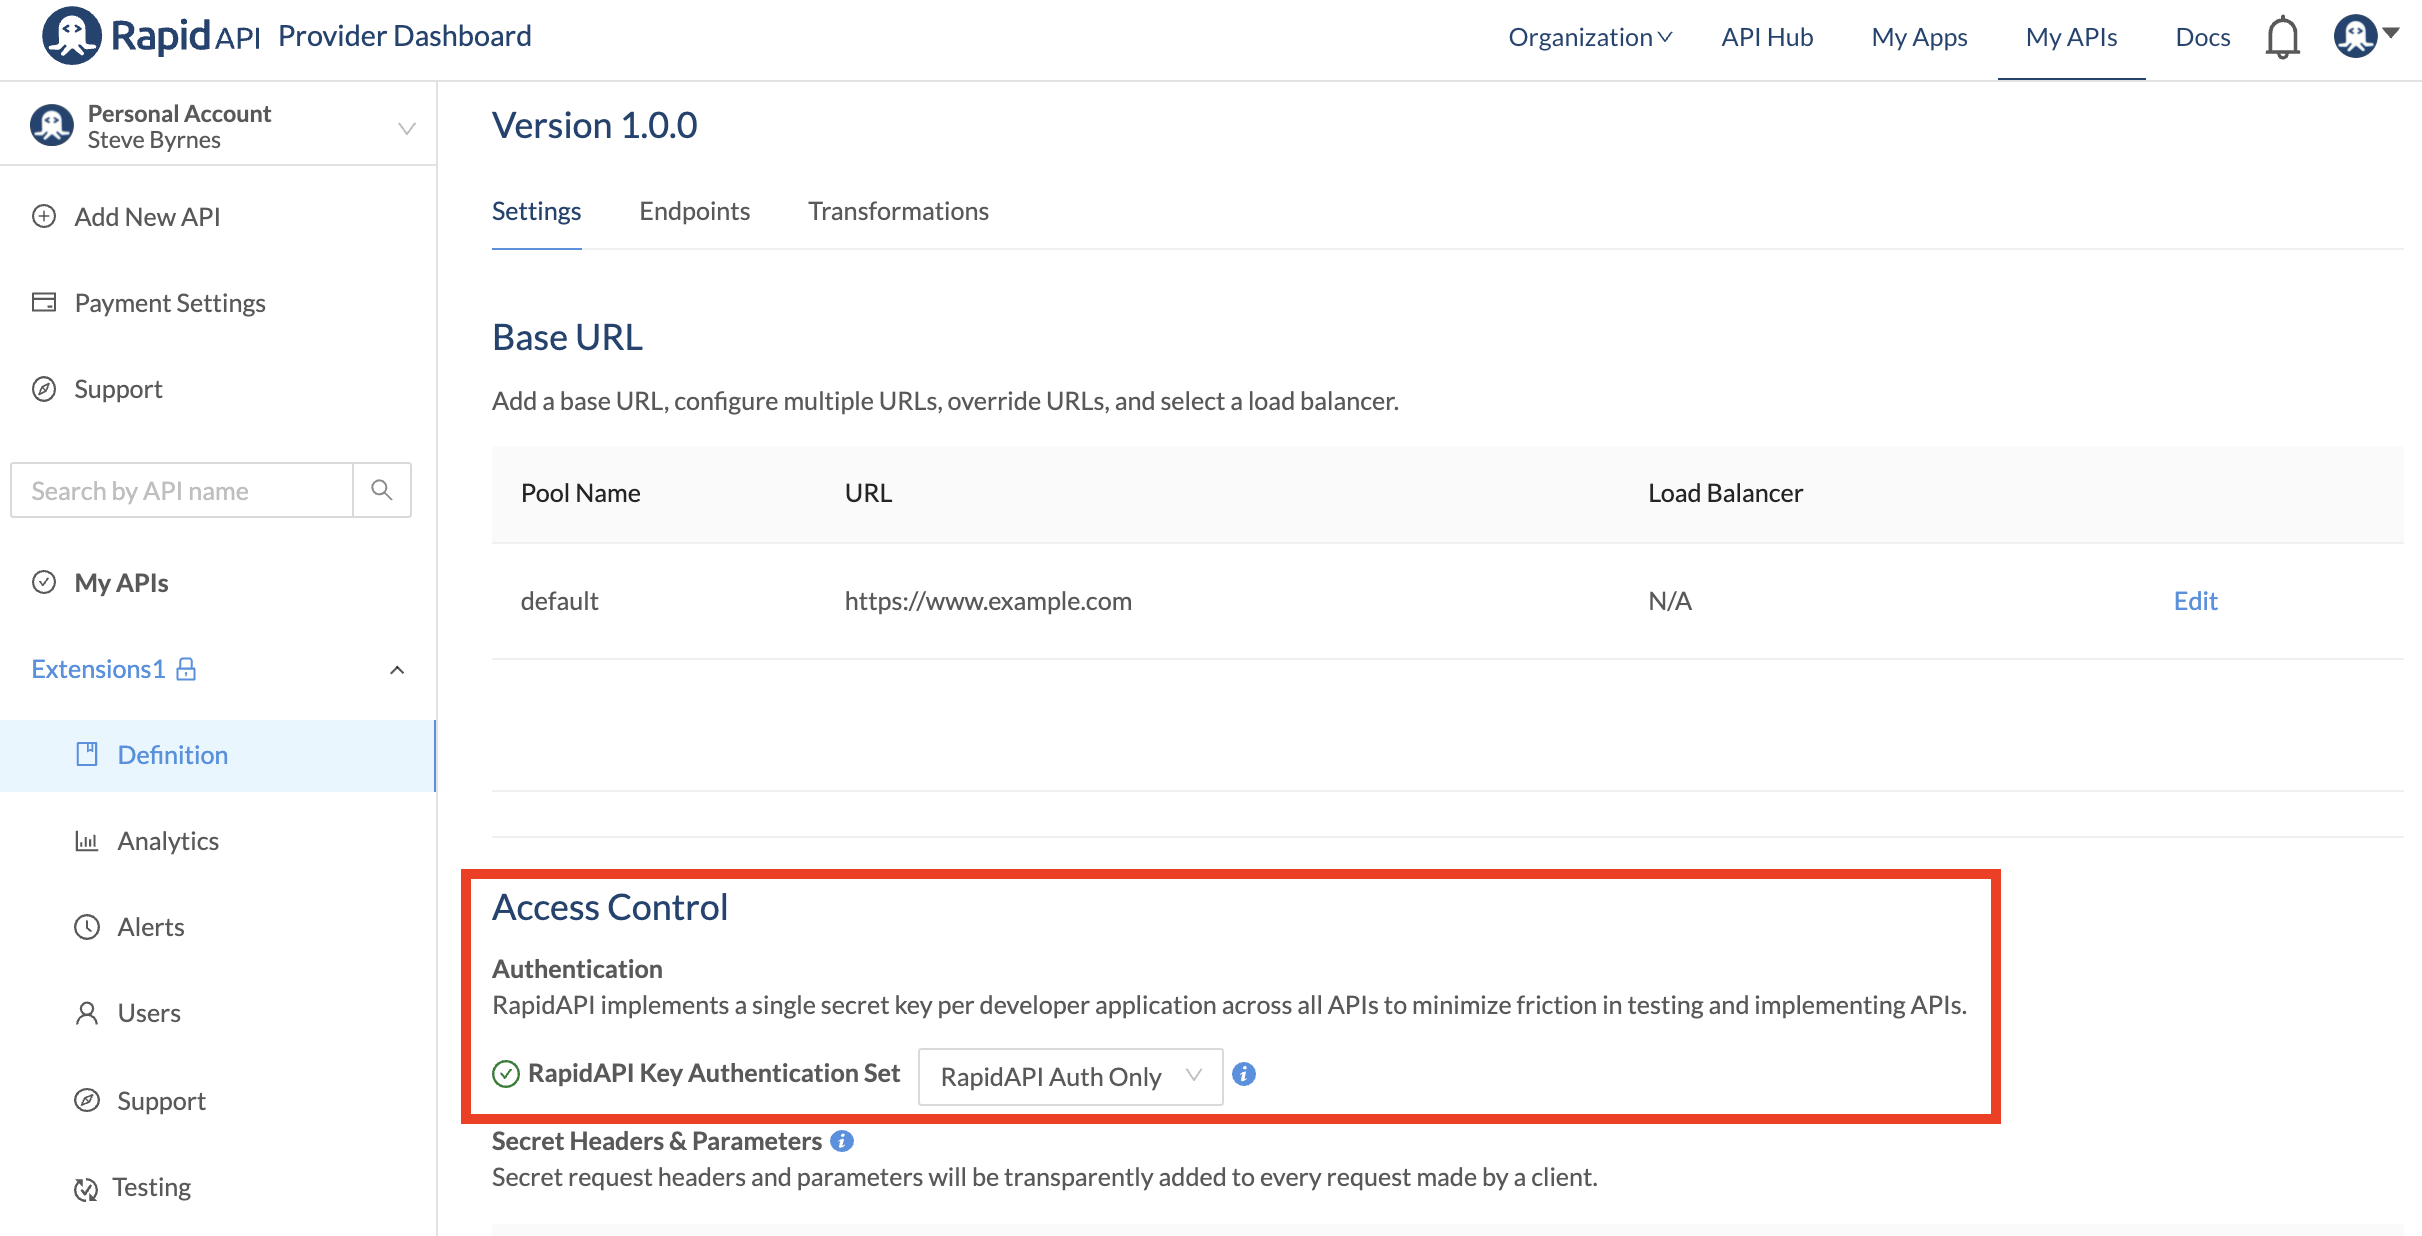
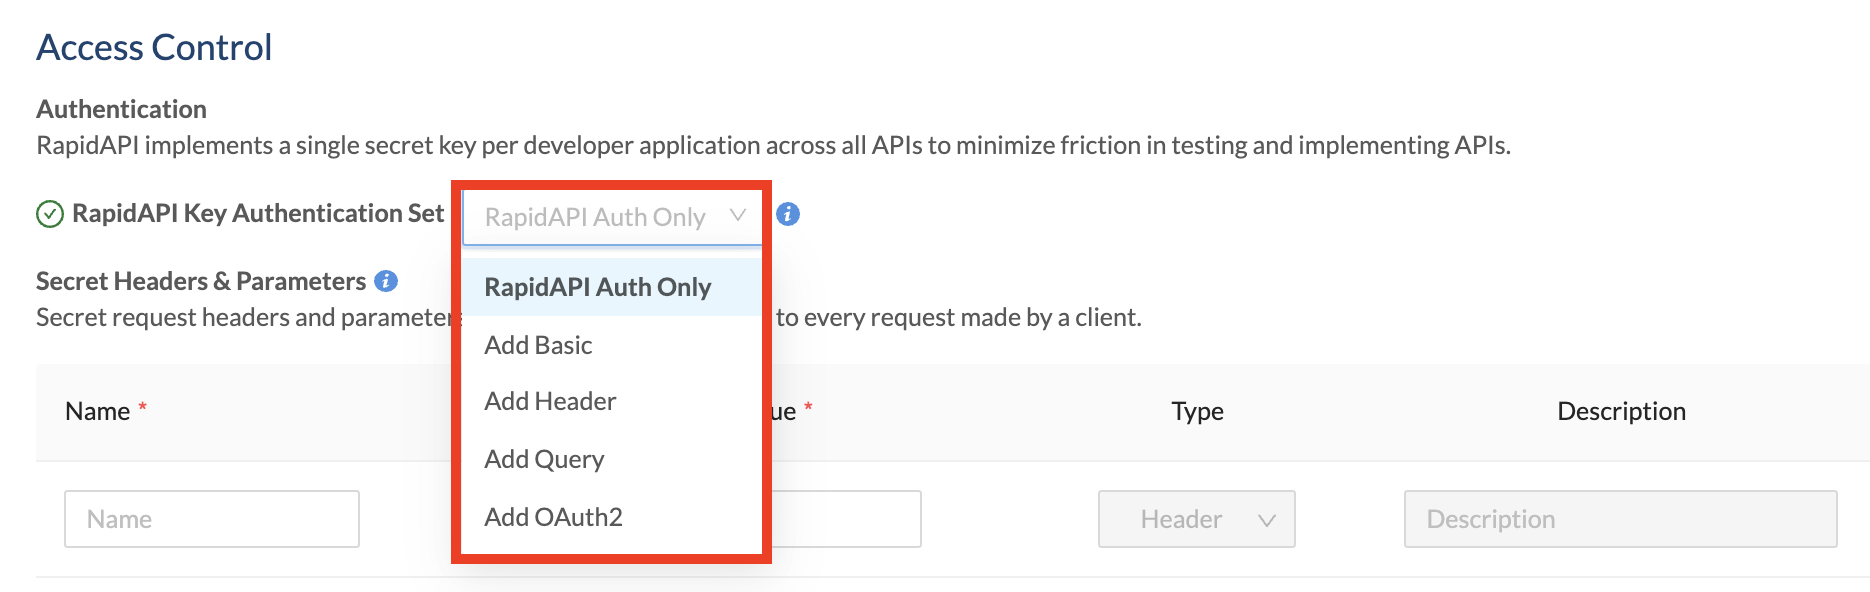
These are set using the RapidAPI Key Authentication Set dropdown (as shown below).
Why add other forms of authentication for an API?
API providers configure an additional form of authentication because the API itself has authentication requirements. If these additional authentication requirements are not accounted for, API consumers will not be able to successfully test the API's endpoints using the API Hub - they will receive permission-related responses such as 403 Forbidden. Also, the sample code provided will not include the additional authentication requirements, such as an authorization header.
Add basic authentication
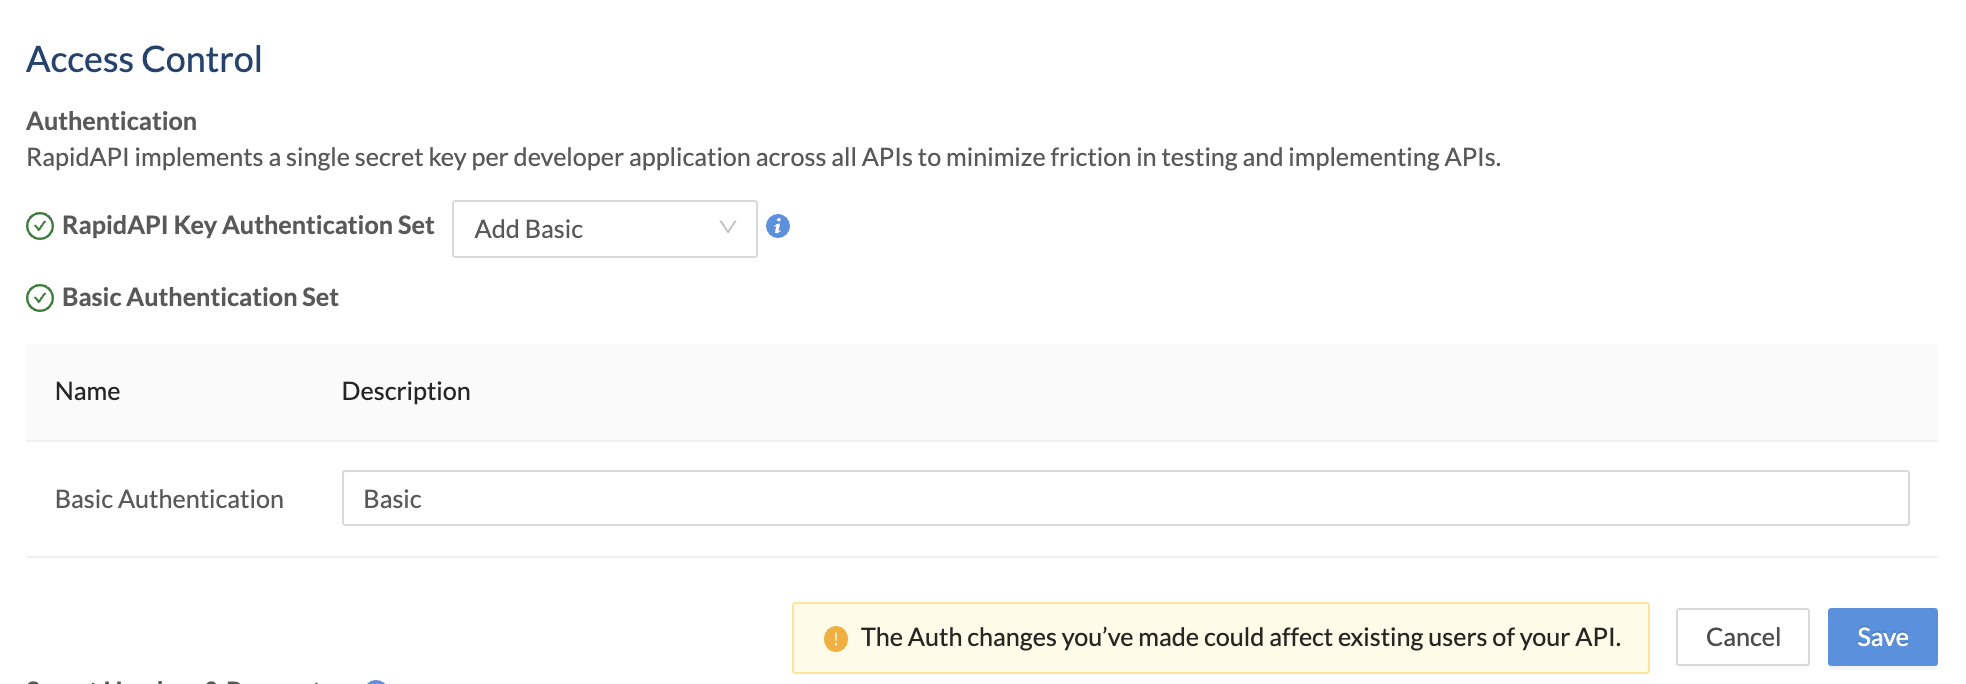
This option adds basic authentication to API calls. The user ID and password are base64 encoded and passed in a request header as Authorization: Basic<base64> . When this RapidAPI Key Authentication Set option is selected, the API consumer must include this request header (in addition to the RapidAPI Authentication headers described above, unless your API is not using the Rapid Runtime) in all calls to the API.
To enable basic authentication for your API:
- Navigate to the Provider Dashboard (My APIs).
- In the sidebar, click the Definition tab for your API.
- Click the API Specs tab.
- Click the Settings tab.
- For Access Control > Authentication > RapidAPI Key Authentication Set, select Add Basic.
- Optionally enter a Description. This is shown as a label under the Authorization section when testing an API endpoint (see the second screenshot below).
- Click Save.
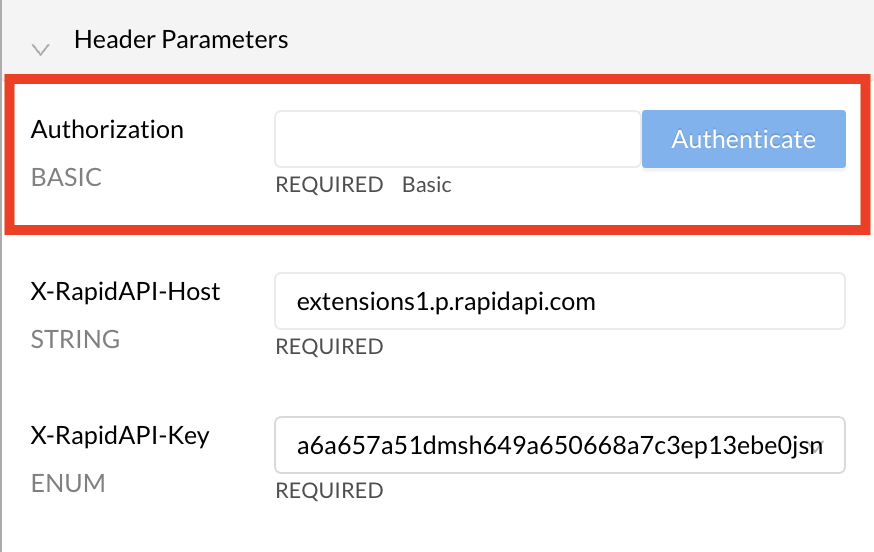
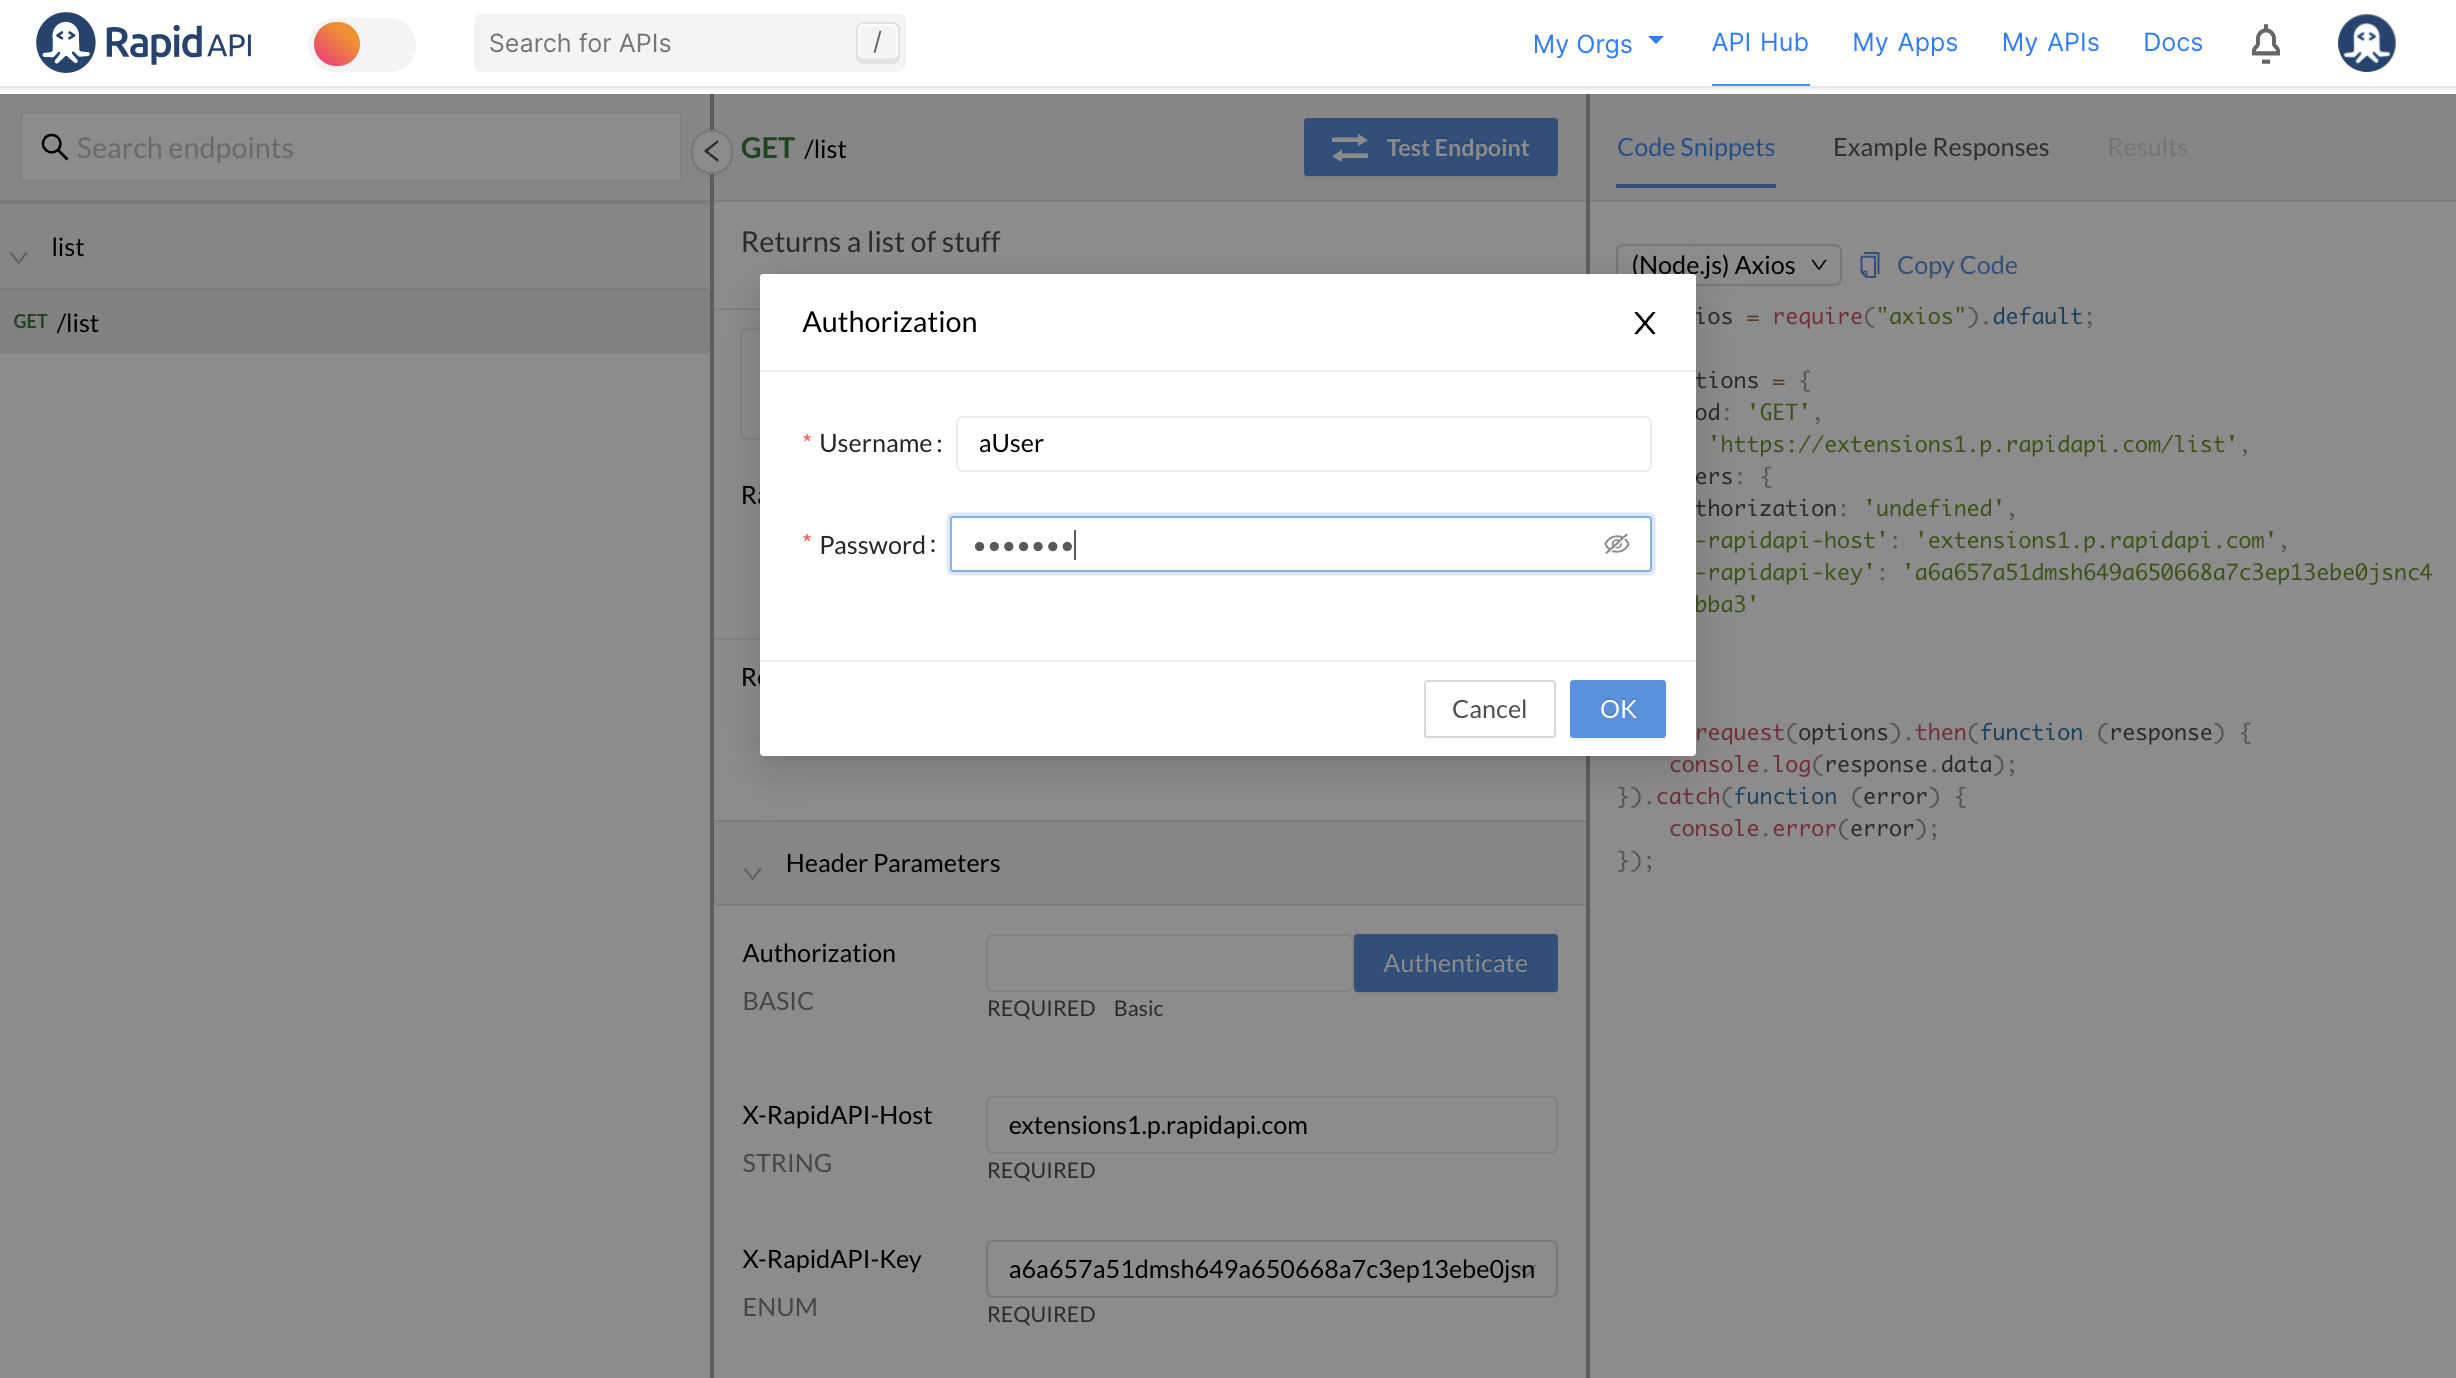
When an API consumer uses the API, they will also have to provide basic authentication credentials to successfully call the API. When testing an endpoint, the developer sees a Header Parameter named Authorization BASIC. Clicking the Authenticate button opens an Authorization dialog, where the API consumer enters a username and password. RapidAPI will convert that information to base64 when the call is made.
Add header authentication
Header authentication allows API providers to require API consumers to add one or more authentication-related headers to API requests. Calls to the API must have valid values for these headers, otherwise the request should not succeed. The API provider is responsible for verifying these values and returning the proper response to the caller.
To enable header authentication for your API:
- Navigate to the Provider Dashboard (My APIs).
- In the sidebar, click the Definition tab for your API.
- Click the API Specs tab.
- Click the Settings tab.
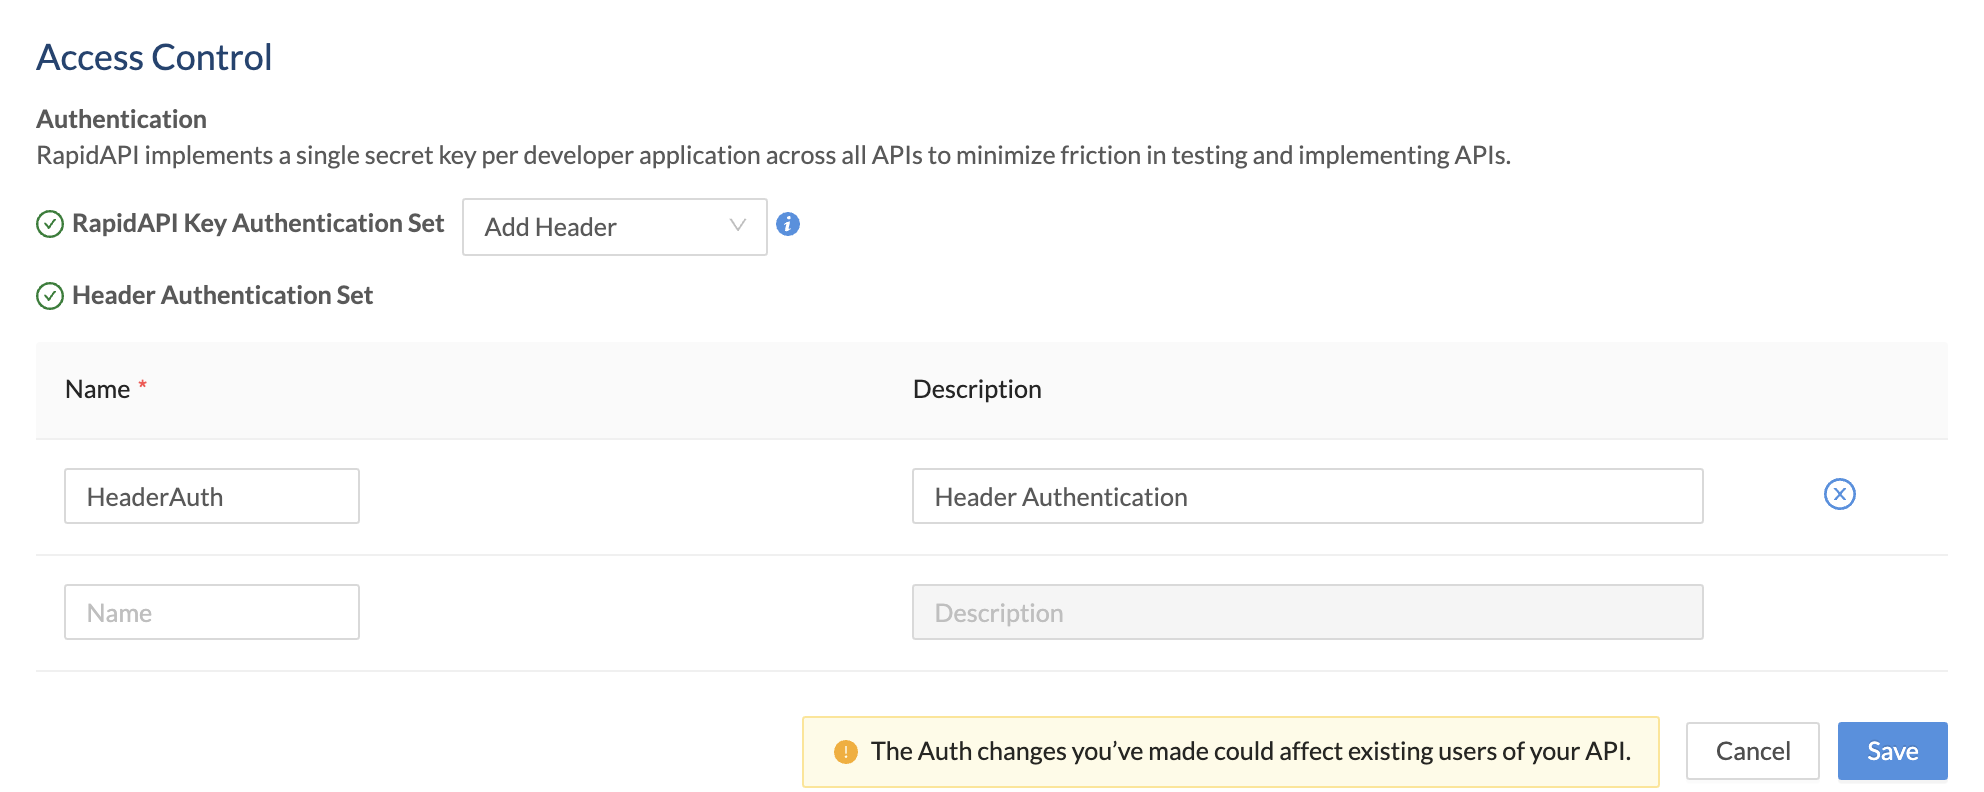
- For Access Control > Authentication > RapidAPI Key Authentication Set, select Add Header.
- Enter a Name for the header. The API consumer will need to add a header with this name and a valid value for the call to succeed.
- Optionally enter a Description. This is shown as a label under the Header Parameters section when testing an API endpoint (see the second screenshot below).
- If desired, repeat this process to add more headers.
- Click Save.
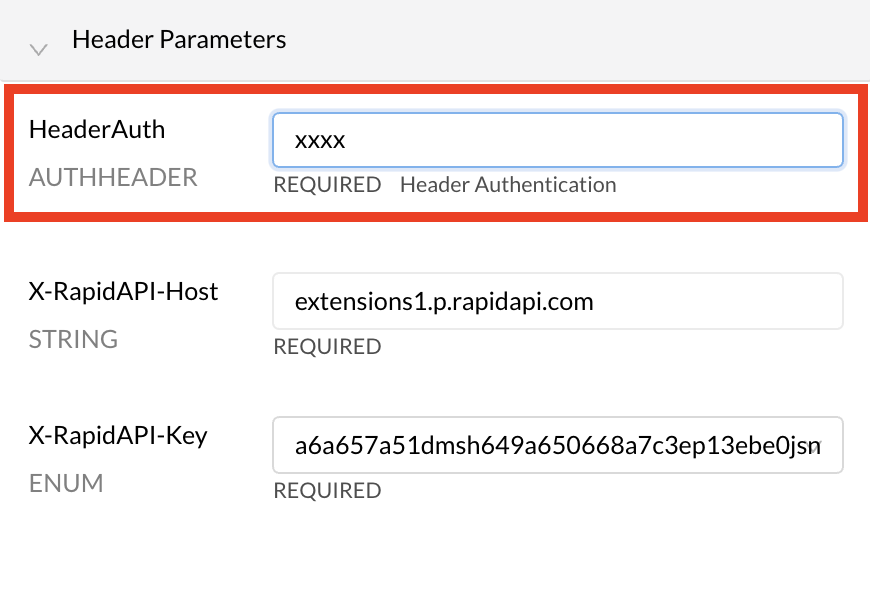
When an API consumer uses the API, they will have to provide header(s) with valid name-value pairs, as specified by the API provider. When testing an endpoint, under Header Parameters, the developer will see one or more AUTHHEADER headers that they need to specify values for. In the example below, the header parameter is named HeaderAuth.
Add query parameter authentication
Query authentication allows API providers to require API consumers to add one or more query string parameters to API requests. Calls to the API must have valid values for these query string parameters, otherwise the request should not succeed. The API provider is responsible for verifying these values and returning the proper response to the caller.
To enable query authentication for your API:
- Navigate to the Provider Dashboard (My APIs).
- In the sidebar, click the Definition tab for your API.
- Click the API Specs tab.
- Click the Settings tab.
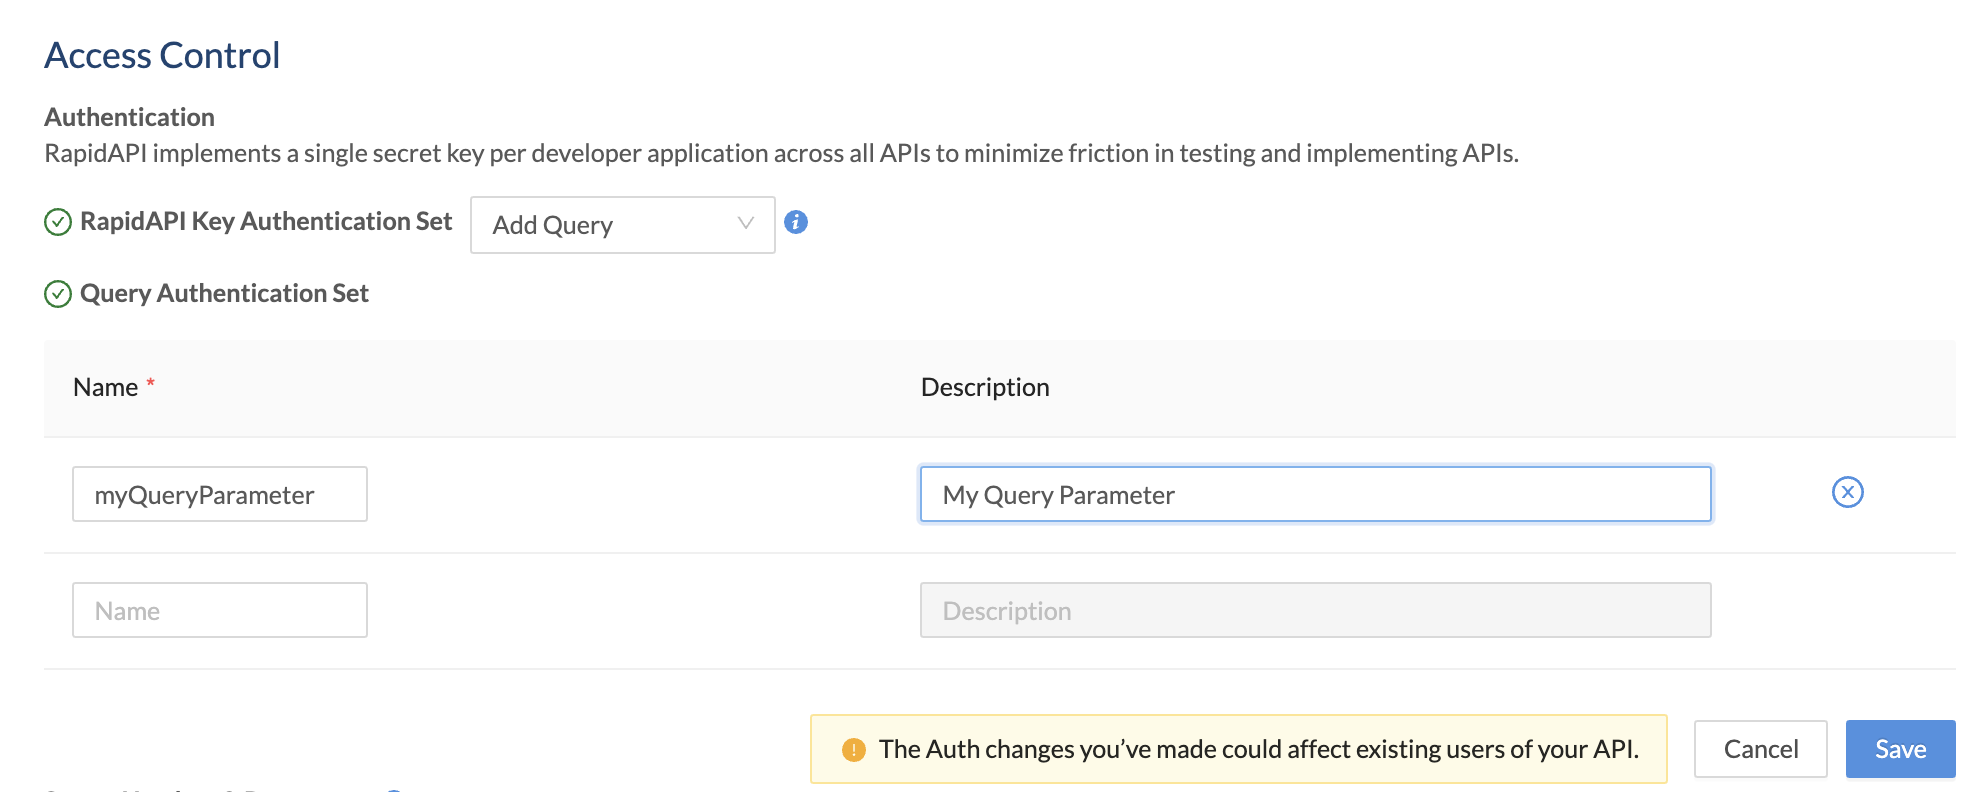
- For Access Control > Authentication > RapidAPI Key Authentication Set, select Add Query.
- Enter a Name for the query string parameter. The API consumer will need to add a query string parameter with this name and a valid value for the call to succeed.
- Optionally enter a Description. This is shown as a label under the Required Parameters section when testing an API endpoint (see the second screenshot below).
- If desired, repeat this process to add more query string parameters.
- Click Save.
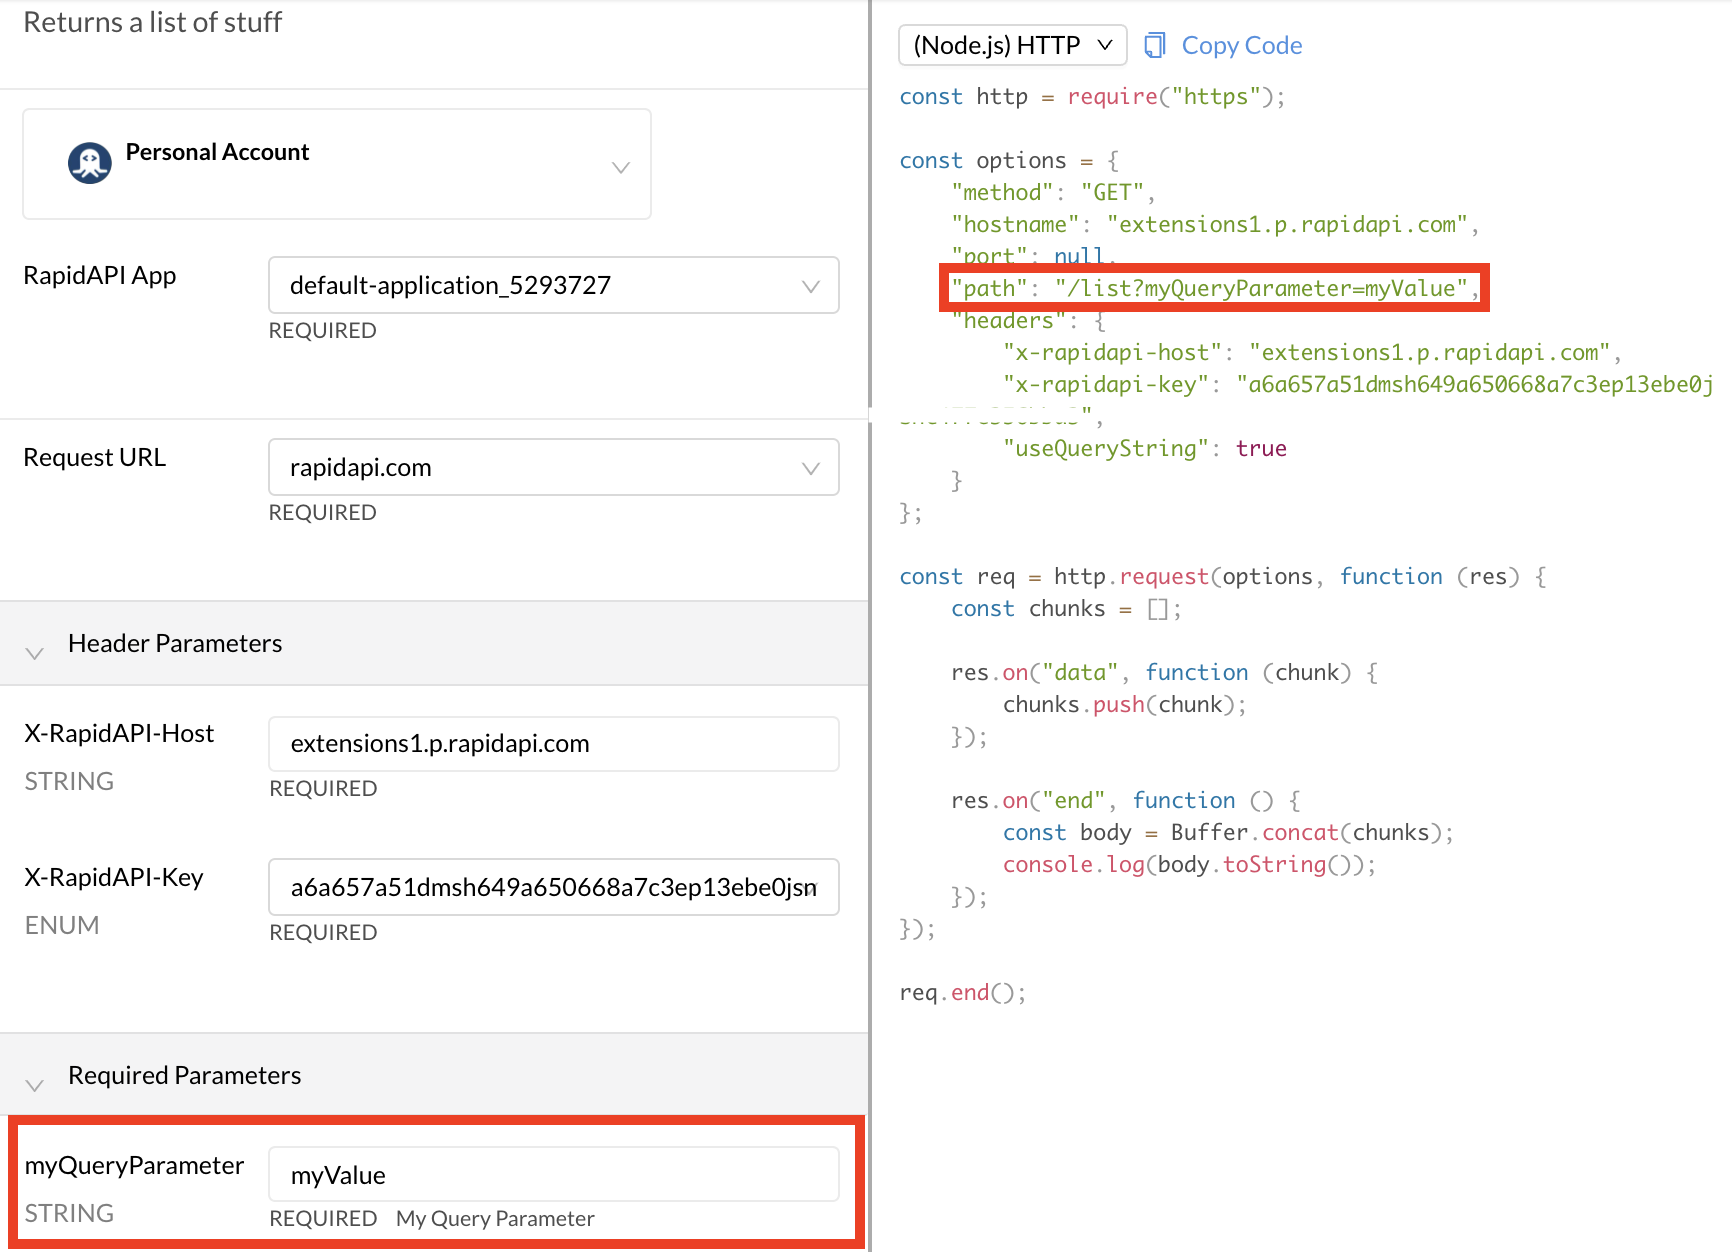
When an API consumer uses the API, they will have to provide query string parameter(s) with valid name-value pairs, as specified by the API provider. When testing an endpoint, under Required Parameters, the developer will see one or more parameters that they need to specify values for. In the example below, the query string parameter is named myQueryParameter.
Add OAuth2 authentication
OAuth2 is a token-based authorization protocol. Using this authentication method in RapidAPI, API providers can support APIs that use OAuth2 for security. OAuth2 is very flexible, supporting several authorization flows, or grant types. Additionally, depending on the user, API providers can authorize only certain capabilities, known as scopes, for their API. Therefore, compared to the other authentication methods, there are more options to configure here.
RapidAPI supports two OAuth Grant Types: Client Credentials and Authorization Code. These are the most likely Grant Types used with APIs. We will discuss these separately.
Client Credentials Grant Type
To enable client credentials OAuth2 authentication for your API:
- Navigate to the Provider Dashboard (My APIs).
- In the sidebar, click the Definition tab for your API.
- Click the API Specs tab.
- Click the Settings tab.
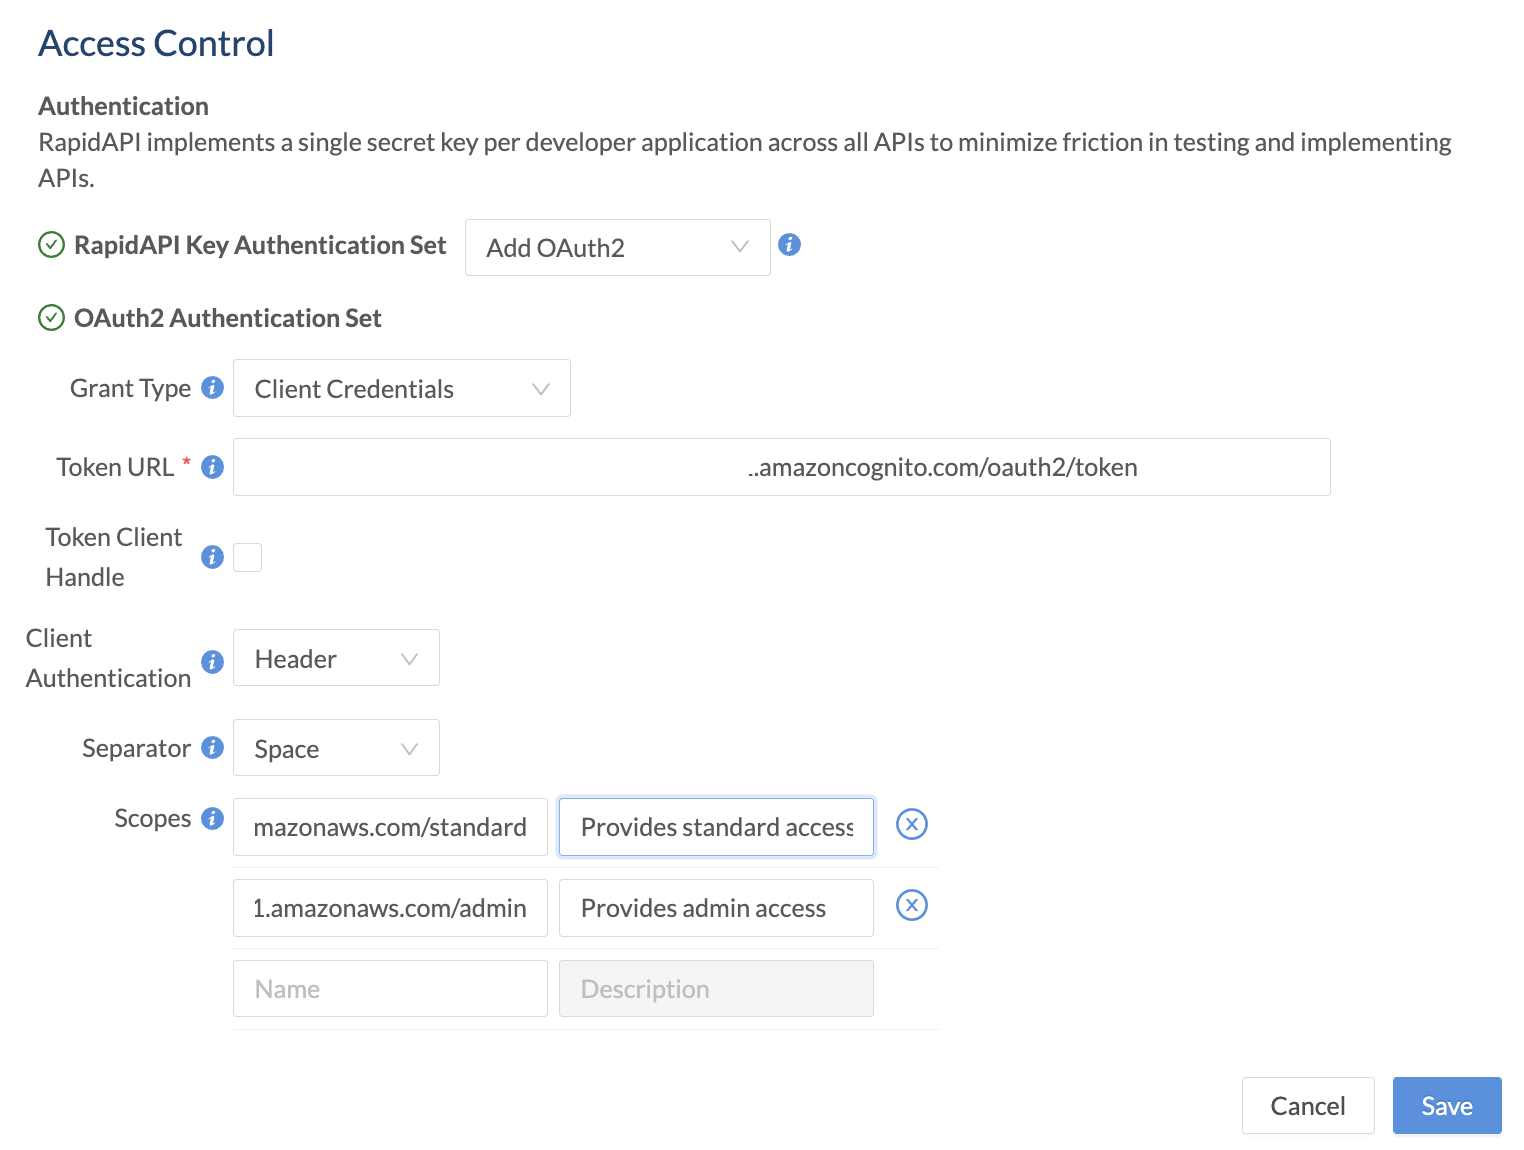
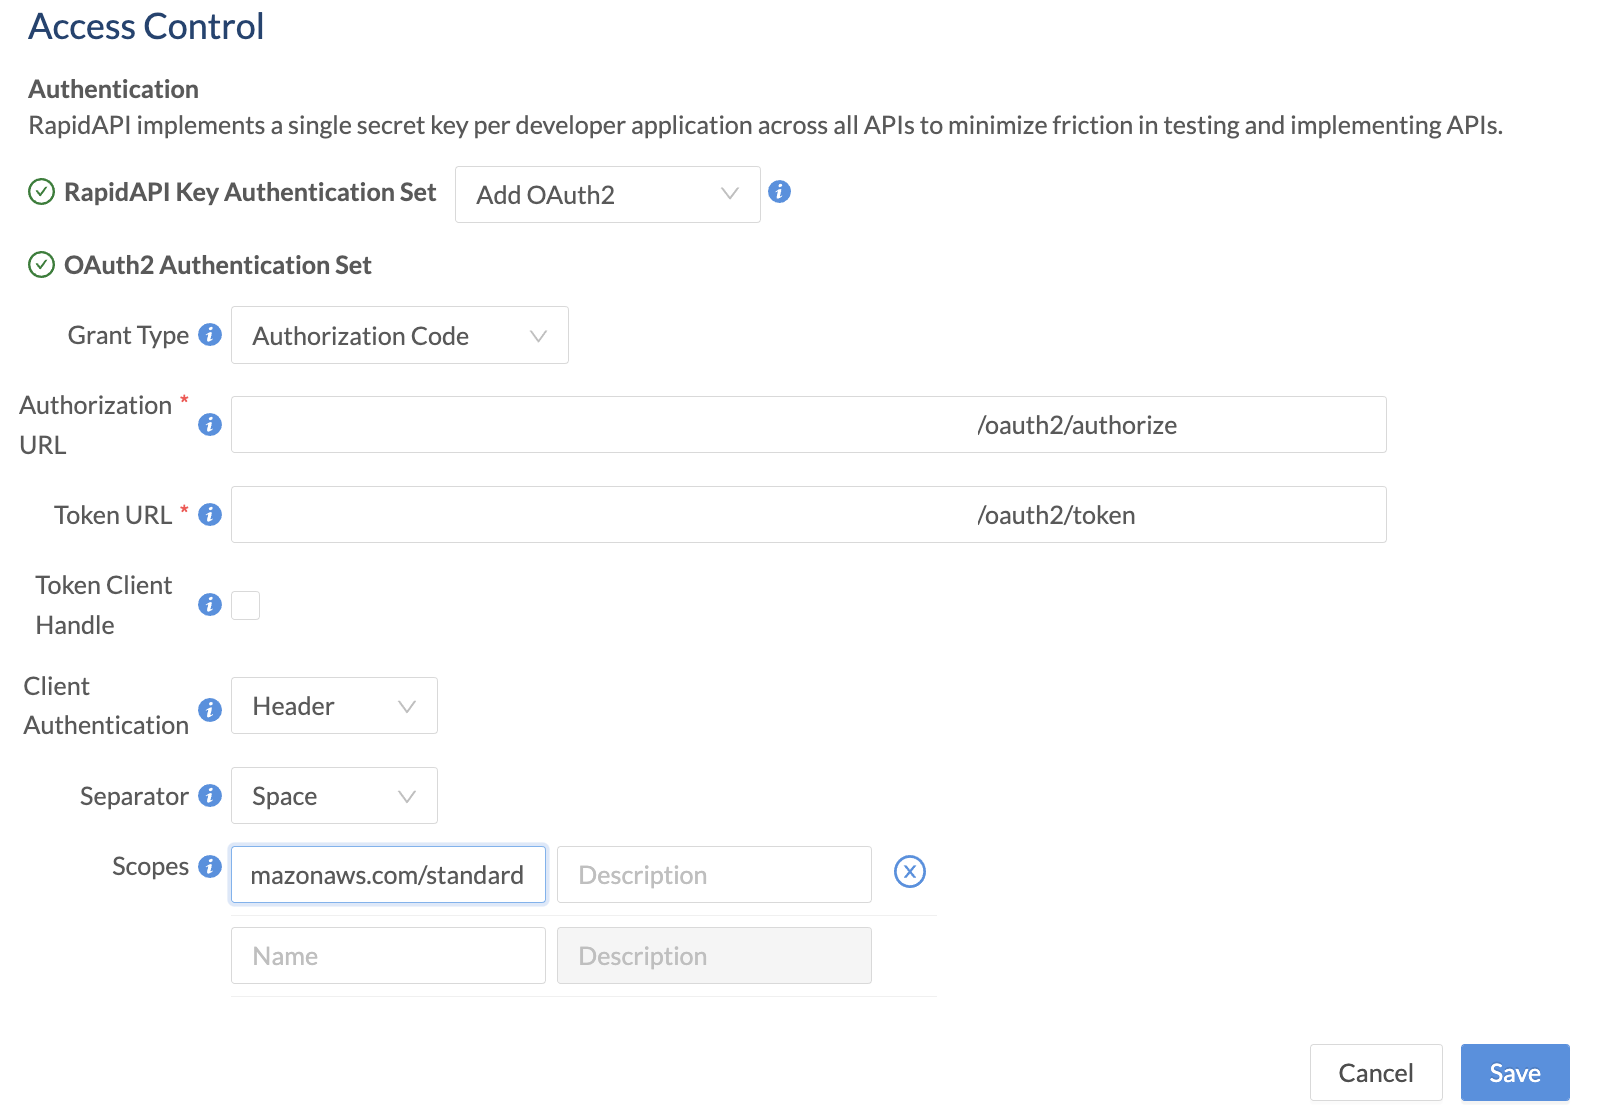
- For Access Control > Authentication > RapidAPI Key Authentication Set, select Add OAuth2.
- For Grant Type, select Client Credentials.
- For Token URL, enter the URL where calls are made to obtain a token for the API.
- Check the Token Client Handle box if you would prefer that the token URL is called directly by the browser rather than via the Rapid Runtime. The token URL endpoint would then be responsible for handling CORS issues related to calling this URL from the browser via the rapidapi.com domain. See this link for more information.
- For Client Authentication, select either Header or Body. This specifies whether RapidAPI should place the authentication data in the request's header or body. Consult your API's documentation to determine which approach is supported.
- For Separator, select either Space or Comma. This separator setting is used if you specify more than one scope.
- If your API supports scopes, under Scopes, add the scope names and descriptions. API consumers are then given the option of including these scopes in their requests. Scopes authorize the API consumer to perform certain actions.
- Click Save.
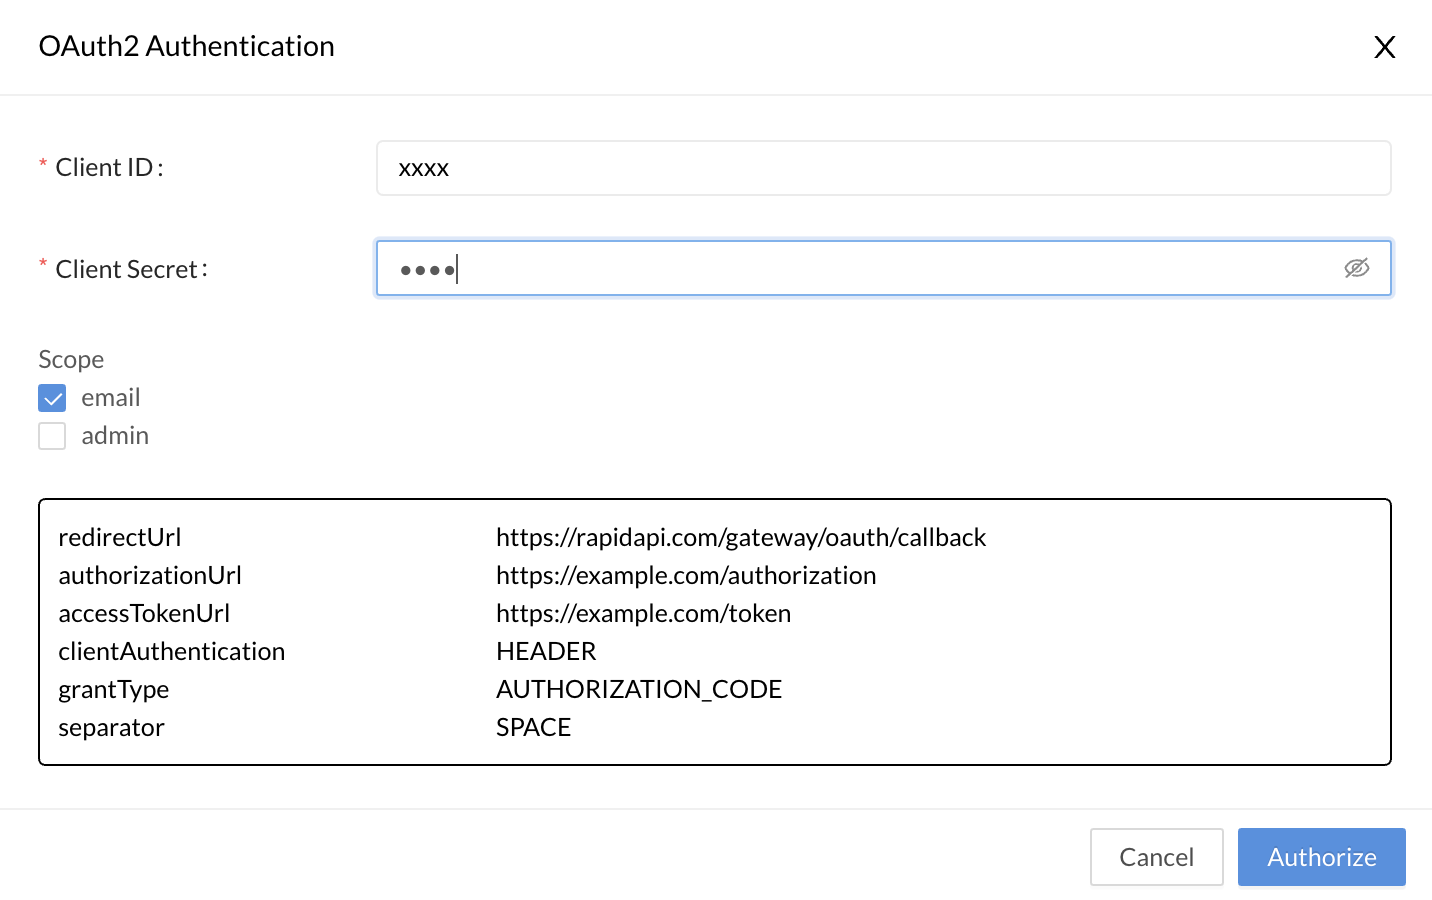
When an API consumer uses the API, they will have to provide a valid token to successfully call the API. When testing an endpoint, the developer sees a Header Parameter named Authorization OAUTH2.
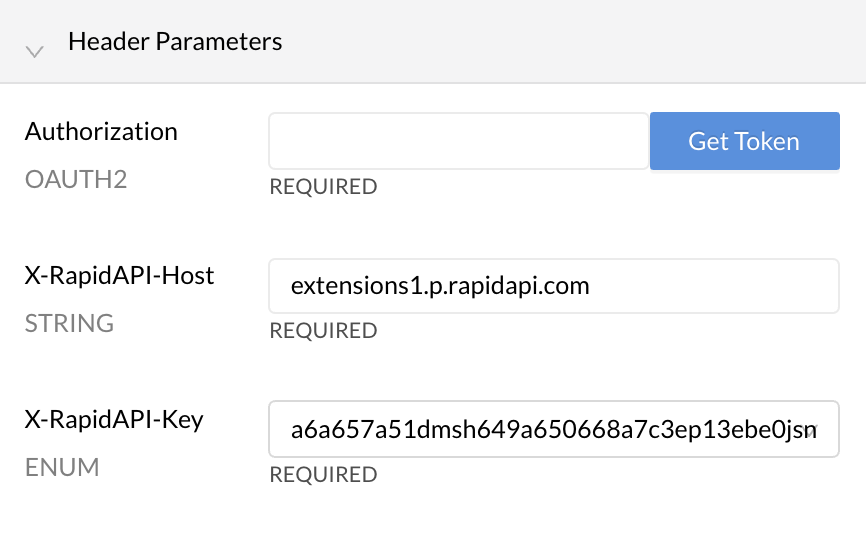
Clicking the Get Token button (above) opens an OAuth2 Authentication dialog (below), where the API consumer enters the Client ID and Client Secret needed to obtain a token. They can also check boxes for the scopes that they want to use when making API requests. Clicking Authorize will result in a token that can be used when calling the API.
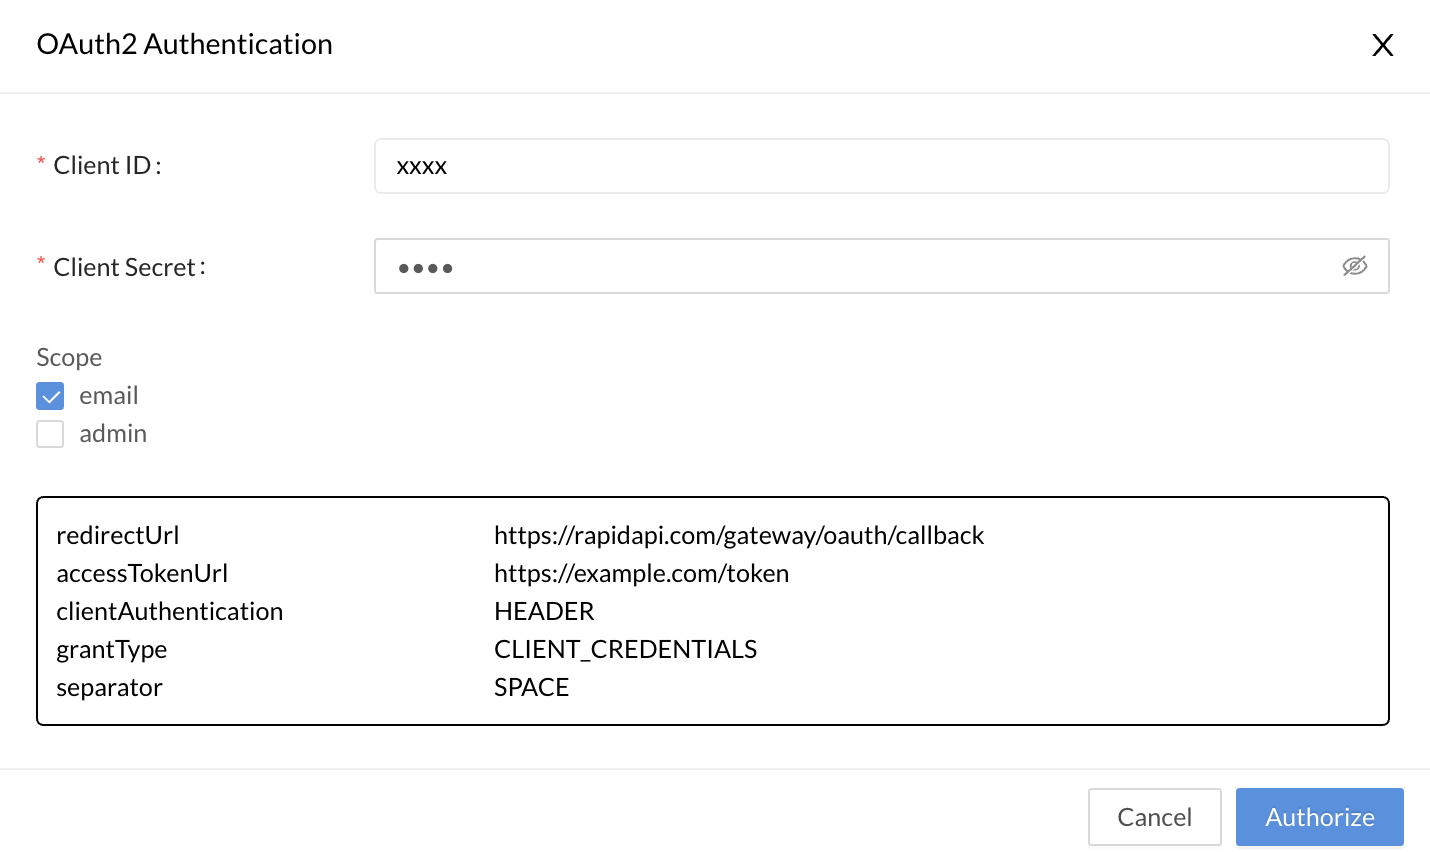
Client ID and Client SecretIf your API consumers can receive access tokens without providing the Client ID and Client Secret as shown above, you have the option of using the Header authentication set instead of OAuth2. The API provider can add an "authorization" header, and API consumers can add an access token directly when testing the API. This bypasses the Client ID and Client Secret workflow shown above.
Authorization Code Grant Type
To enable Authorization Code OAuth2 authentication for your API:
- Navigate to the Provider Dashboard (My APIs).
- In the sidebar, click the Definition tab for your API.
- Click the API Specs tab.
- Click the Settings tab.
- For Access Control > Authentication > RapidAPI Key Authentication Set, select Add OAuth2.
- For Grant Type, select Authorization Code.
- For Authorization URL, enter the URL (often ending in /oauth2/authorize) where calls are made to obtain an authorization code for the API. This code is needed before tokens can be obtained.
- For Token URL, enter the URL (often ending in /oauth2/token) where calls are made to obtain a token for the API.
- Check the Token Client Handle box if you would prefer that the token Authorization URL is called directly by the browser rather than via the Rapid Runtime. The Authorization URL endpoint would then be responsible for handling CORS issues related to calling this URL from the browser via the rapidapi.com domain. See this link for more information.
- For Client Authentication, select either Header or Body. This specifies whether RapidAPI should place the authentication data in the request's header or body. Consult your API's documentation to determine which approach is supported.
- For Separator, select either Space or Comma. This separator setting is used if you specify more than one scope.
- If your API supports scopes, under Scopes, add the scope names and descriptions. API consumers are then given the option of including these scopes in their requests. Scopes authorize the API consumer to perform certain actions.
- Click Save.
When an API consumer uses the API, they will have to provide a valid token to successfully call the API. When testing an endpoint, the developer sees a Header Parameter named Authorization OAUTH2.

Clicking the Get Token button (above) opens an OAuth2 Authentication dialog (below), where the API consumer enters the Client ID and Client Secret needed to obtain a token. They can also check boxes for the scopes that they want to use when making API requests. Clicking Authorize will result in a token that can be used when calling the API.
If your API is not configured to use a client secret, you can enter any value for Client Secret.
Client ID and Client SecretIf your API consumers can receive access tokens without providing the Client ID and Client Secret as shown above, you have the option of using the Header authentication set instead of OAuth2. The API provider can add an "authorization" header, and API consumers can add an access token directly when testing the API. This bypasses the Client ID and Client Secret workflow shown above.
Updated about 1 year ago